VisibilityOS (OwnSEO) is your AI-powered search visibility command center. Run technical SEO audits, discover content and keyword opportunities, benchmark competitors, find backlink and distribution targets, track your presence inside AI assistants, monitor rankings from Google Search Console, manage the resulting tasks, and ship weekly performance reports — all per project. This guide walks through every screen with real steps and screenshots; no onboarding session required.
search
No topics match your search. Try a different term.
explore
Getting started with VisibilityOS
1Everything in VisibilityOS is scoped to a project — a single website with its industry, products, target keywords, and competitors. Create your first project from the 'New project' panel in the left sidebar, then pick it from 'Tracked projects' to switch context. The active project name and URL show at the top of the sidebar and in the header.
2The left sidebar is your primary navigation: Dashboard, SEO Audit, AI Visibility, Content, Competitors, Backlinks, Authority, Rank Tracker, Tasks, Reports, and Automation. The highlighted item is the page you are on.
3Most modules are populated by an analysis run. Click the blue 'Run' button in the sidebar (or 'Refresh Sync' on the Dashboard) to crawl the site and regenerate every module's data for the active project.
4The header shows the active project URL and a Help icon. Use the Help & Support link at the bottom of the sidebar to return to this guide anytime.
Foundations
Set up projects and read the intelligence overview.
Projects: your website workspace
Create and manage the websites VisibilityOS analyzes.
A project bundles a website with the context VisibilityOS needs to analyze it: company name, URL, industry, description, products, target keywords, and competitor domains. Every module — audits, content, competitors, rankings — reads from the active project, so this is the first thing to set up.
location_onWhere to find it: Left sidebar → 'New project' / 'Tracked projects' / 'Edit project'.
The sidebar holds project creation, switching, and editing alongside the main navigation.
format_list_numbered
Step-by-step
1In the left sidebar, expand the 'New project' panel.
2Enter the company name and website URL (required), and optionally the industry.
3Add target keywords and competitor domains as comma-separated lists.
4Click 'Create project'. The new project becomes active.
5To switch projects later, click any entry under 'Tracked projects'.
6To change details, expand 'Edit project', update the fields (including company description and products), and click 'Save project'.
lightbulb
Tips & pitfalls
Accurate keywords and competitors directly improve the quality of the Content, Competitor, and AI Visibility modules.
Use a clean root URL (https://example.com) so the crawler and Search Console matching work correctly.
Dashboard — Intelligence Overview
Your at-a-glance visibility scorecard and trends.
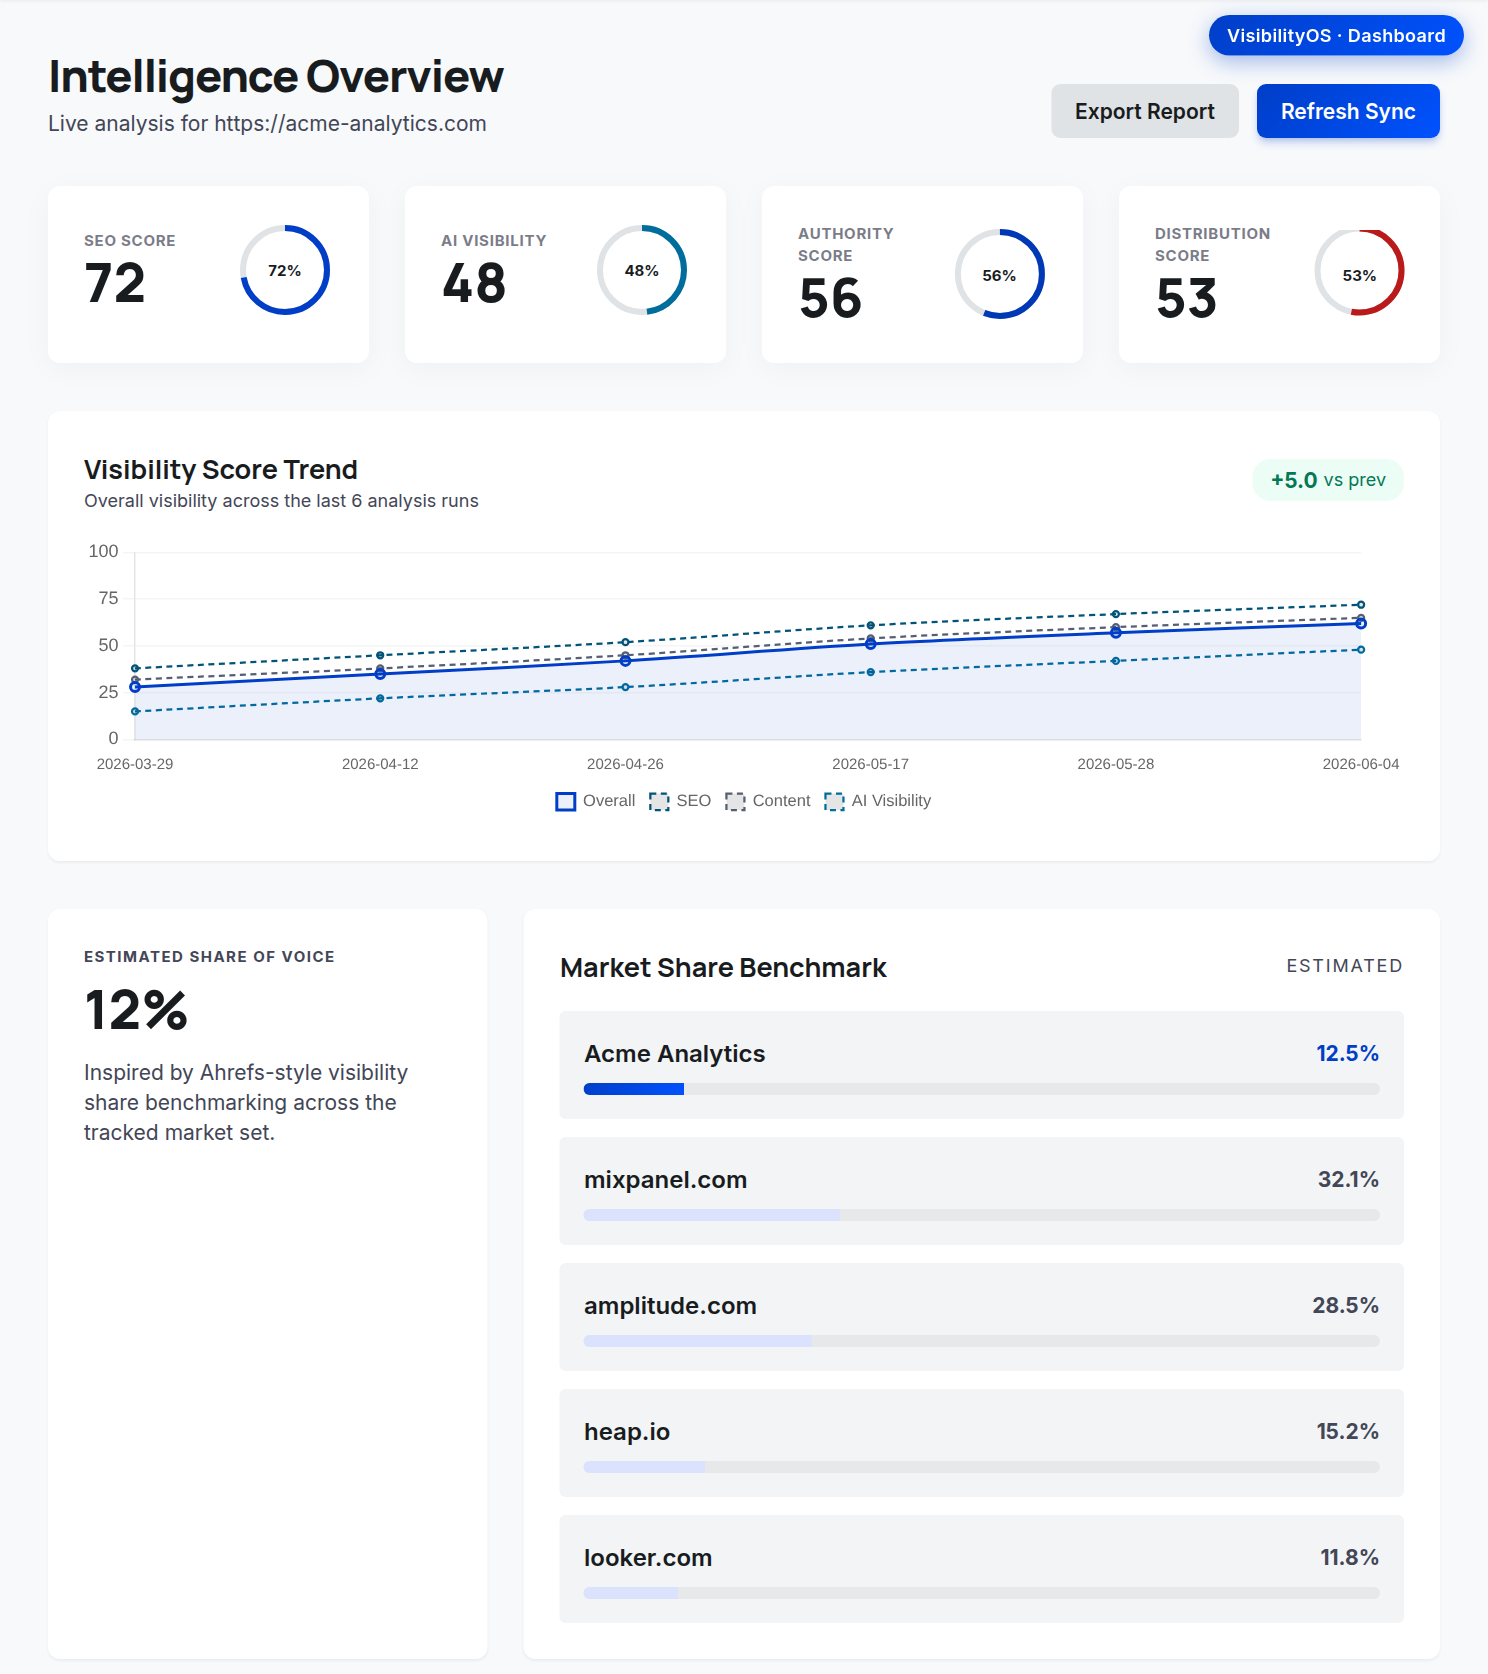
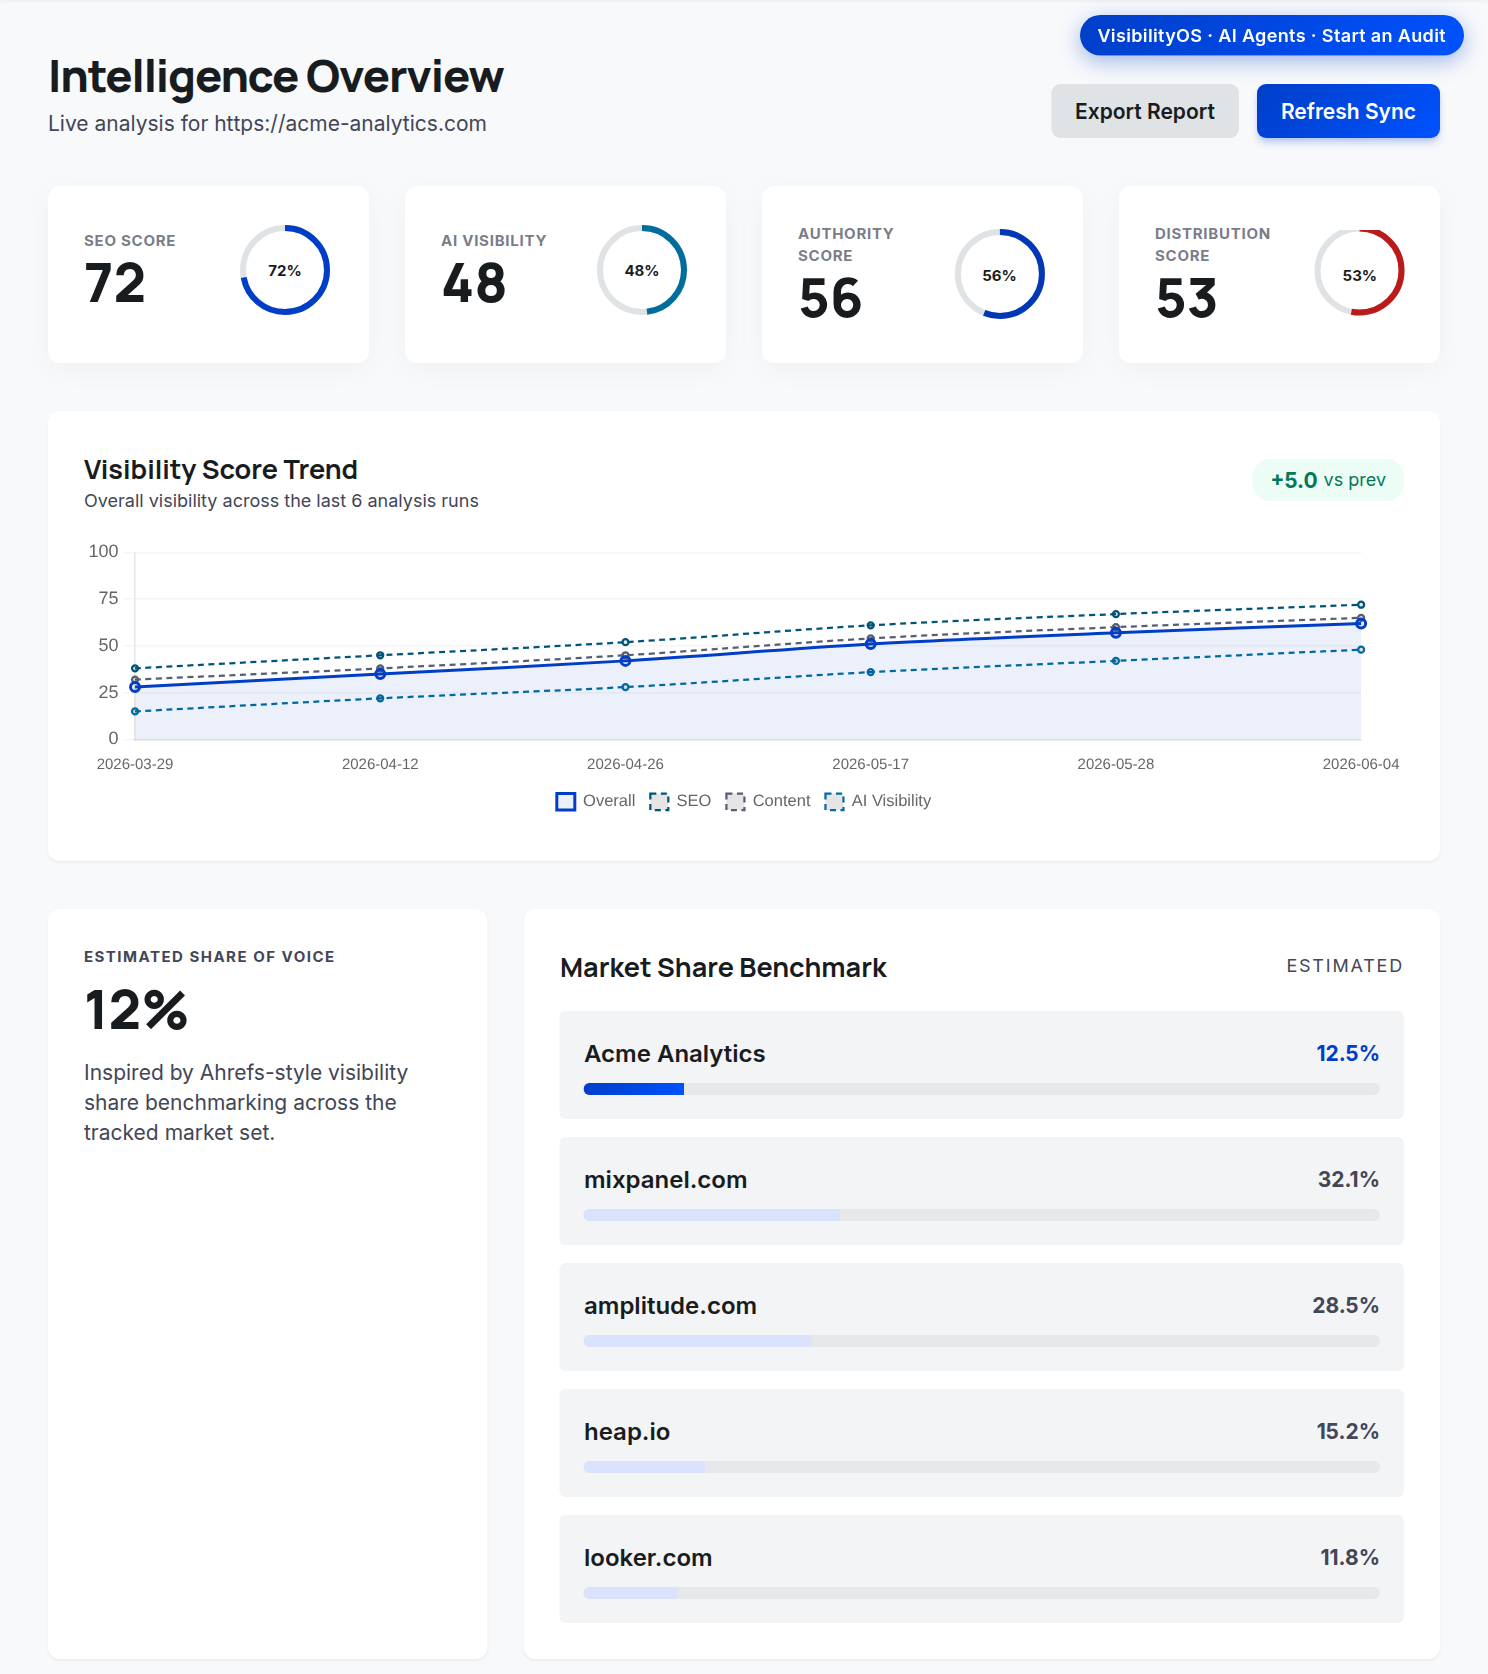
The Dashboard is the home screen. It rolls up the latest analysis run into score cards (overall visibility plus per-pillar scores), a score-history trend chart, and quick links into each module. Use it to see where a site stands and what changed since the last run.
location_onWhere to find it: Left sidebar → Dashboard (the VisibilityOS home '/').
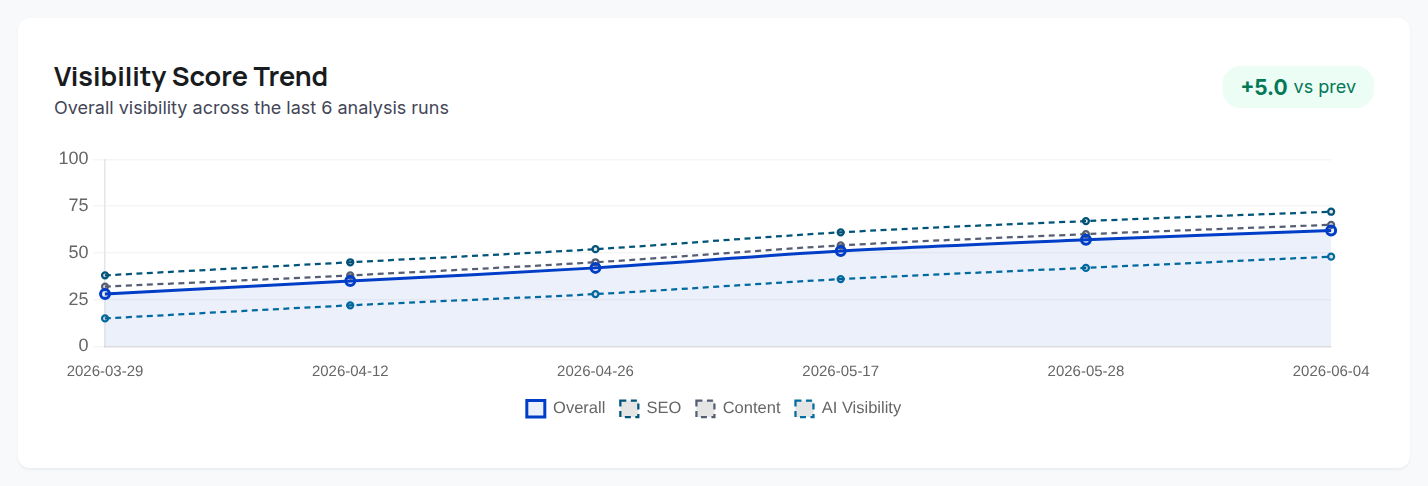
Intelligence Overview: pillar score cards and the score-history trend.Visibility Score Trend: overall plus per-pillar (SEO, content, AI) lines across recent analysis runs, with the change vs. the previous run.
format_list_numbered
Step-by-step
1Select a project, then open the Dashboard.
2Read the score cards at the top: overall visibility and each pillar (SEO, content, authority, AI visibility, distribution).
3Review the score-history chart to see trends across analysis runs.
4Click 'Refresh Sync' to run a fresh analysis, or 'Export Report' to jump to the Reports page.
lightbulb
Tips & pitfalls
If the Dashboard looks empty, the project has no analysis run yet — click 'Run' in the sidebar.
The trend chart only appears once you have more than one analysis run — run the analysis a few times (or let automation do it) to build a history.
Running an analysis
Crawl the site and refresh every module's data.
An analysis run is the engine behind VisibilityOS. It crawls the project's website, computes pillar scores, and regenerates issues, opportunities, keyword data, competitor findings, AI-visibility checks, mentions, and tasks. Run it whenever you want fresh data.
location_onWhere to find it: Sidebar 'Run' button (any page) or 'Refresh Sync' on the Dashboard.
The SEO Audit page exposes 'Start New Crawl', which triggers a fresh analysis run.
format_list_numbered
Step-by-step
1Make sure the correct project is active.
2Click 'Run' in the sidebar's Current project panel, or 'Refresh Sync' on the Dashboard, or 'Start New Crawl' on the SEO Audit page.
3Wait for the run to finish; the page reloads with updated data.
4Open any module to see the regenerated results.
lightbulb
Tips & pitfalls
Runs are stored historically, so the Dashboard and Reports can show trends over time.
Technical & On-Page SEO
Audit crawlability, performance, and on-page issues.
Technical SEO Auditor
Crawl-based audit of issues, severity, and Core Web Vitals.
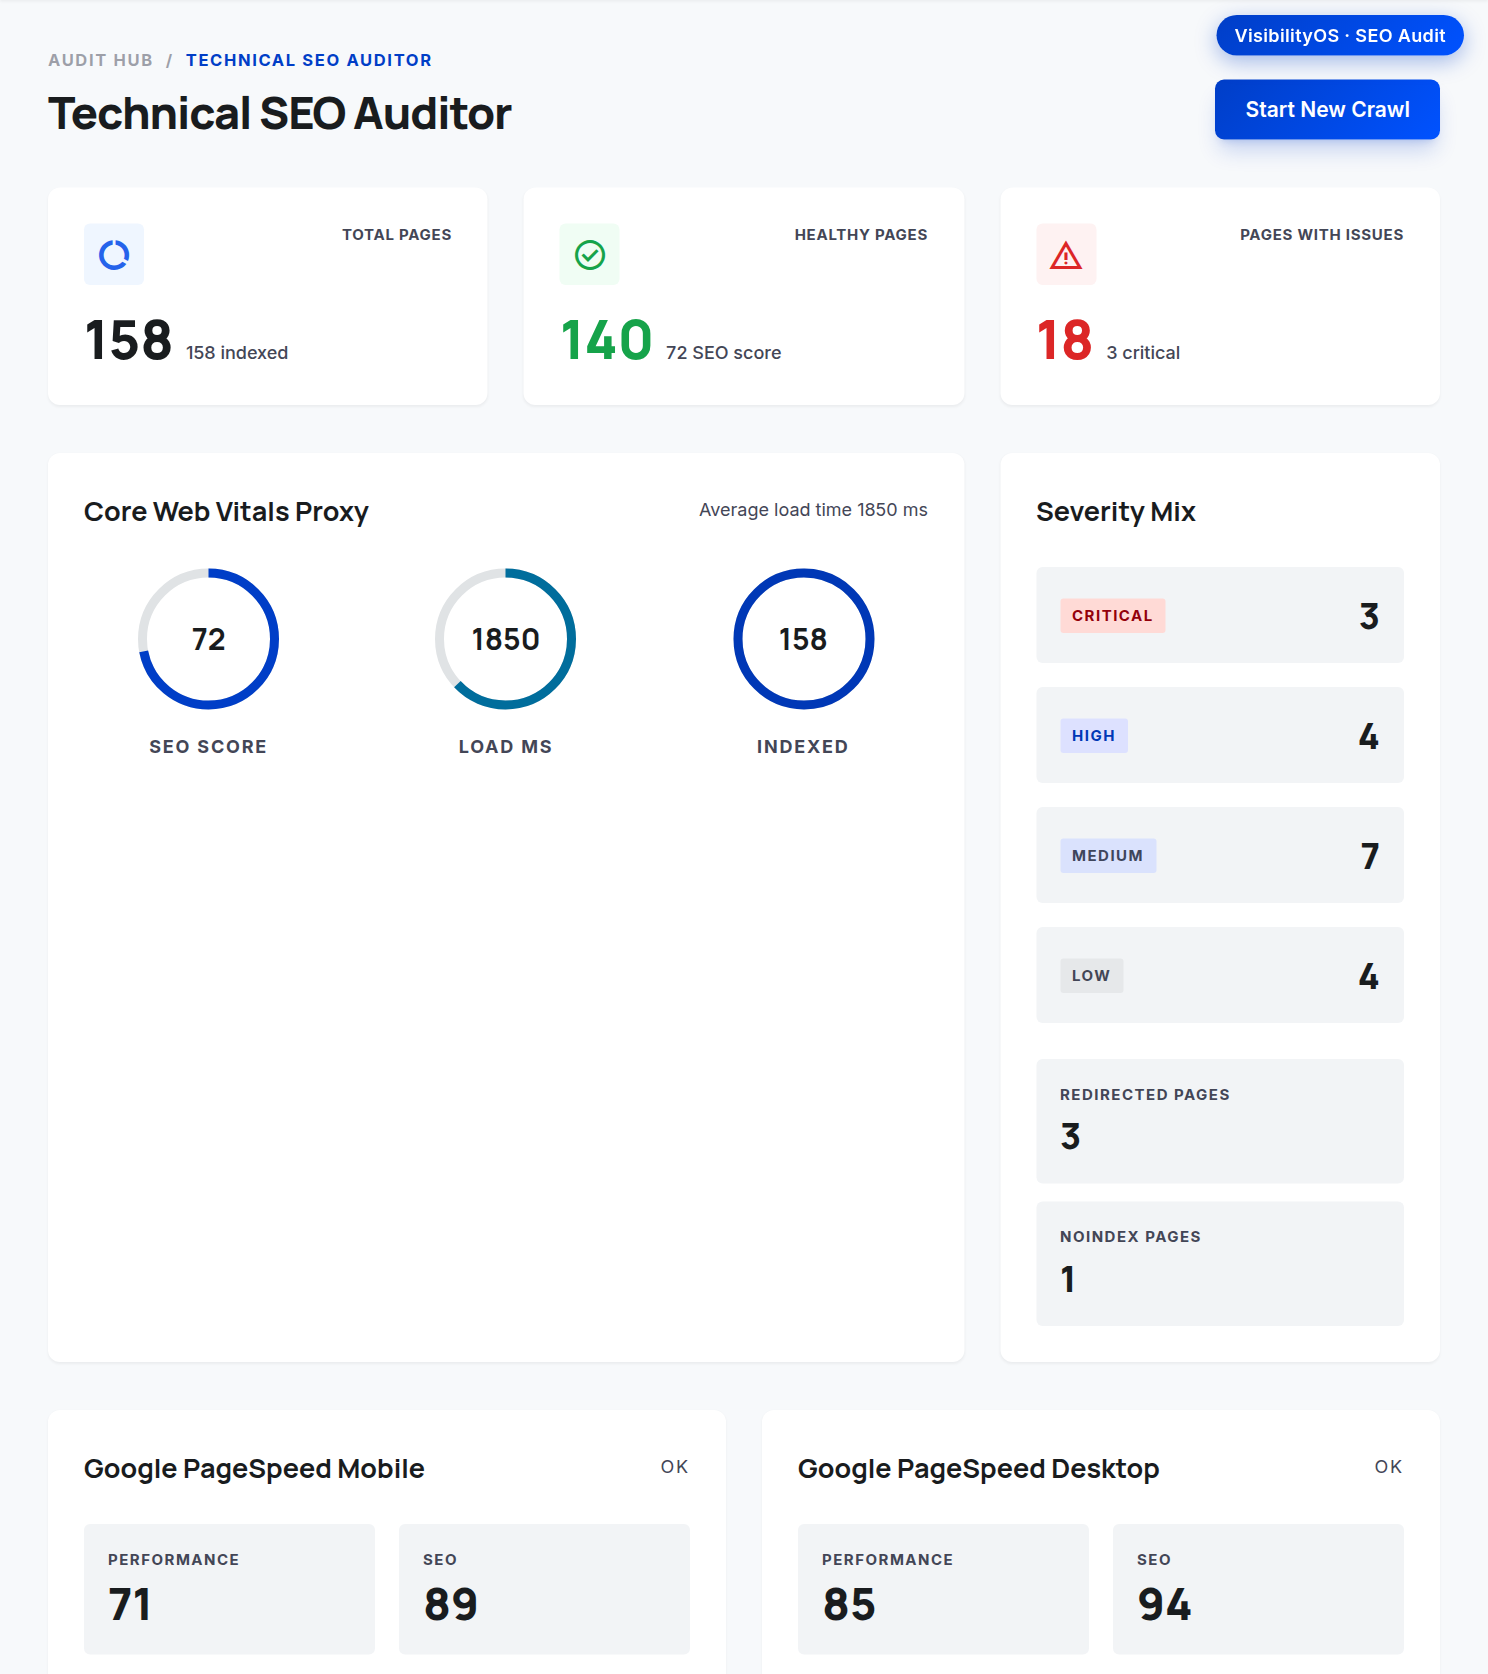
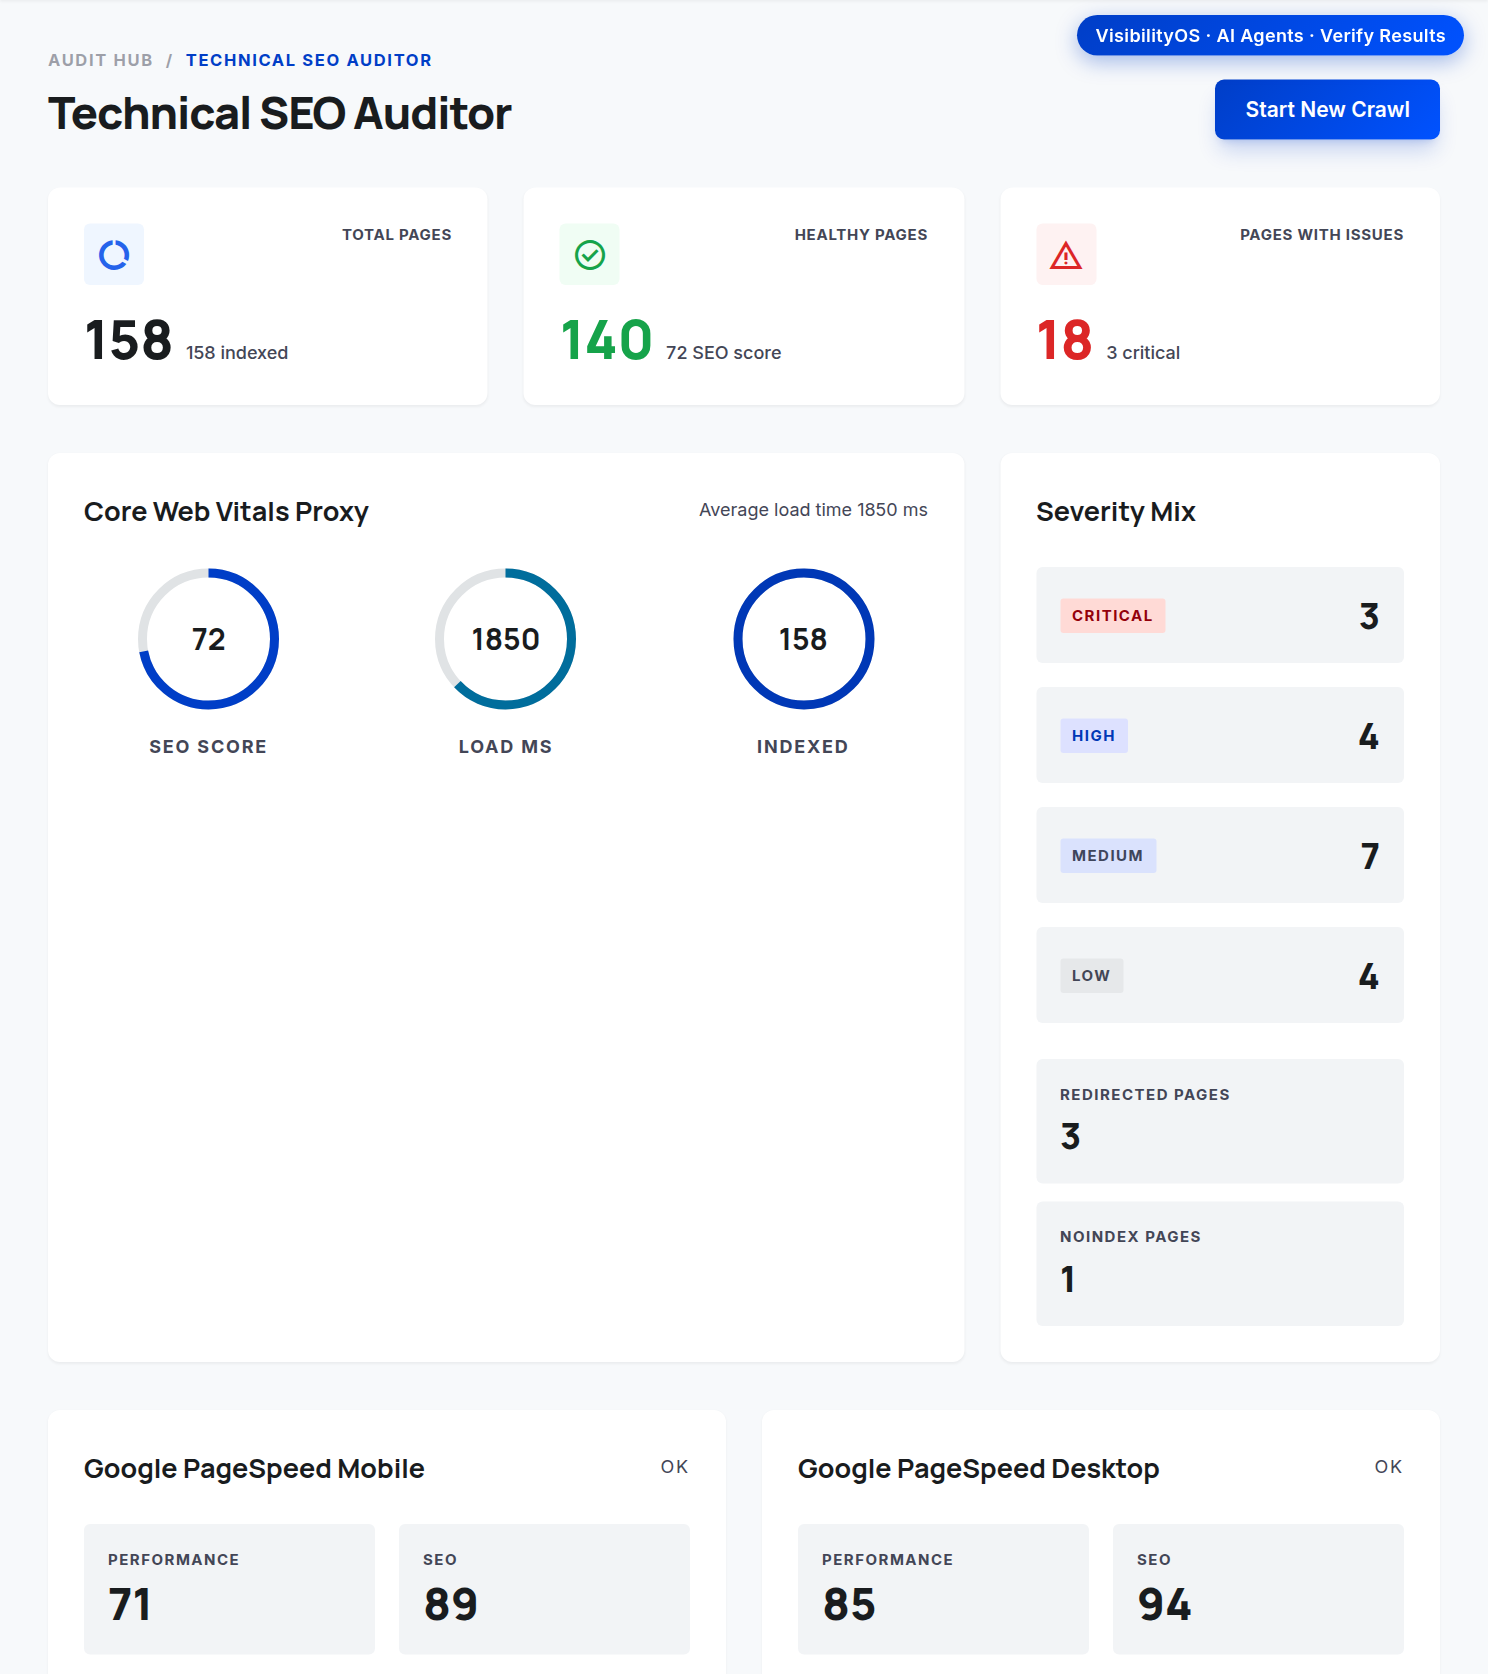
The Technical SEO Auditor crawls the site and surfaces technical and on-page problems — missing meta, H1 issues, redirects, noindex pages, schema gaps, thin content — alongside a Core Web Vitals proxy and live Google PageSpeed scores for mobile and desktop. Issues are grouped by severity in the Issue Register and can be pushed to tasks.
location_onWhere to find it: Left sidebar → SEO Audit.
Technical SEO Auditor: PageSpeed, Severity Mix, and the Issue Register.
format_list_numbered
Step-by-step
1Open SEO Audit from the sidebar.
2Review the headline metrics and the Core Web Vitals Proxy panel.
3Check the Google PageSpeed cards for mobile and desktop scores.
4Read the Severity Mix chart to see how issues break down by priority.
5Scroll the Issue Register for each finding, its page URL, and recommendation.
6Click 'Send to tasks' on an issue to turn it into an actionable task.
7Click 'Start New Crawl' to re-audit after fixes.
lightbulb
Tips & pitfalls
Fix high-severity issues first — they have the biggest crawl/index impact.
PageSpeed cards need a PAGESPEED_API_KEY configured; without it they fall back to the Core Web Vitals proxy.
Severity Mix & PageSpeed scores
Read the priority breakdown and Core Web Vitals / PageSpeed health.
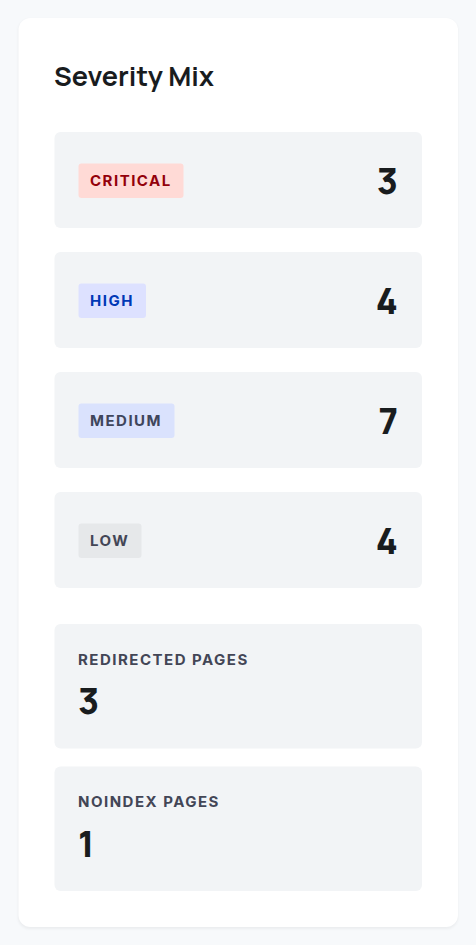
Before working individual issues, use the top of the SEO Audit page to triage. The Severity Mix card counts findings by Critical / High / Medium / Low (plus redirected and noindex page tallies), and the Google PageSpeed cards show live mobile and desktop performance scores backed by a Core Web Vitals proxy. Together they tell you how urgent the audit is and where the performance drag is.
location_onWhere to find it: SEO Audit → Severity Mix card and the Google PageSpeed cards.
Severity Mix: findings counted by Critical / High / Medium / Low, plus redirected and noindex page tallies.
format_list_numbered
Step-by-step
1Open SEO Audit and look at the Severity Mix card first.
2Note the Critical and High counts — these set the size of the immediate fix list.
3Check the Redirected Pages and Noindex Pages tallies for indexation surprises.
4Read the Google PageSpeed Mobile and Desktop scores; treat mobile as the priority.
5Use the Core Web Vitals Proxy panel when live PageSpeed data is unavailable.
lightbulb
Tips & pitfalls
A high Critical/High count with a low PageSpeed score usually means performance fixes will move several issues at once.
Issue Register: reviewing and fixing issues
Work each finding's page, detail, and recommended fix.
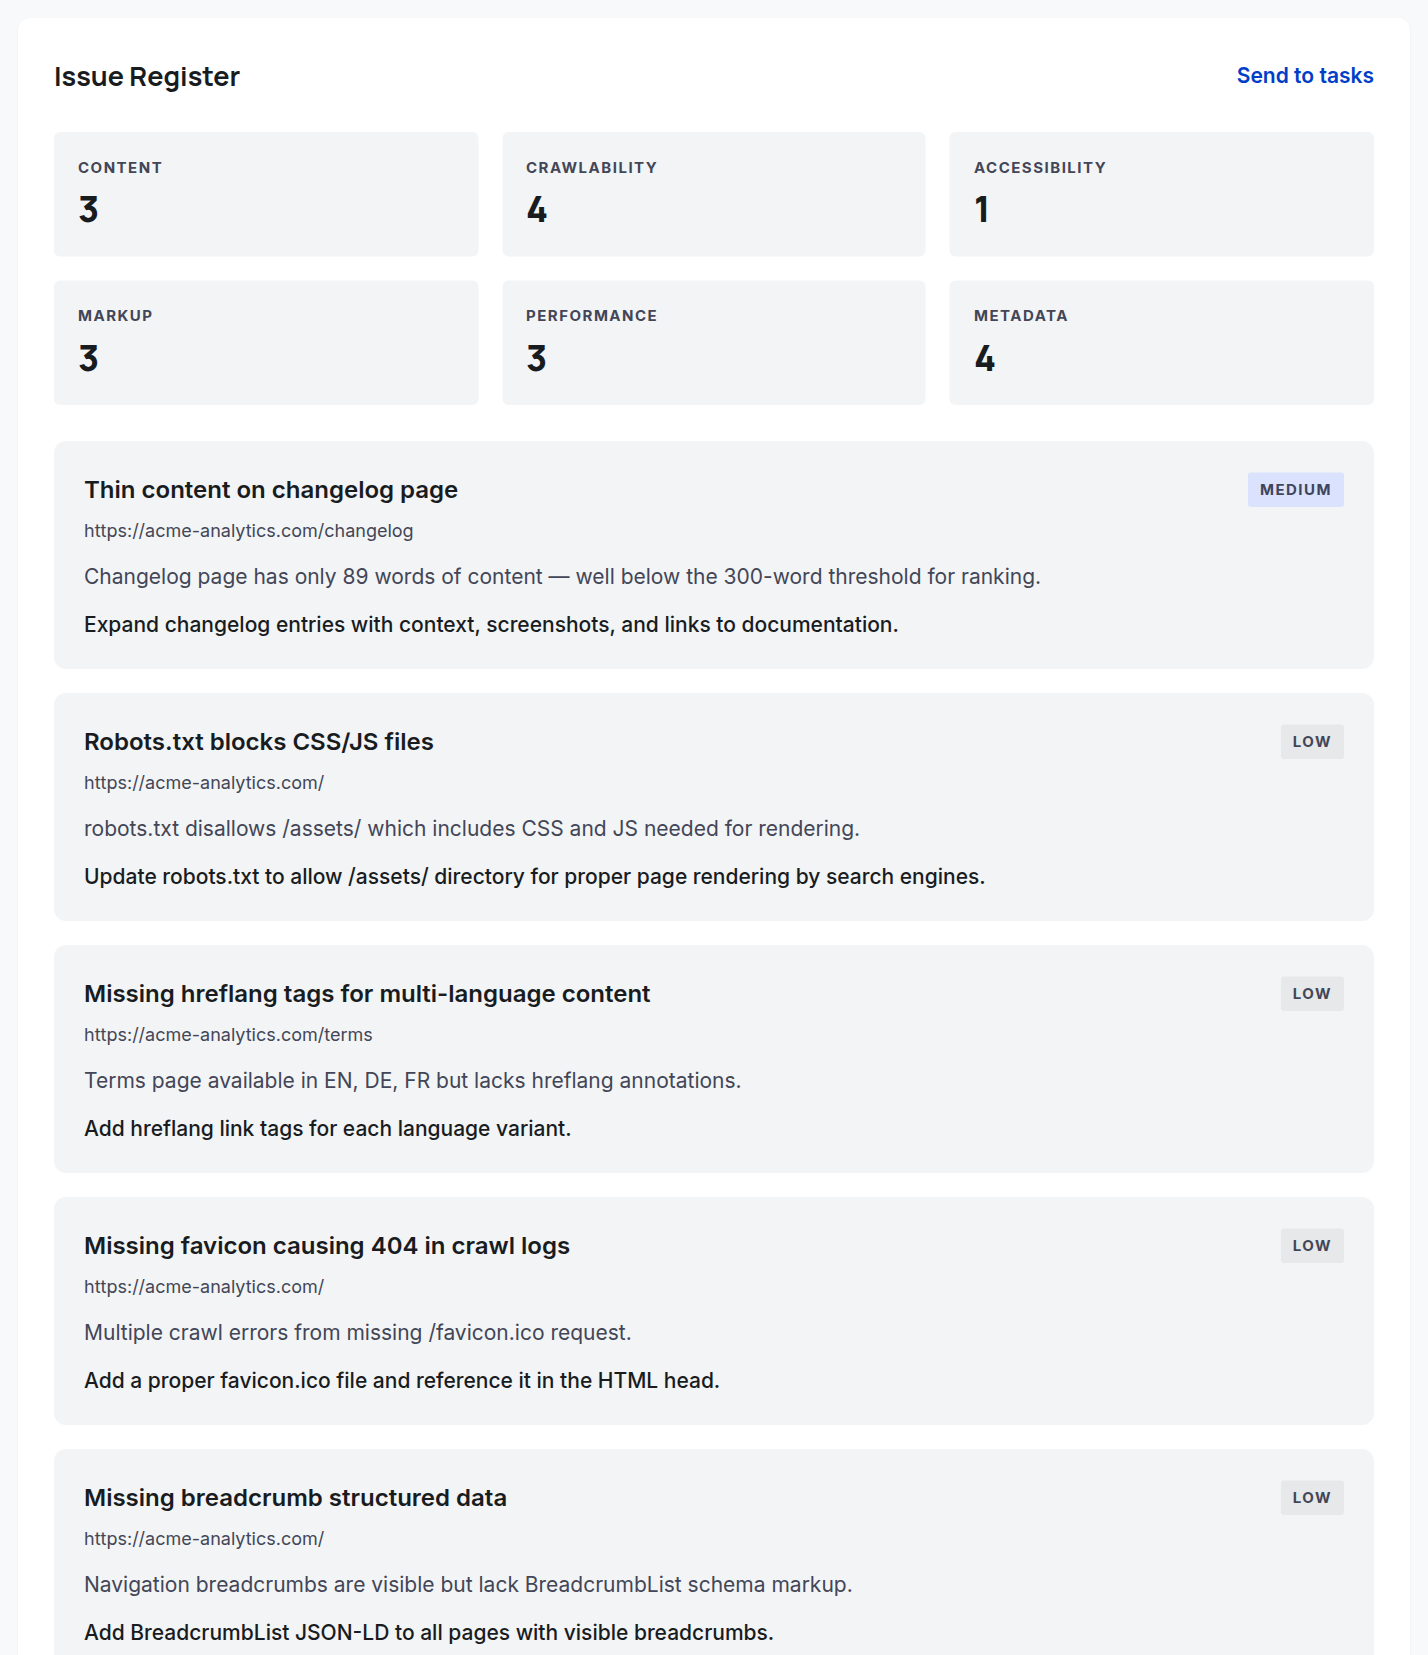
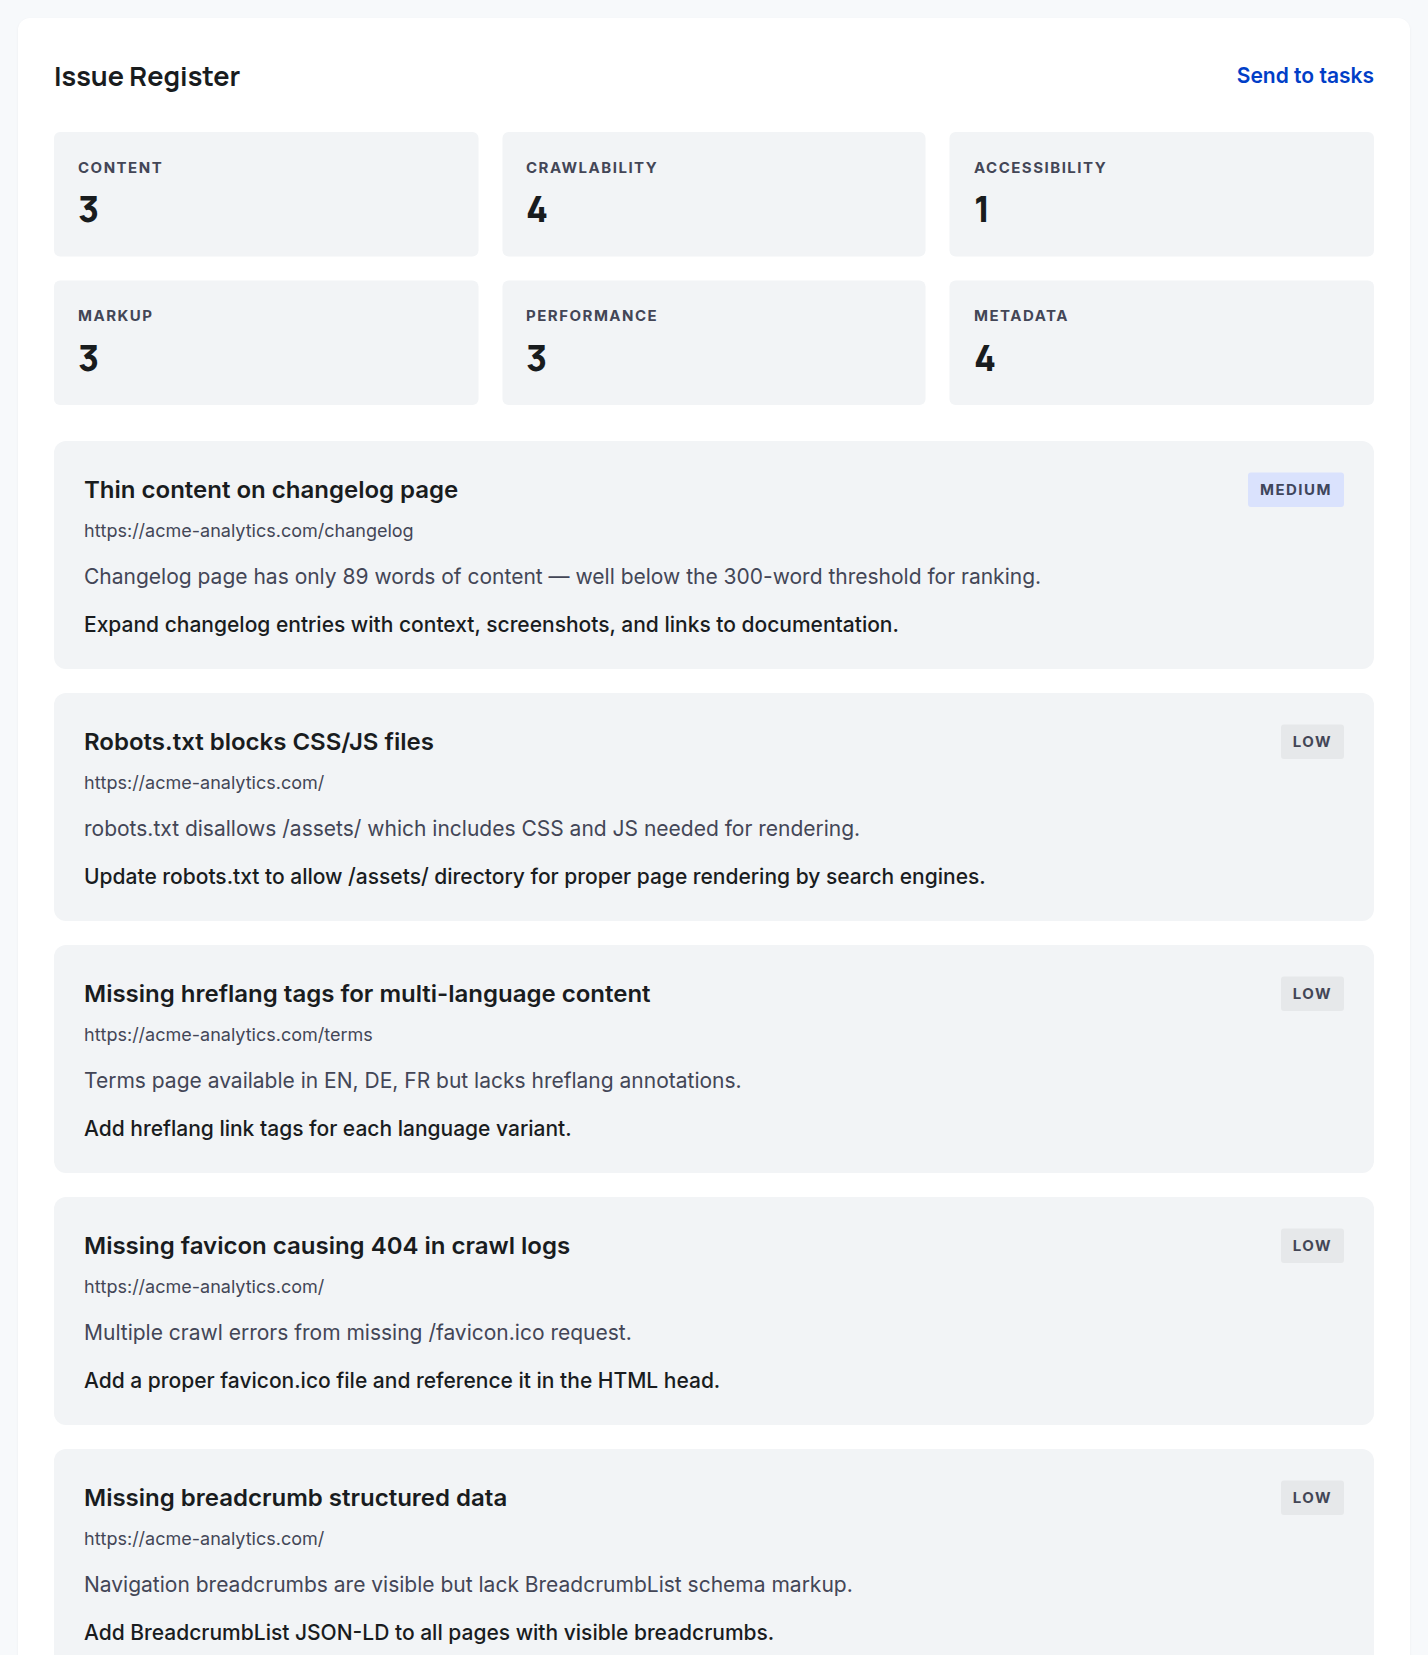
The Issue Register is the actionable heart of the audit. Issues are first summarized by theme (content, crawlability, accessibility, markup, performance, metadata), then listed individually. Each issue card shows its severity badge, the exact page URL, a plain-language explanation of the problem, and a concrete recommended fix you can hand to a developer or content editor.
location_onWhere to find it: SEO Audit → Issue Register (below Severity Mix).
Issue Register: each finding with its severity badge, affected page URL, the problem detail, and a concrete recommended fix.
format_list_numbered
Step-by-step
1Scroll to the Issue Register on the SEO Audit page.
2Scan the theme summary cards to see where issues concentrate.
3Read each issue card: severity badge, affected page URL, the 'what's wrong' detail, and the recommended fix.
4Apply the recommendation on the affected page.
5Click 'Send to tasks' to convert an issue into a tracked task.
6Re-run the audit ('Start New Crawl') to confirm the issue cleared.
lightbulb
Tips & pitfalls
The recommendation line is written to be copy-paste actionable — drop it straight into a dev ticket.
Cleared issues disappear on the next crawl, so re-running is the fastest way to verify a fix.
Content & Keywords
Find content gaps, keyword opportunities, and write briefs.
Content Opportunities
Missing topic clusters, keyword finder, and cannibalization.
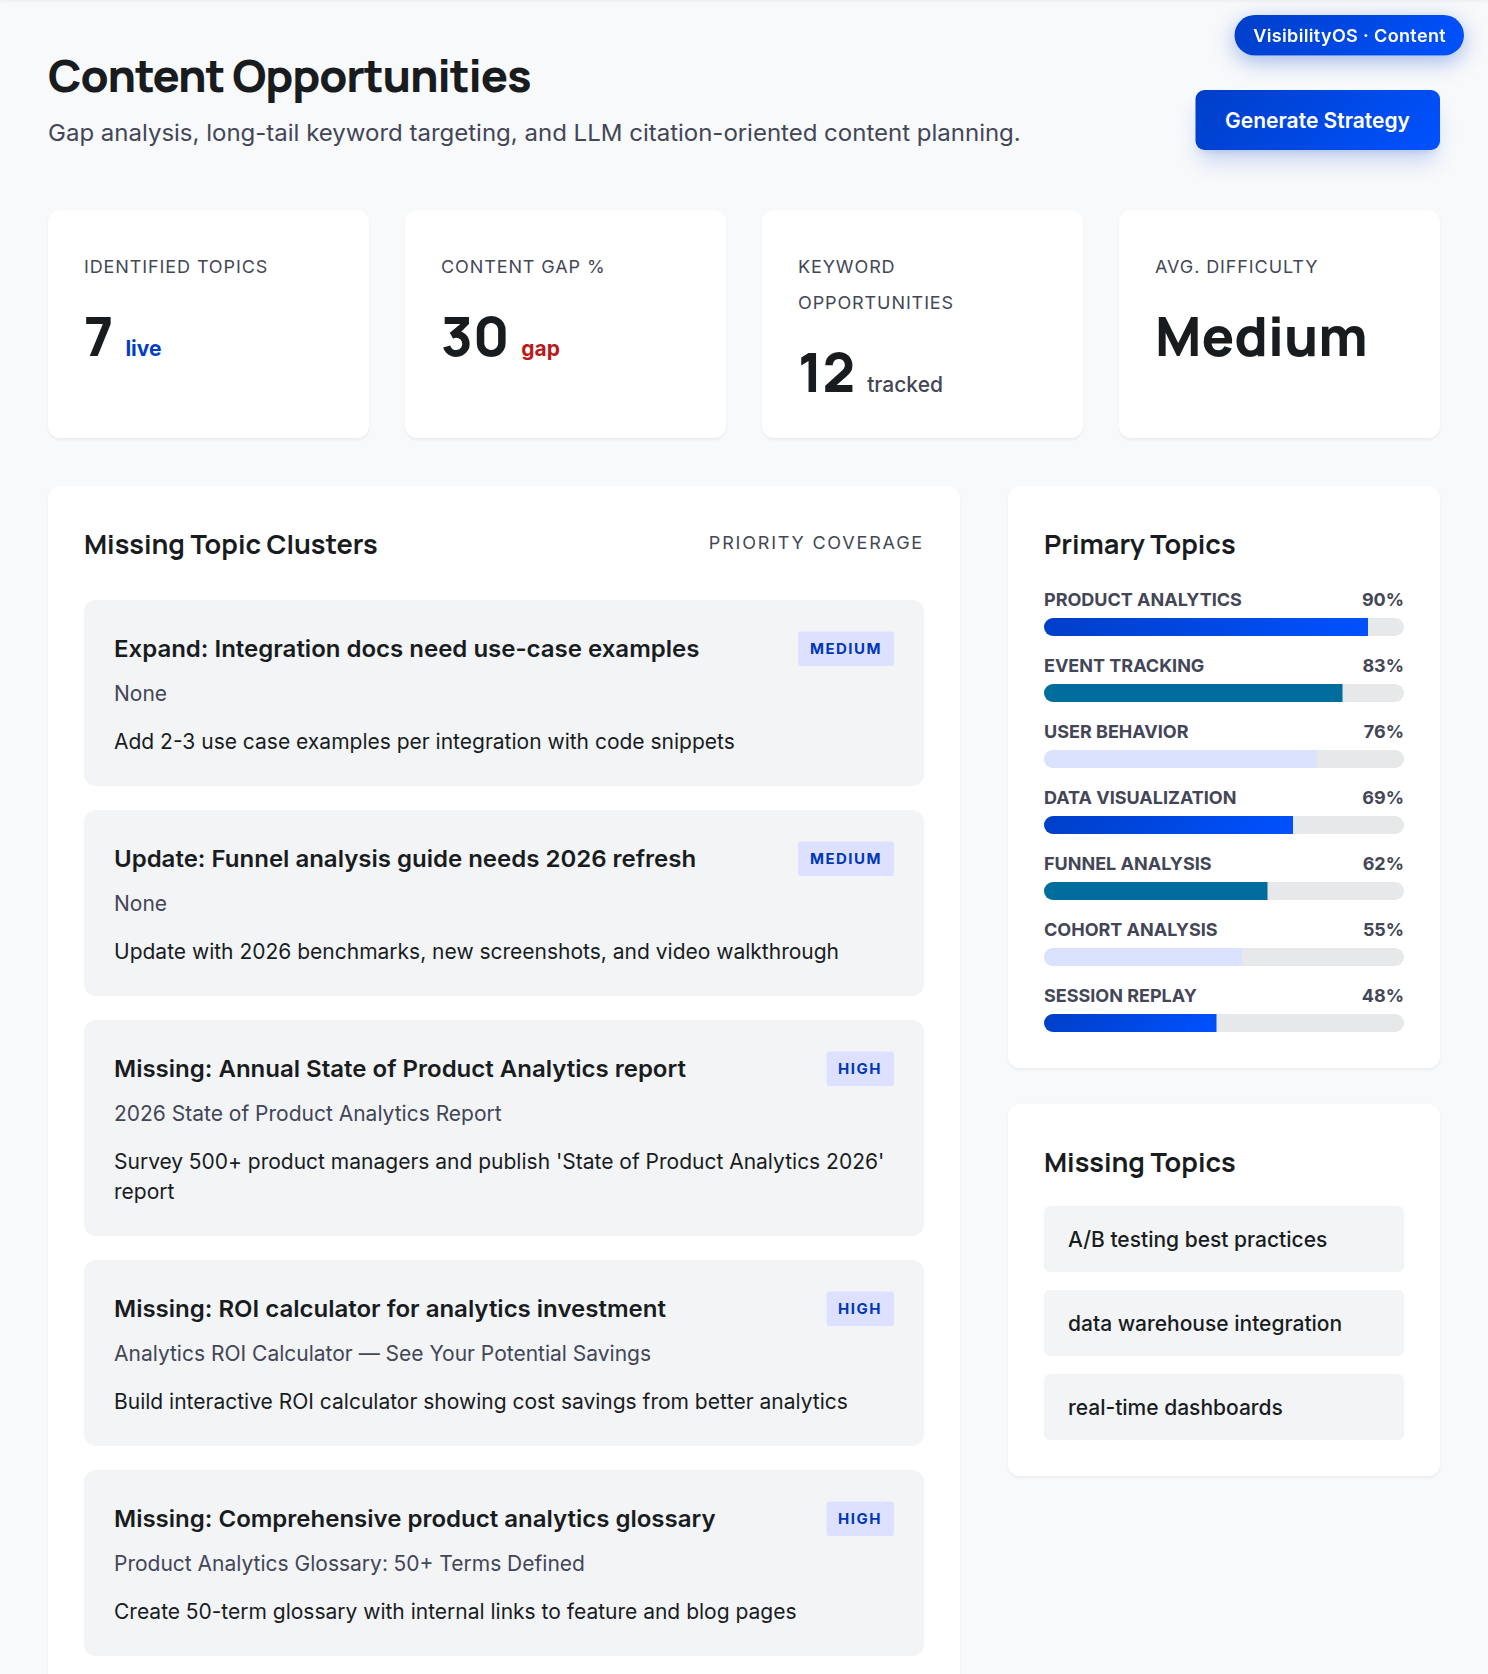
The Content page is mission control for content strategy. It maps your primary topics, flags missing topic clusters, lists keyword opportunities with difficulty and volume, highlights GSC 'near page 1' quick wins, and reports keyword cannibalization where multiple pages compete for the same term.
location_onWhere to find it: Left sidebar → Content.
2Review Primary Topics and the Missing Topic Clusters you should add.
3Scan the Keyword Opportunity Finder for terms to target, with difficulty, volume, and a suggested page.
4Check 'GSC Quick Wins — Near Page 1' for keywords ranking just off the first page.
5Read the Cannibalization Report and consolidate competing pages.
6Click 'Generate Strategy' or a keyword to open the Content Brief Generator.
lightbulb
Tips & pitfalls
Near-page-1 quick wins are the fastest ranking gains — prioritize them.
Cannibalization findings usually mean you should merge or differentiate pages, then re-run the analysis.
Keyword Opportunity Finder
Pick target terms by difficulty, volume, and suggested page.
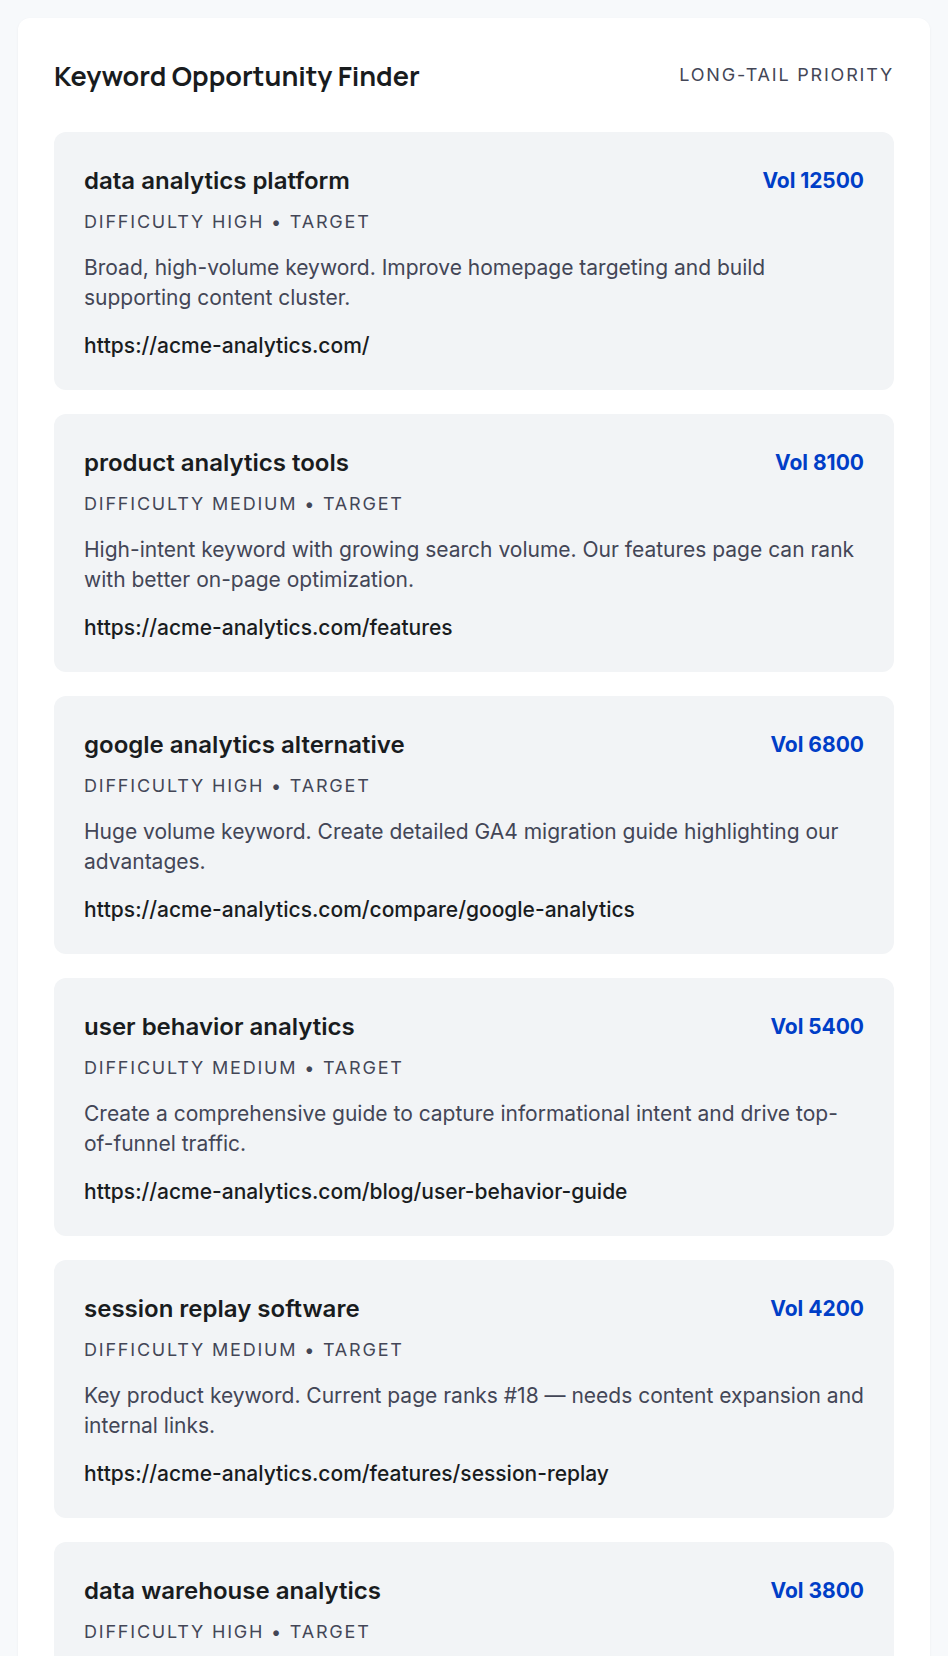
The Keyword Opportunity Finder is the prioritized worklist inside the Content page. Each row is a keyword you could realistically rank for, with its difficulty, search volume, and a suggested page to target it from. Sort and skim it to build a content calendar that balances winnable terms against traffic upside.
location_onWhere to find it: Content page → Keyword Opportunity Finder table.
Keyword Opportunity Finder: candidate keywords with difficulty, volume, and a suggested target page.
format_list_numbered
Step-by-step
1Open Content and scroll to the Keyword Opportunity Finder.
2Compare each keyword's difficulty against its volume — favor low difficulty with meaningful volume.
3Use the suggested page to decide whether to optimize an existing URL or create a new one.
4Shortlist the keywords you'll act on this cycle.
5Open the Content Brief Generator for a shortlisted keyword to turn it into a writer-ready brief.
lightbulb
Tips & pitfalls
Low-difficulty + decent-volume keywords are the sweet spot for new sites; chase higher-difficulty terms once authority grows.
Cannibalization Report
Find and resolve pages competing for the same term.
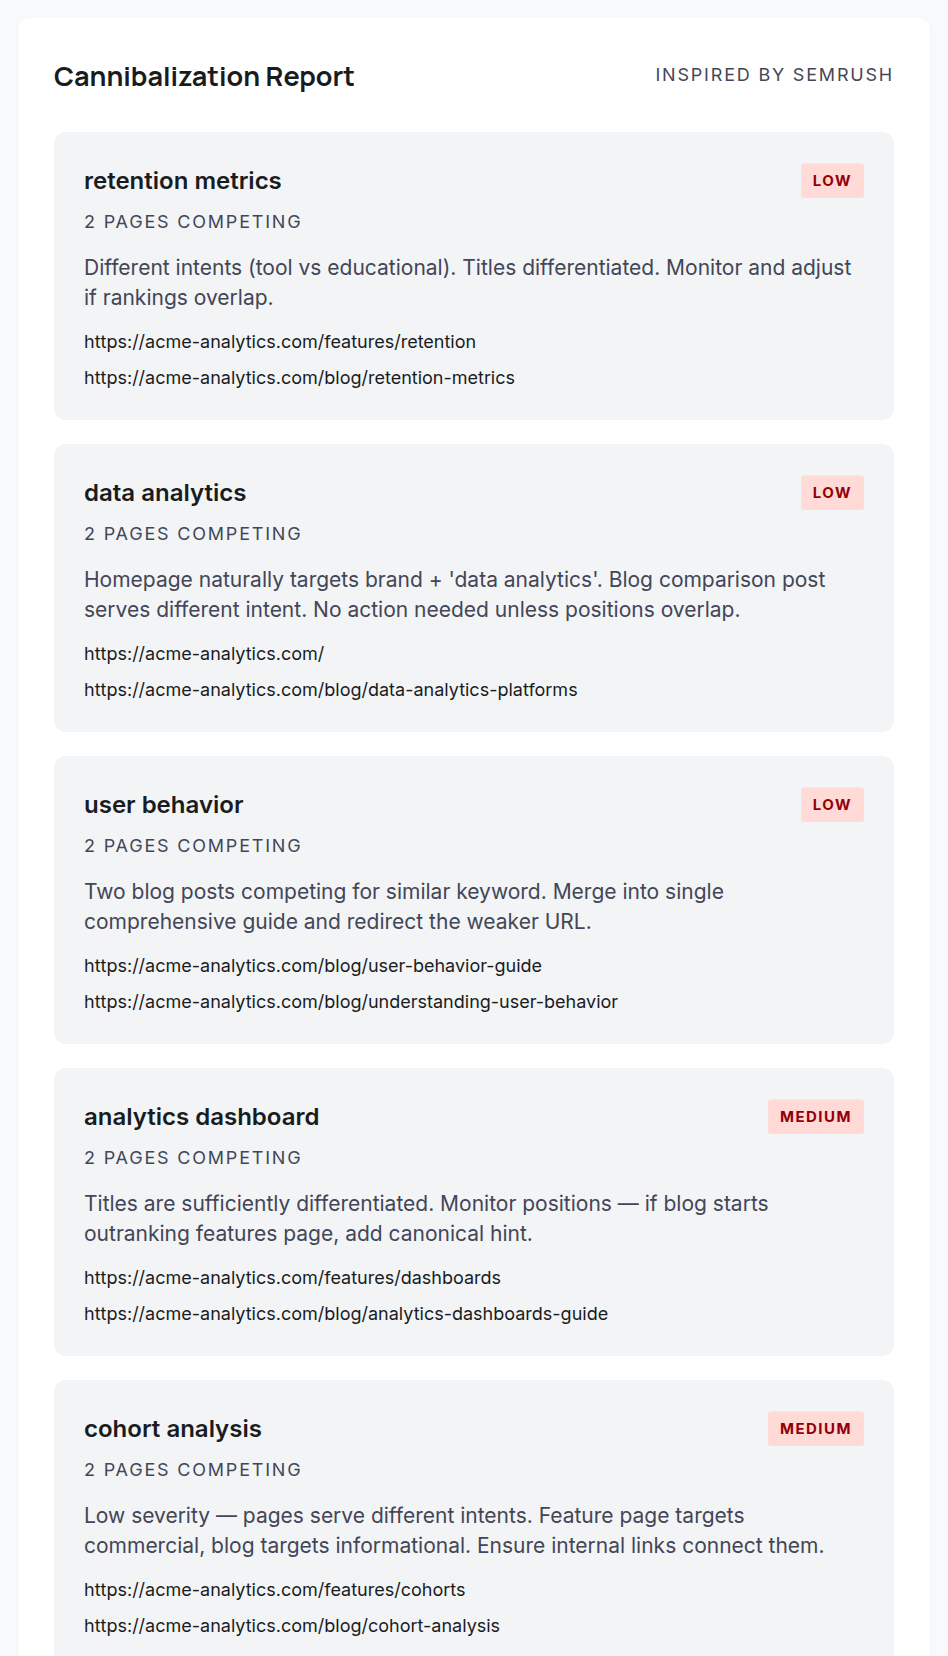
Keyword cannibalization happens when several of your pages target the same query, splitting authority and confusing search engines about which page to rank. The Cannibalization Report lists each affected keyword and the competing URLs so you can consolidate, differentiate, or redirect — and recover the lost ranking strength.
location_onWhere to find it: Content page → Cannibalization Report.
Cannibalization Report: keywords where multiple pages compete, with the conflicting URLs.
format_list_numbered
Step-by-step
1Open Content and scroll to the Cannibalization Report.
2For each flagged keyword, review the competing pages it lists.
3Decide the fix: merge the weaker page into the stronger one, redirect it, or re-target it to a distinct keyword.
4Update internal links to point at the page you want to rank.
5Re-run the analysis to confirm the conflict is resolved.
lightbulb
Tips & pitfalls
Consolidating cannibalizing pages often produces a quick ranking jump because authority stops being split.
Content Brief Generator
Generate an AI brief for any target keyword.
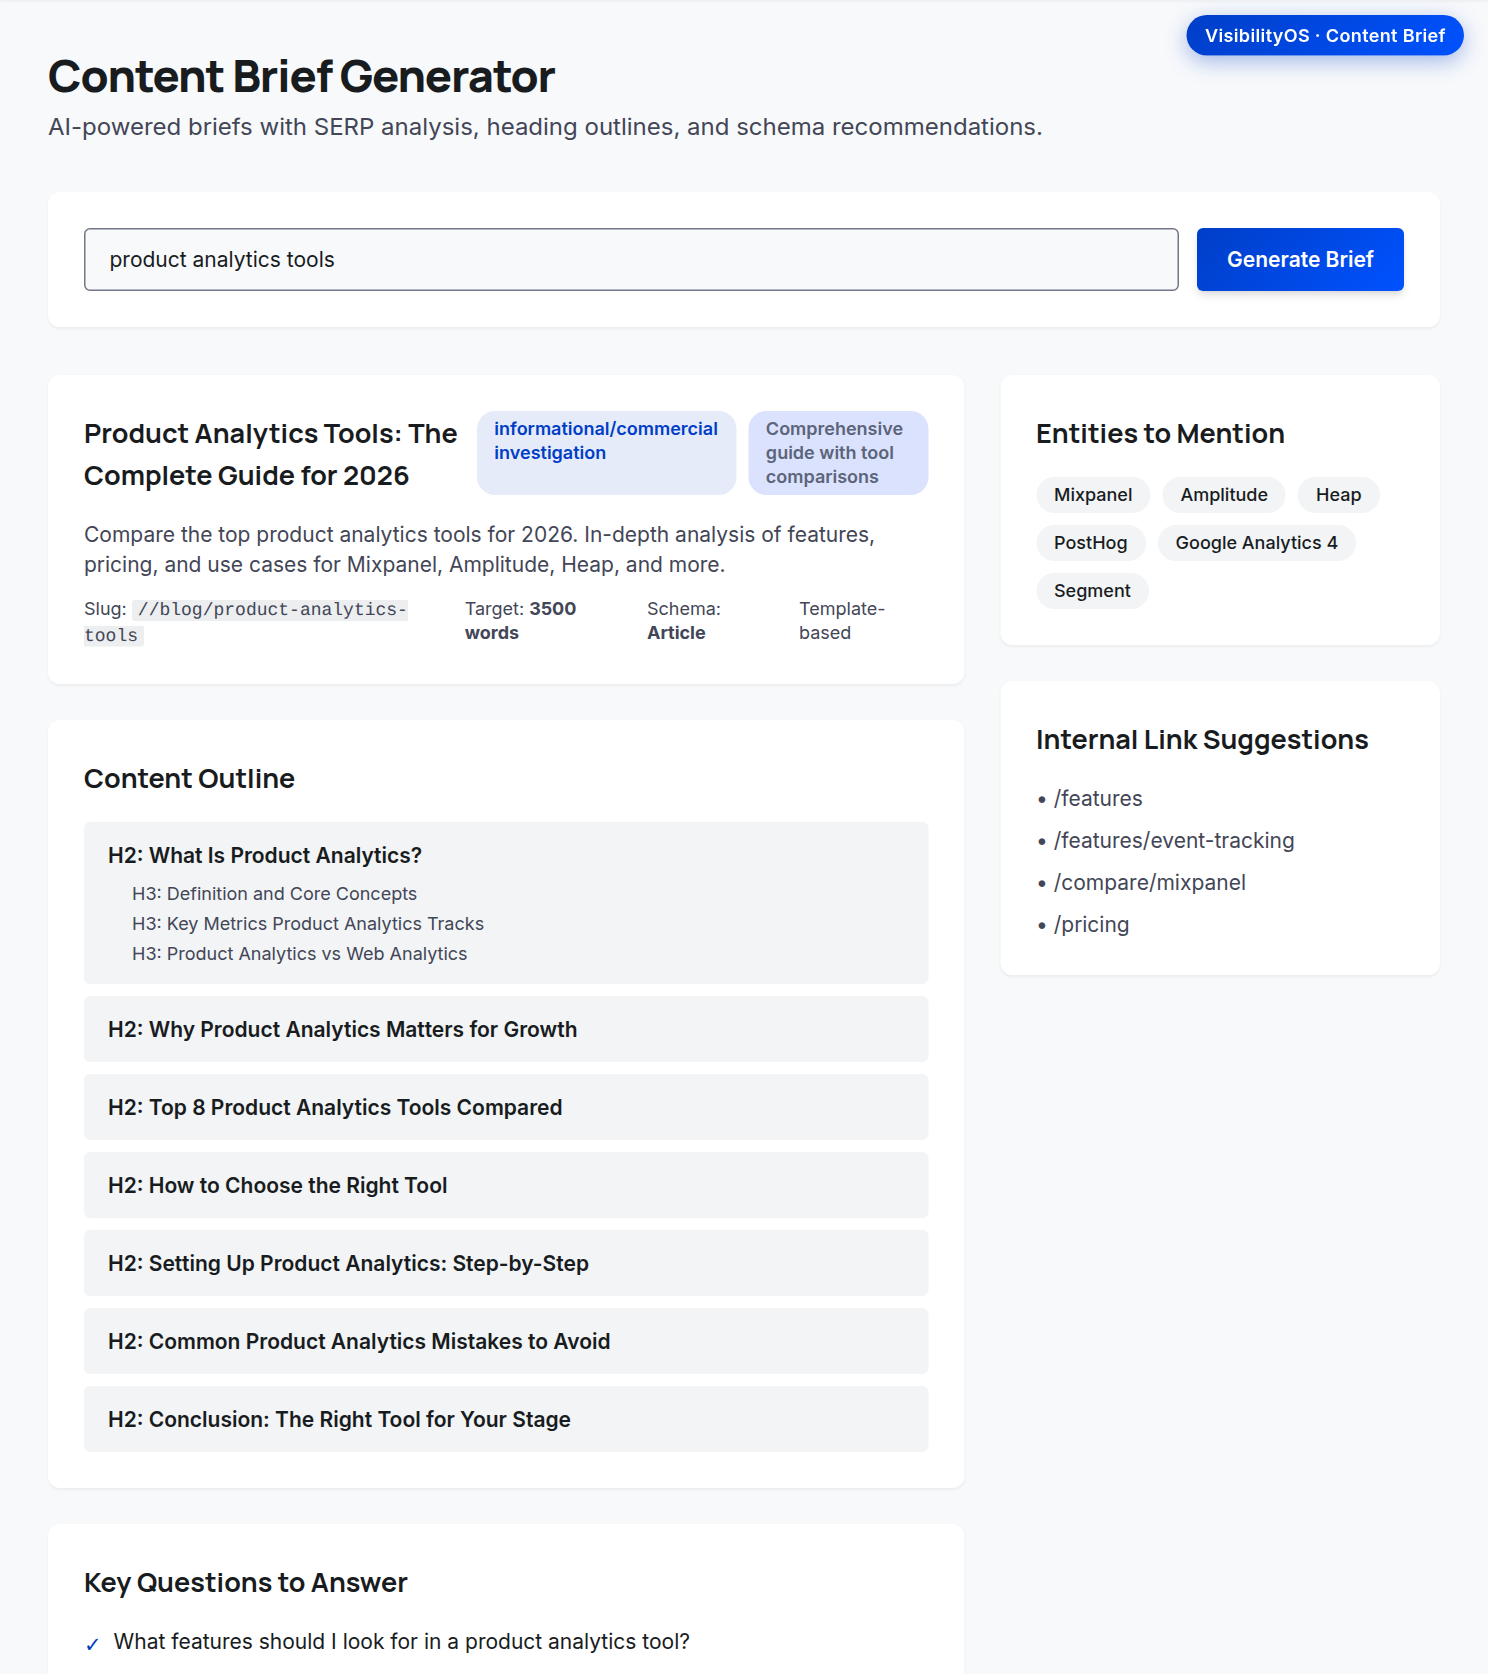
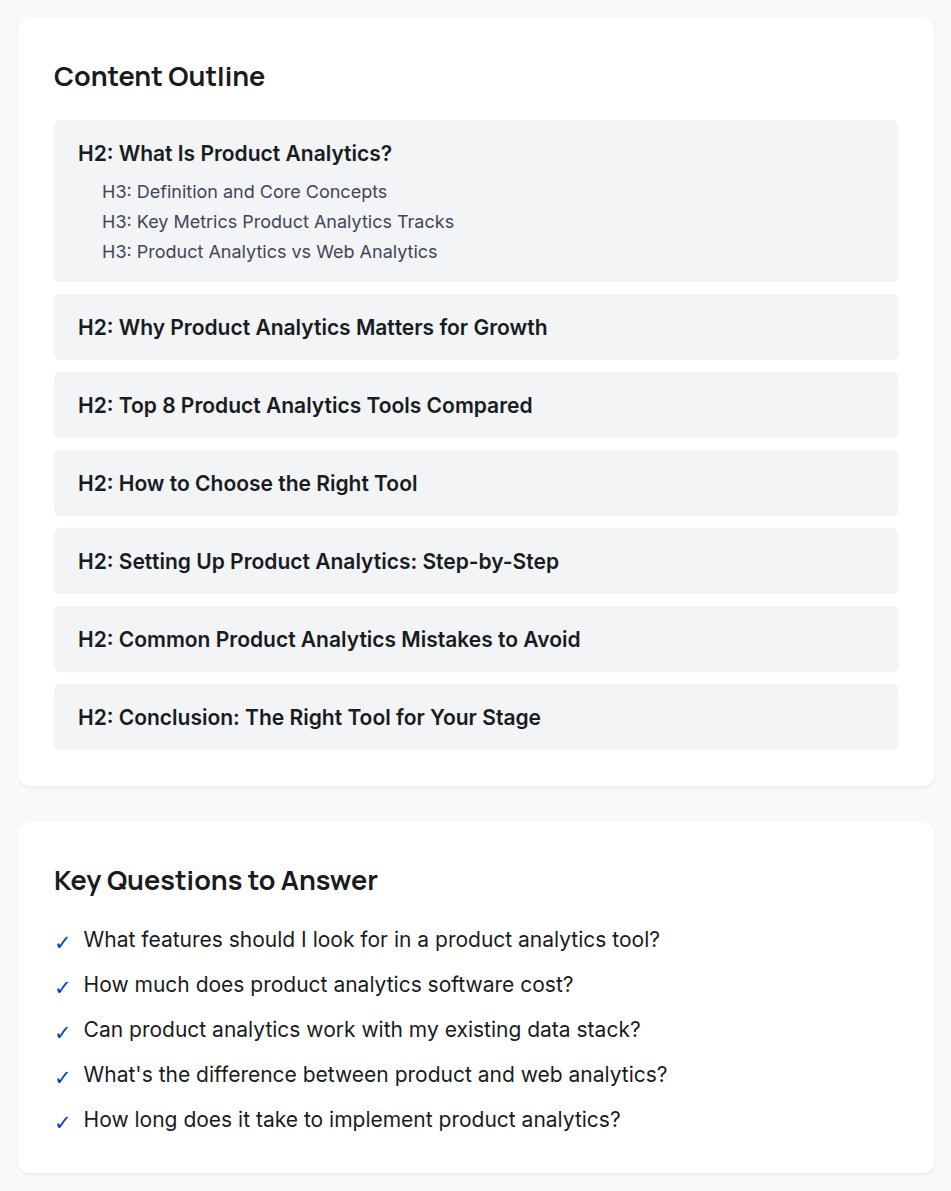
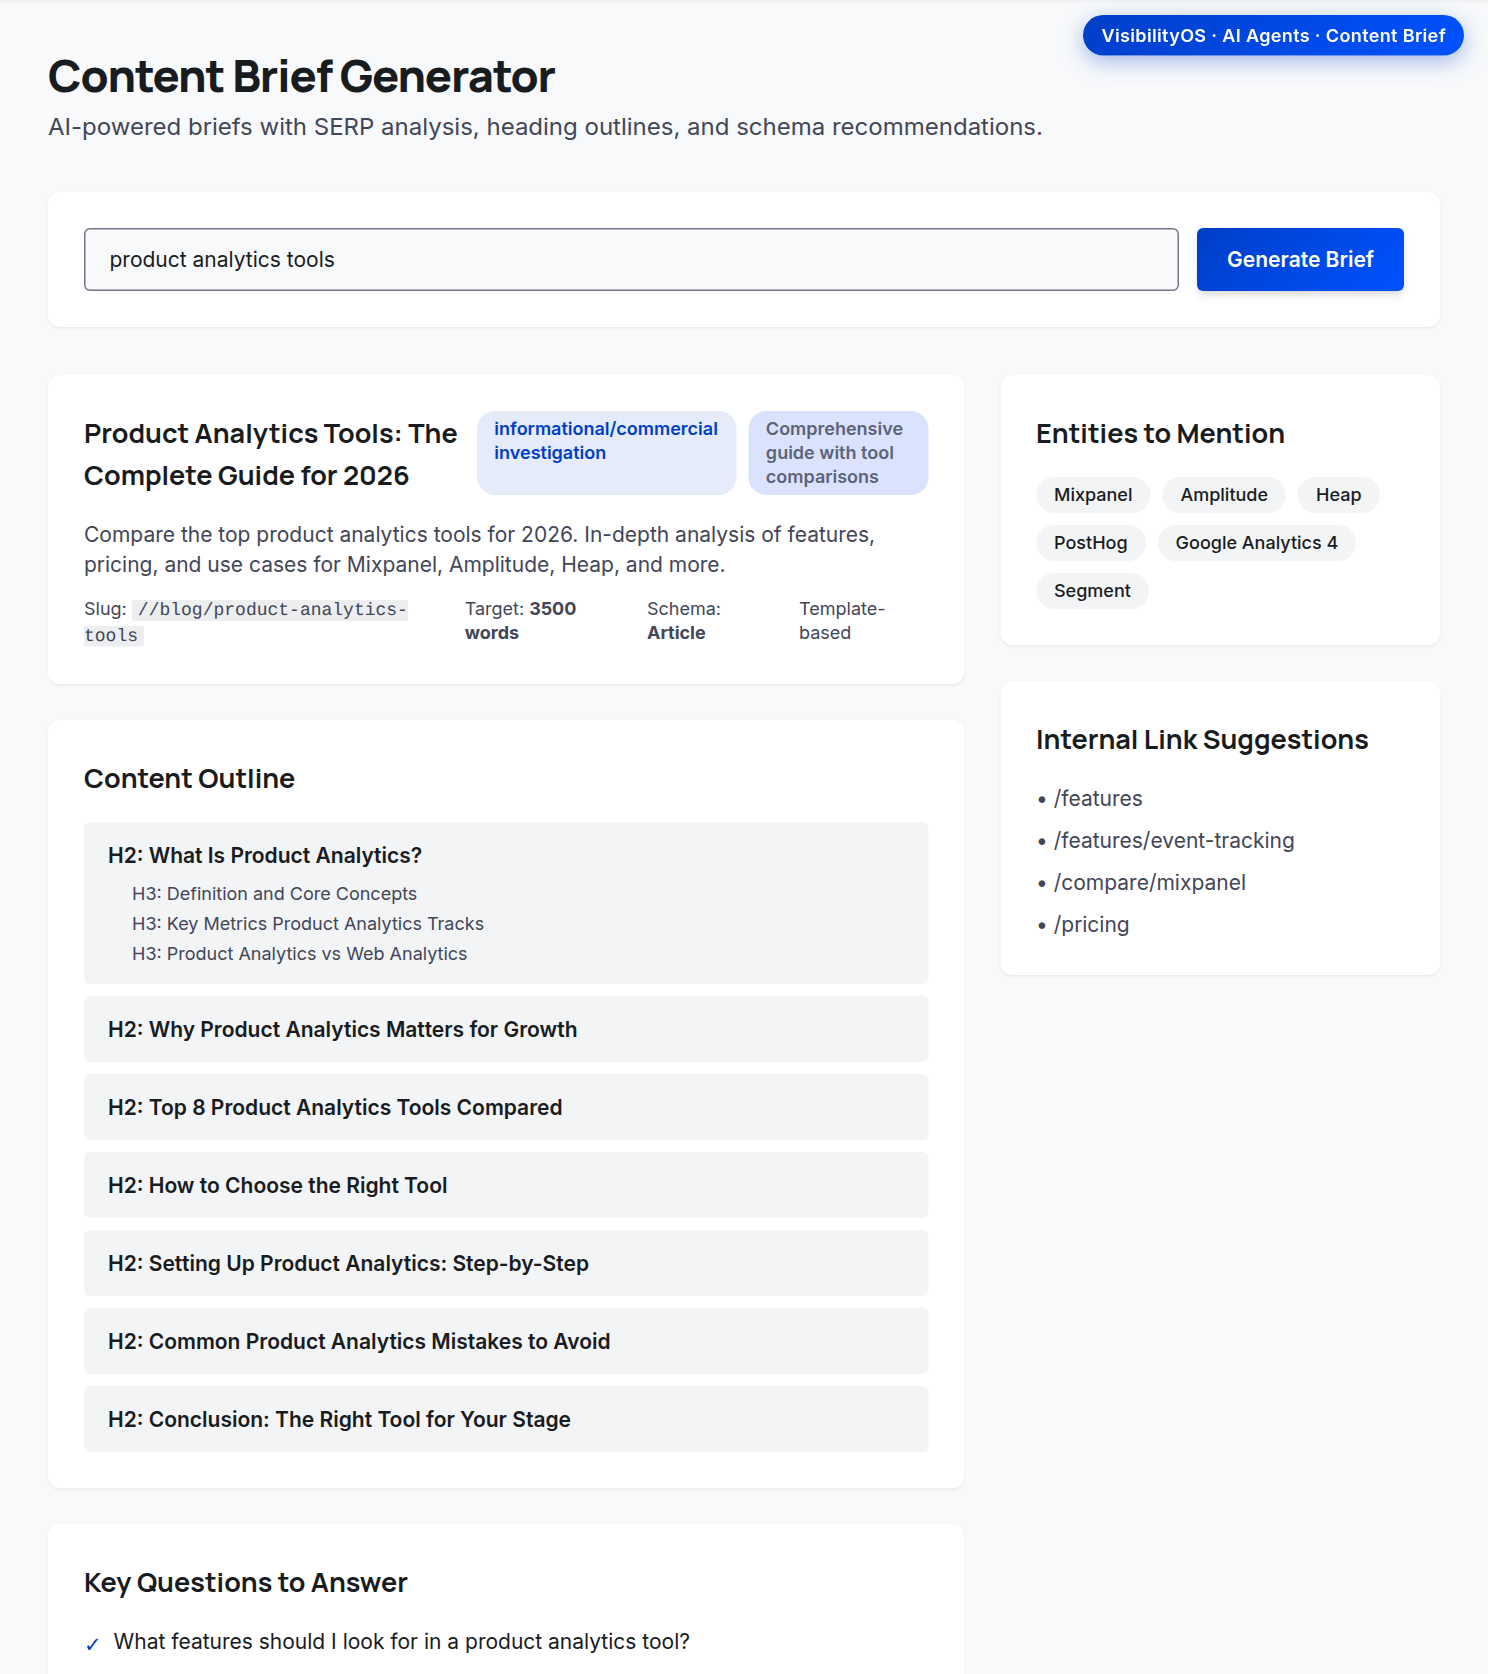
The Content Brief Generator produces a writer-ready brief for a single keyword: a recommended title, a content outline, key questions to answer, writing notes, entities to mention, and internal-link suggestions. Past briefs are saved per project for reuse.
location_onWhere to find it: Content page → 'Generate Strategy', or open /content/brief.
Content Brief Generator: title, outline, key questions, entities, and internal links for a keyword.A generated brief: the H2/H3 Content Outline plus the Key Questions to Answer that the article should cover.
format_list_numbered
Step-by-step
1From the Content page, click 'Generate Strategy' (or open the Content Brief Generator directly).
2Type a target keyword into the 'Enter a target keyword…' field.
3Submit to generate the brief.
4Use the recommended title, Content Outline, and Key Questions to Answer as your writing scaffold.
5Reference Entities to Mention and Internal Link Suggestions while drafting.
6Revisit saved briefs under 'Past Briefs'.
lightbulb
Tips & pitfalls
Brief generation uses AI (OwnIQ). If AI is not configured the endpoint returns a clear 503 instead of a brief.
Competitors & Authority
Benchmark rivals, find backlinks, and grow authority.
Competitor Analyzer
Multi-metric benchmarking, share of voice, and gap pulse.
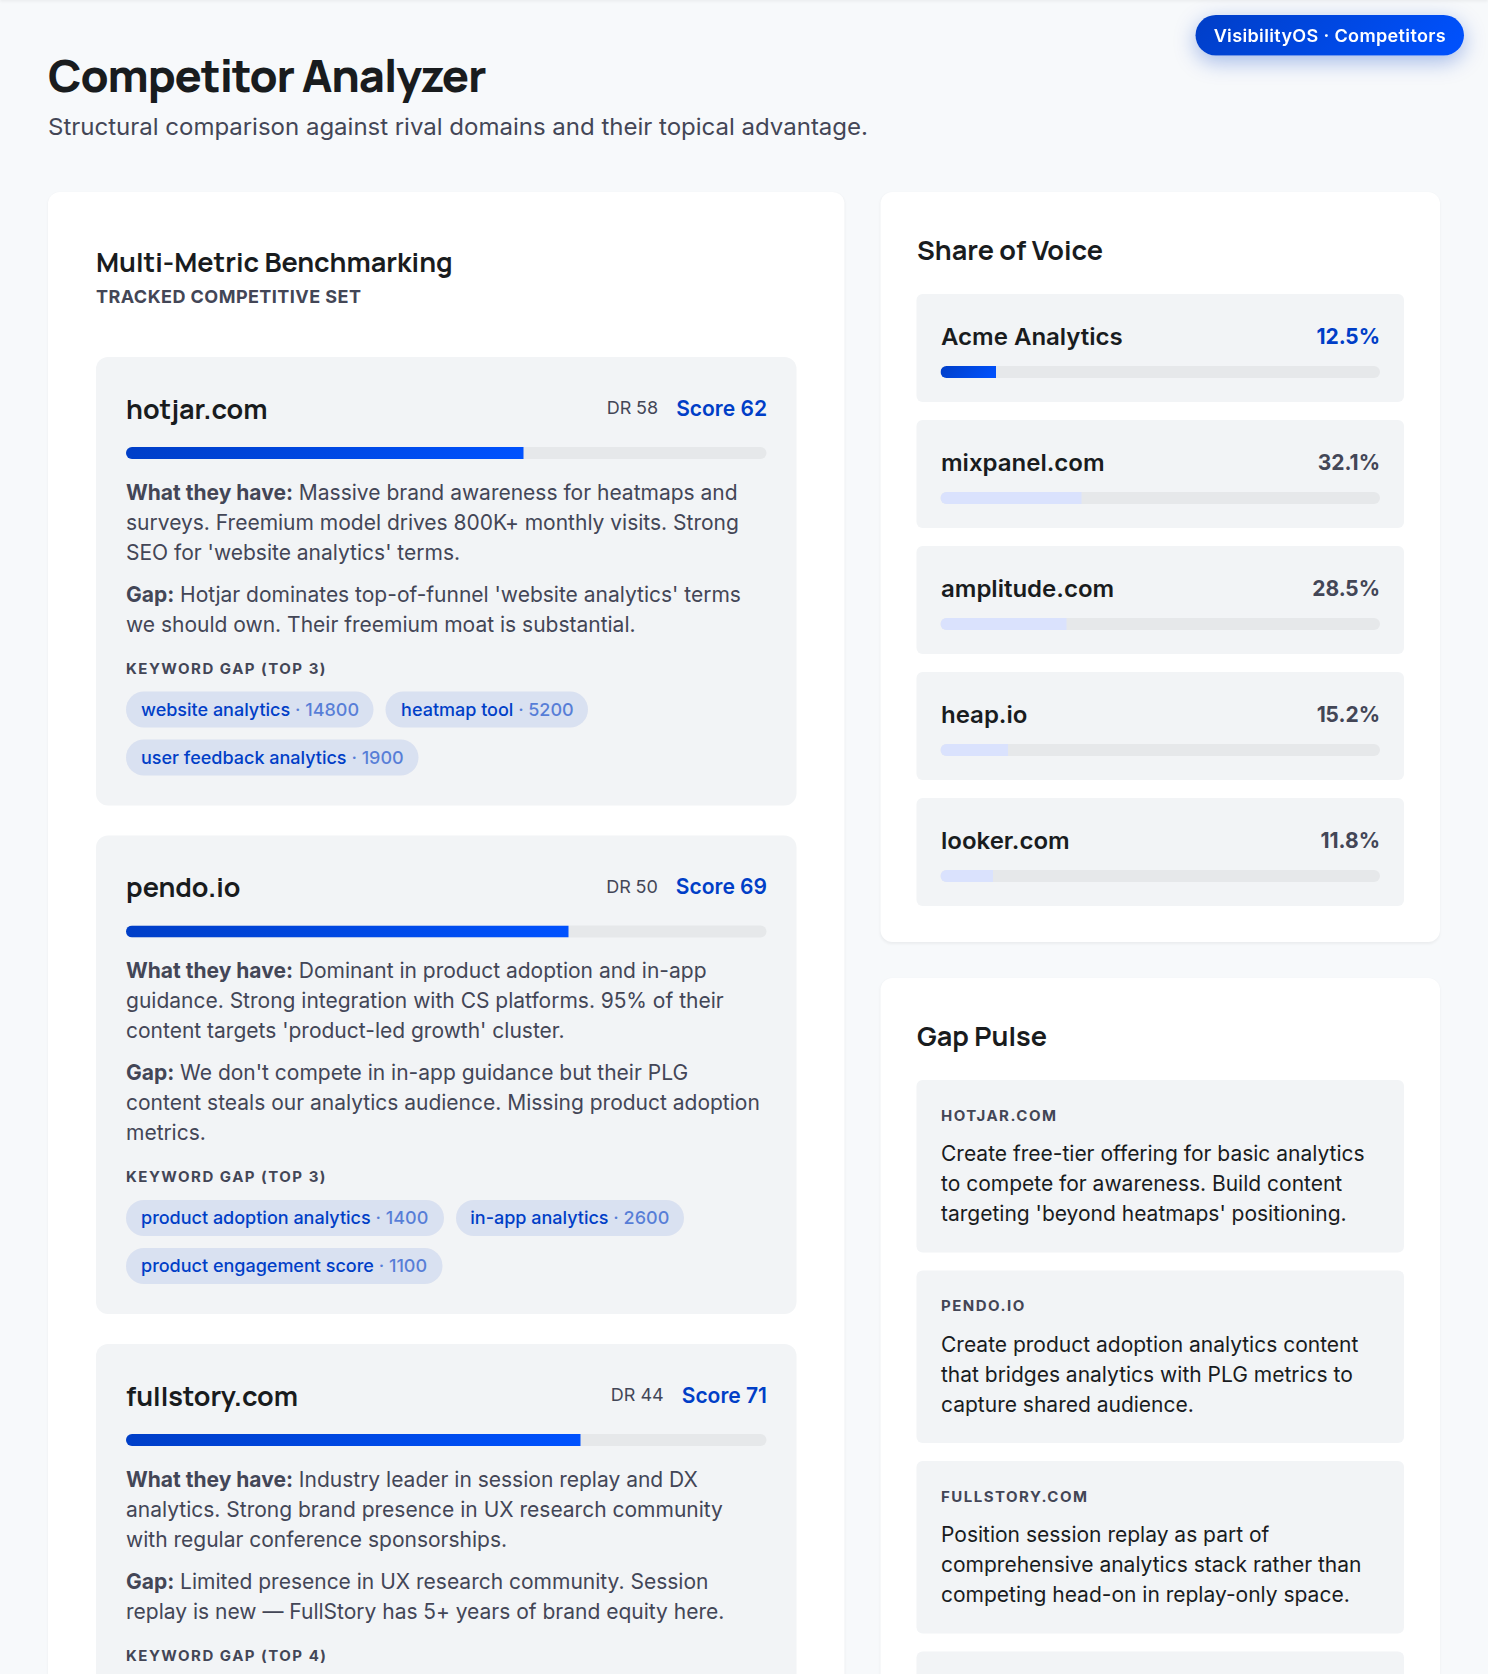
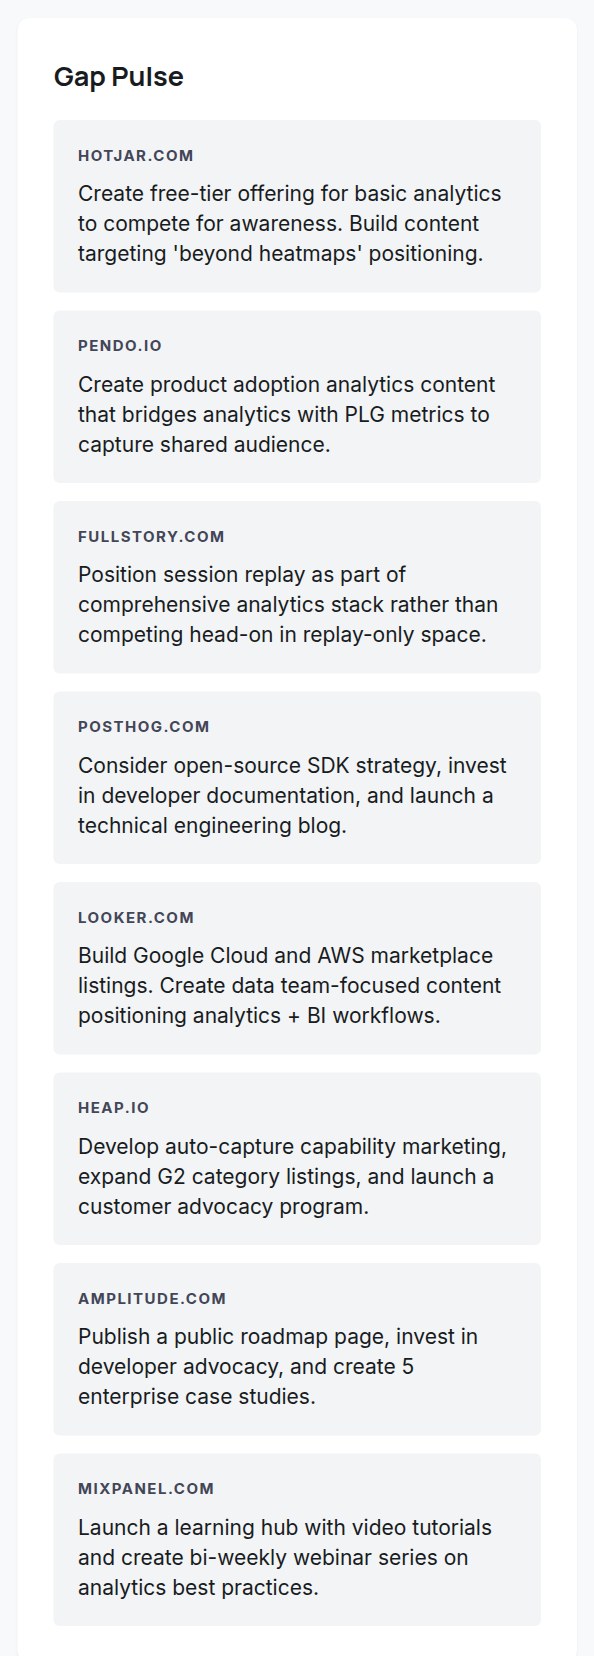
The Competitor Analyzer benchmarks your project against the competitor domains you configured. It shows multi-metric benchmarking, your Share of Voice, a Gap Pulse of what rivals have that you lack, and Suggested Next Moves to close those gaps.
location_onWhere to find it: Left sidebar → Competitors.
Competitor Analyzer: benchmarking, Share of Voice, Gap Pulse, and suggested moves.
format_list_numbered
Step-by-step
1Open Competitors from the sidebar.
2Review Multi-Metric Benchmarking to compare each competitor across metrics.
3Read the Share of Voice panel to gauge your market presence.
4Use Gap Pulse to see what competitors have and you don't.
5Action the Suggested Next Moves to close the highest-impact gaps.
lightbulb
Tips & pitfalls
Keep the competitor list in the project up to date — the analysis only benchmarks the domains you list.
Multi-Metric Benchmarking & keyword gaps
Compare each rival's authority, strengths, and the keywords you're missing.
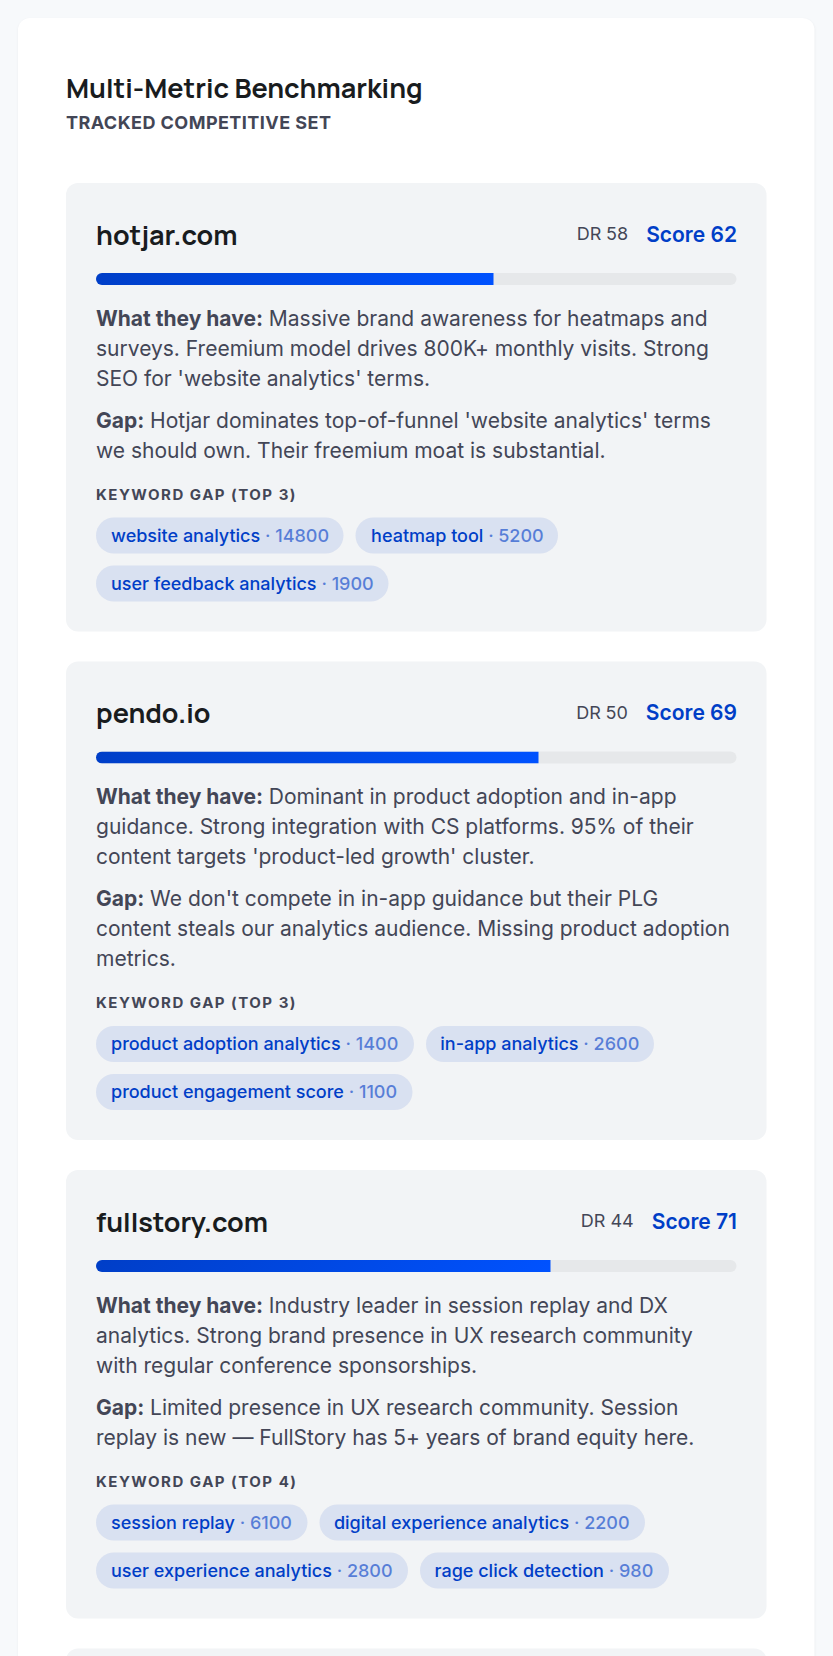
The Multi-Metric Benchmarking section profiles each competitor side by side: a domain-authority-style score, what they do well ('what they have'), where you trail them ('the gap'), and a Keyword Gap list of the top terms they rank for that you don't. It's the evidence base for your competitive content plan.
location_onWhere to find it: Competitors page → Multi-Metric Benchmarking.
Multi-Metric Benchmarking: each competitor's authority score, strengths, the gap vs. you, and their top keyword gaps.
format_list_numbered
Step-by-step
1Open Competitors and review the benchmarking cards, one per rival.
2Read each rival's score and 'what they have' to understand their positioning.
3Study the Keyword Gap list — these are concrete terms to target.
4Cross-reference the gaps with the Keyword Opportunity Finder on the Content page to pick winnable ones.
lightbulb
Tips & pitfalls
Target keyword gaps where the competitor's authority isn't far above yours — those are the realistic wins.
Share of Voice, Gap Pulse & next moves
Gauge market presence and act on prioritized competitive moves.
Beyond raw benchmarking, the Competitor Analyzer summarizes your market position and tells you what to do about it. Share of Voice estimates your slice of visibility versus the tracked field, Gap Pulse lists a per-competitor recommended move, and Suggested Next Moves rolls the highest-impact actions into a short plan.
location_onWhere to find it: Competitors page → Share of Voice, Gap Pulse, Suggested Next Moves.
Gap Pulse: a per-competitor recommended move to close the most important gaps.
format_list_numbered
Step-by-step
1Open Competitors and read the Share of Voice panel for your overall market presence.
2Work down Gap Pulse — each card is a specific move against a named competitor.
3Prioritize using Suggested Next Moves, which surfaces the highest-impact actions first.
4Send the moves you'll commit to into the Task Manager.
lightbulb
Tips & pitfalls
Share of Voice is relative to the competitors you configured — add your true rivals so the number is meaningful.
Backlink & Distribution Finder
Backlink targets, distribution directories, and mentions.
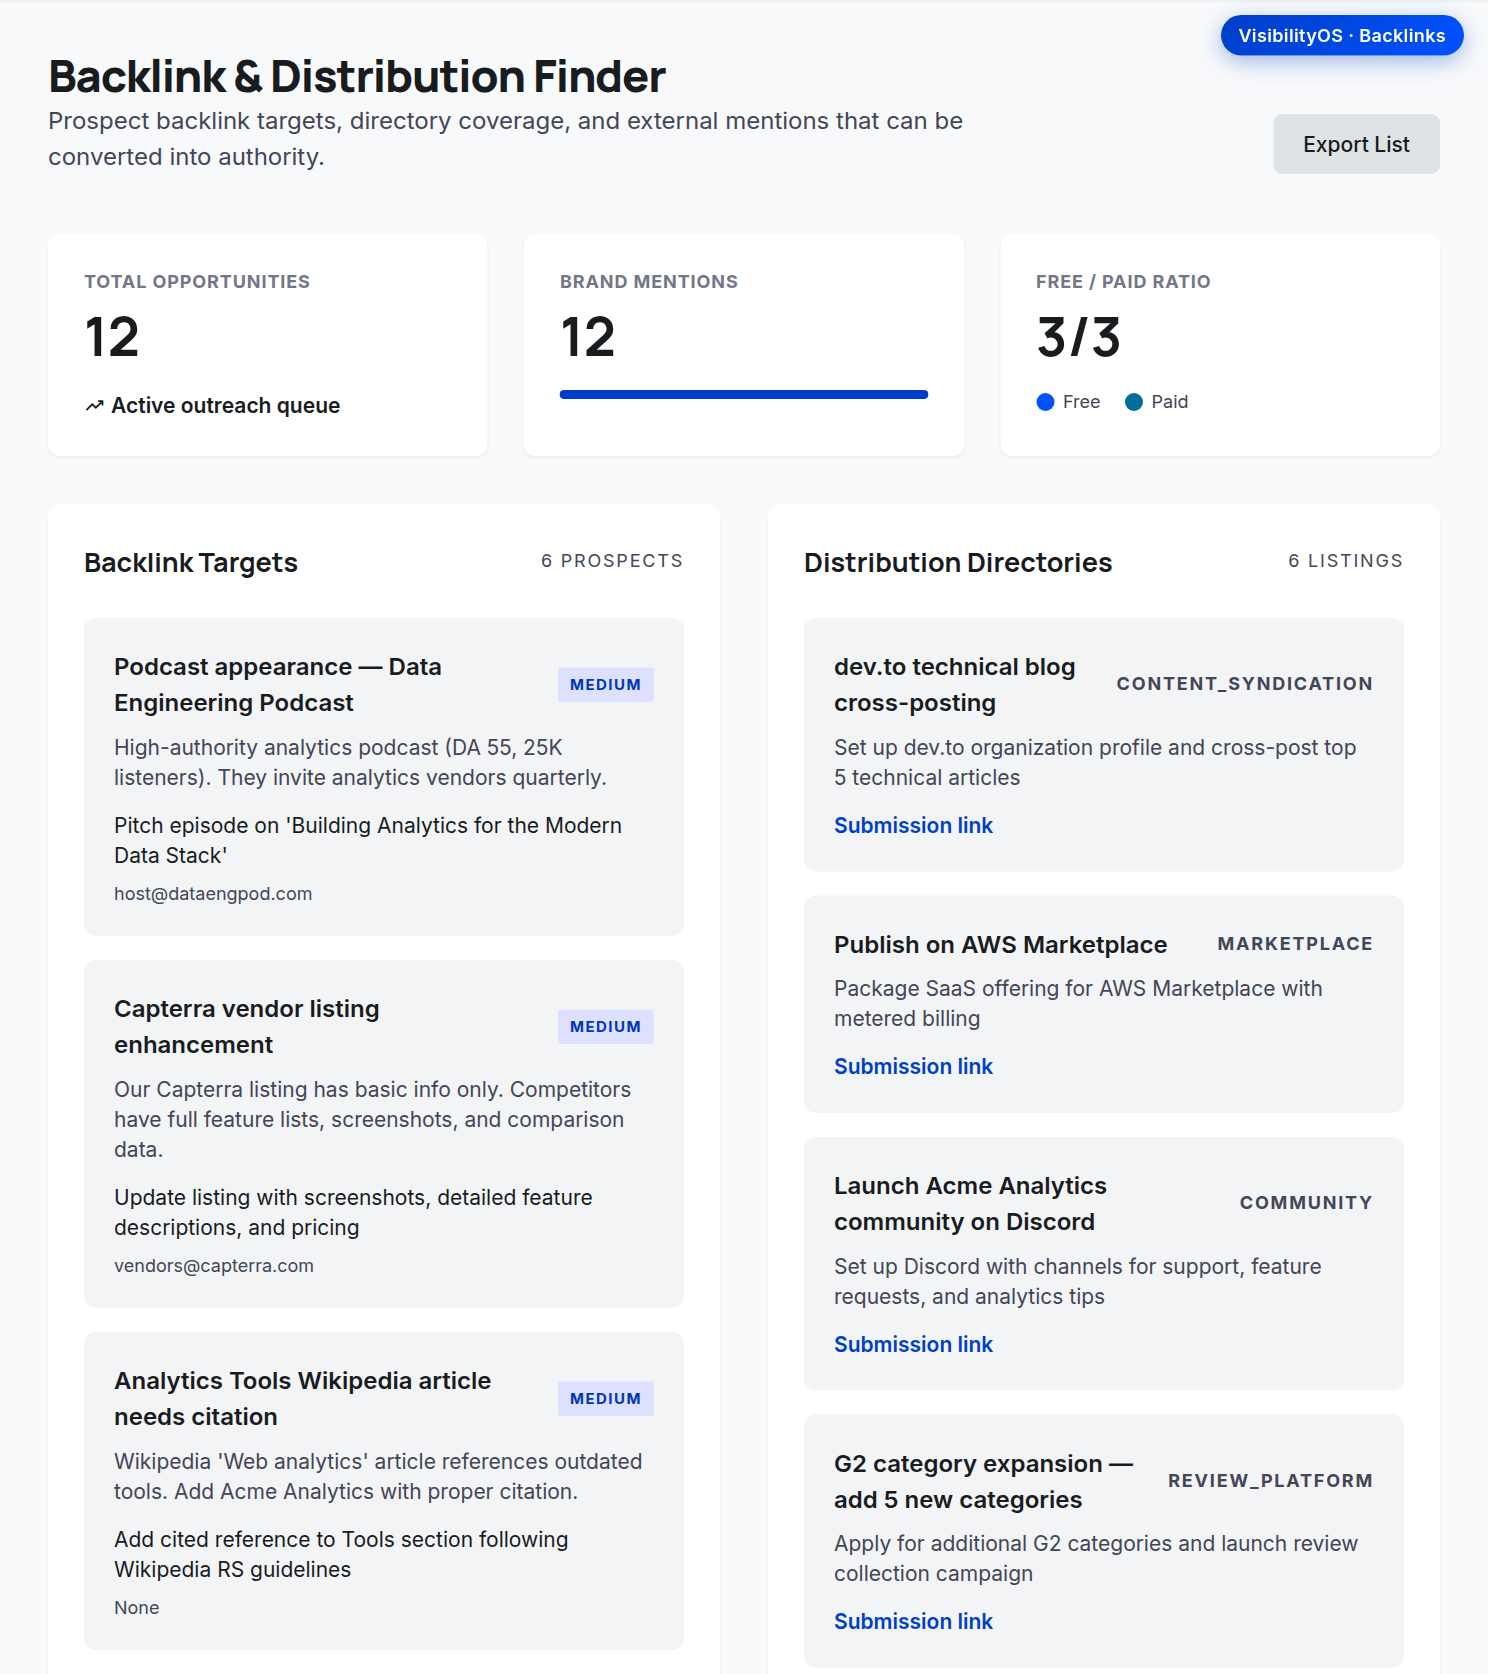
This module finds where to earn links and exposure: prioritized Backlink Targets, Distribution Directories (with free vs. paid counts and submission links), and a Brand Mention Tracker showing where your brand is mentioned across the web.
location_onWhere to find it: Left sidebar → Backlinks.
Backlink & Distribution Finder: targets, directories, and the brand mention tracker.
format_list_numbered
Step-by-step
1Open Backlinks from the sidebar.
2Review the totals: opportunity count, brand mentions, and free/paid directory split.
3Work through Backlink Targets, the highest-value link prospects.
4Use Distribution Directories and their 'Submission link' to list your site.
5Monitor the Brand Mention Tracker and click 'Open source' to review each mention.
6Click 'Export List' to take the opportunities offline.
lightbulb
Tips & pitfalls
Unlinked brand mentions are easy link wins — reach out and ask for a link.
Authority Tracker
Brand mentions, distribution coverage, and authority tasks.
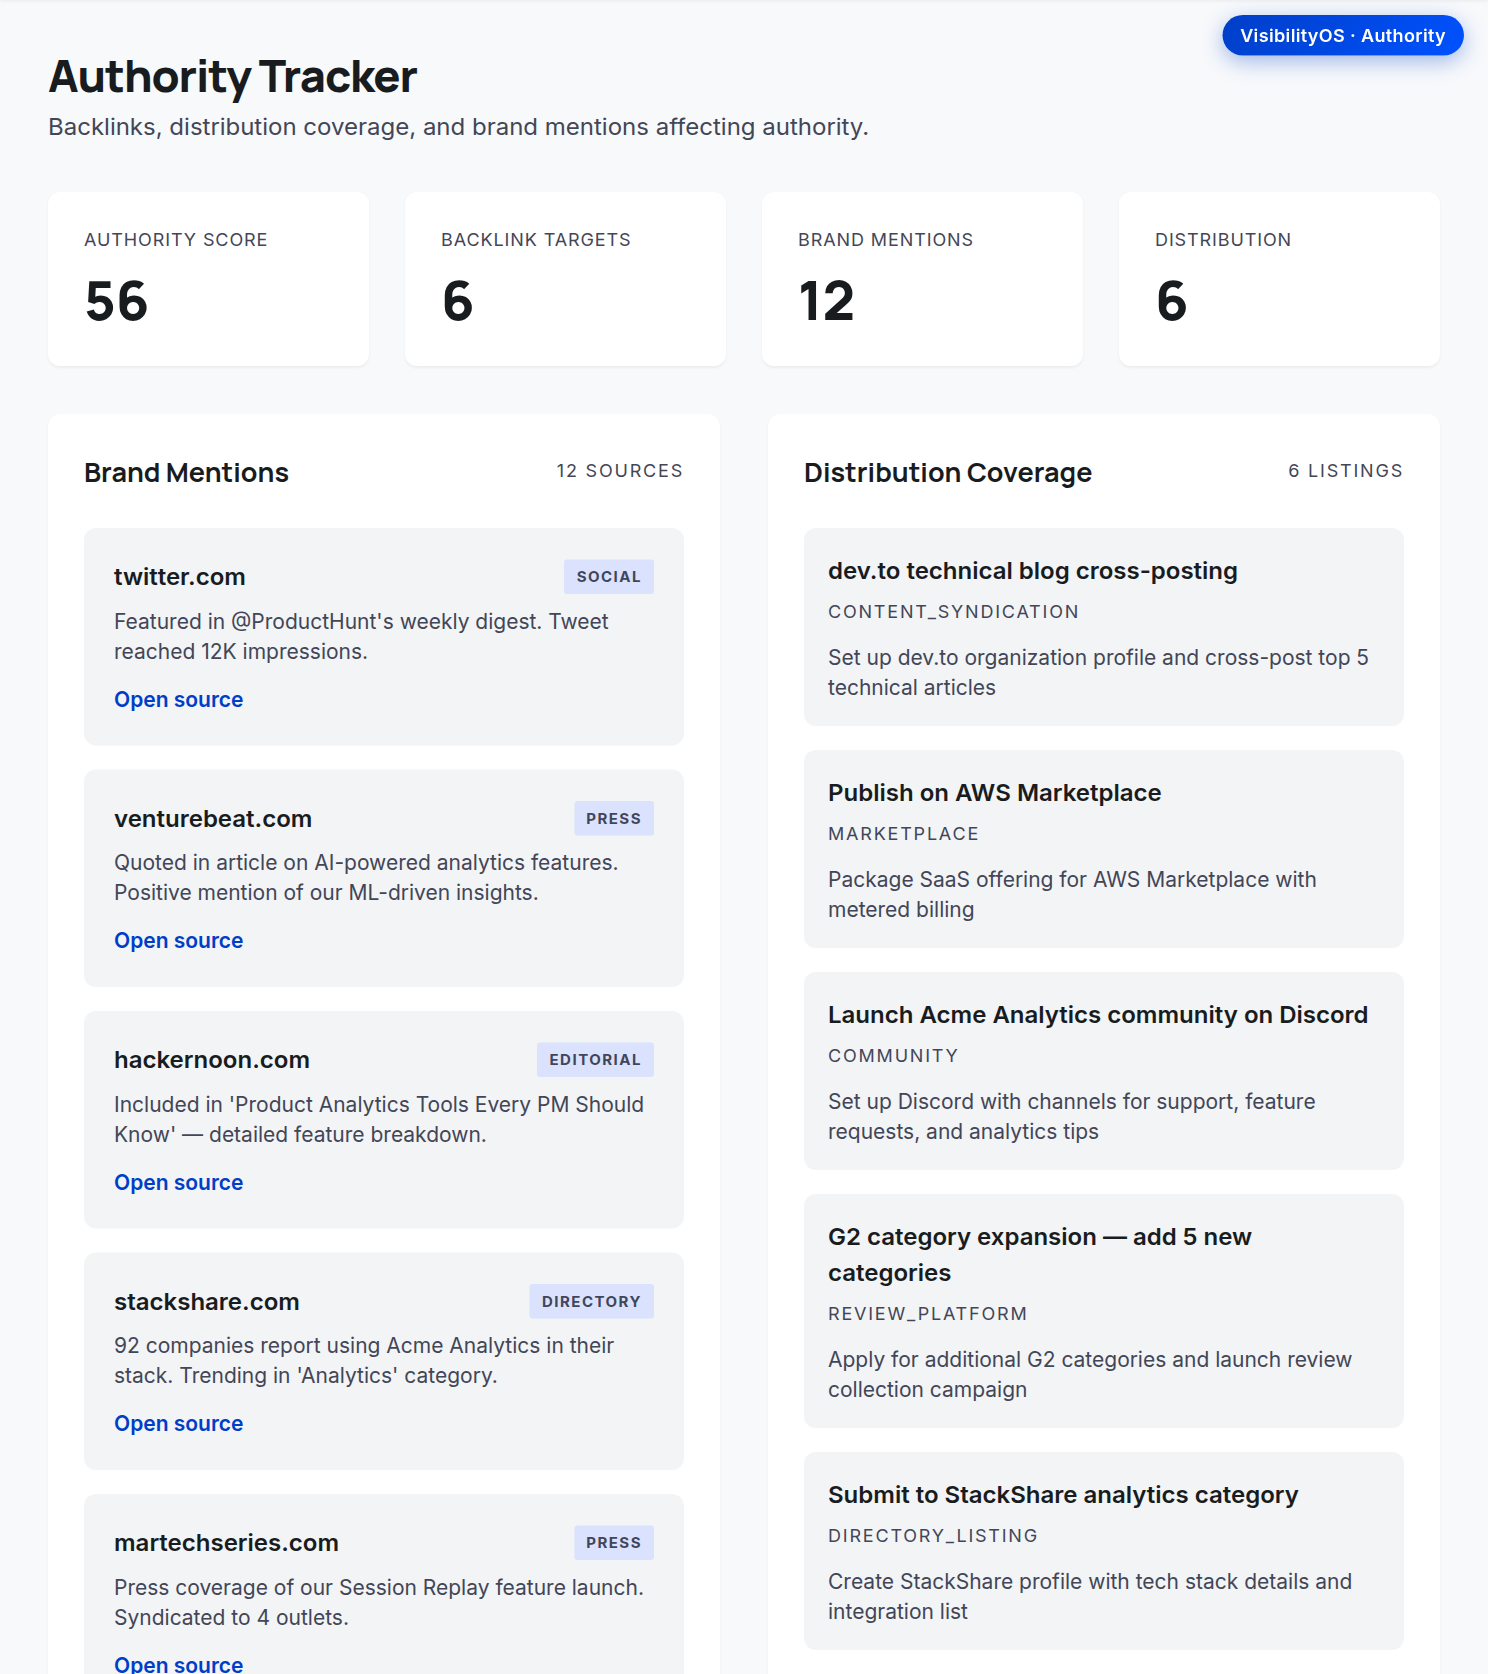
The Authority Tracker focuses on off-site authority signals: brand mentions across the web, your distribution coverage across directories and channels, and a focused list of Authority Tasks to strengthen your domain's standing.
location_onWhere to find it: Left sidebar → Authority.
Authority Tracker: brand mentions, distribution coverage, and authority tasks.
format_list_numbered
Step-by-step
1Open Authority from the sidebar.
2Review Brand Mentions and click 'Open source' to inspect each one.
3Check Distribution Coverage to see where you are (and aren't) listed.
4Work through the Authority Tasks to improve coverage and mentions.
lightbulb
Tips & pitfalls
Authority and Backlinks share data sources — use Authority for the strategic view and Backlinks for the prospect-by-prospect actions.
AI Search Visibility
Track how often AI assistants mention your brand.
AI Visibility Tracker
Measure your presence inside LLM answers.
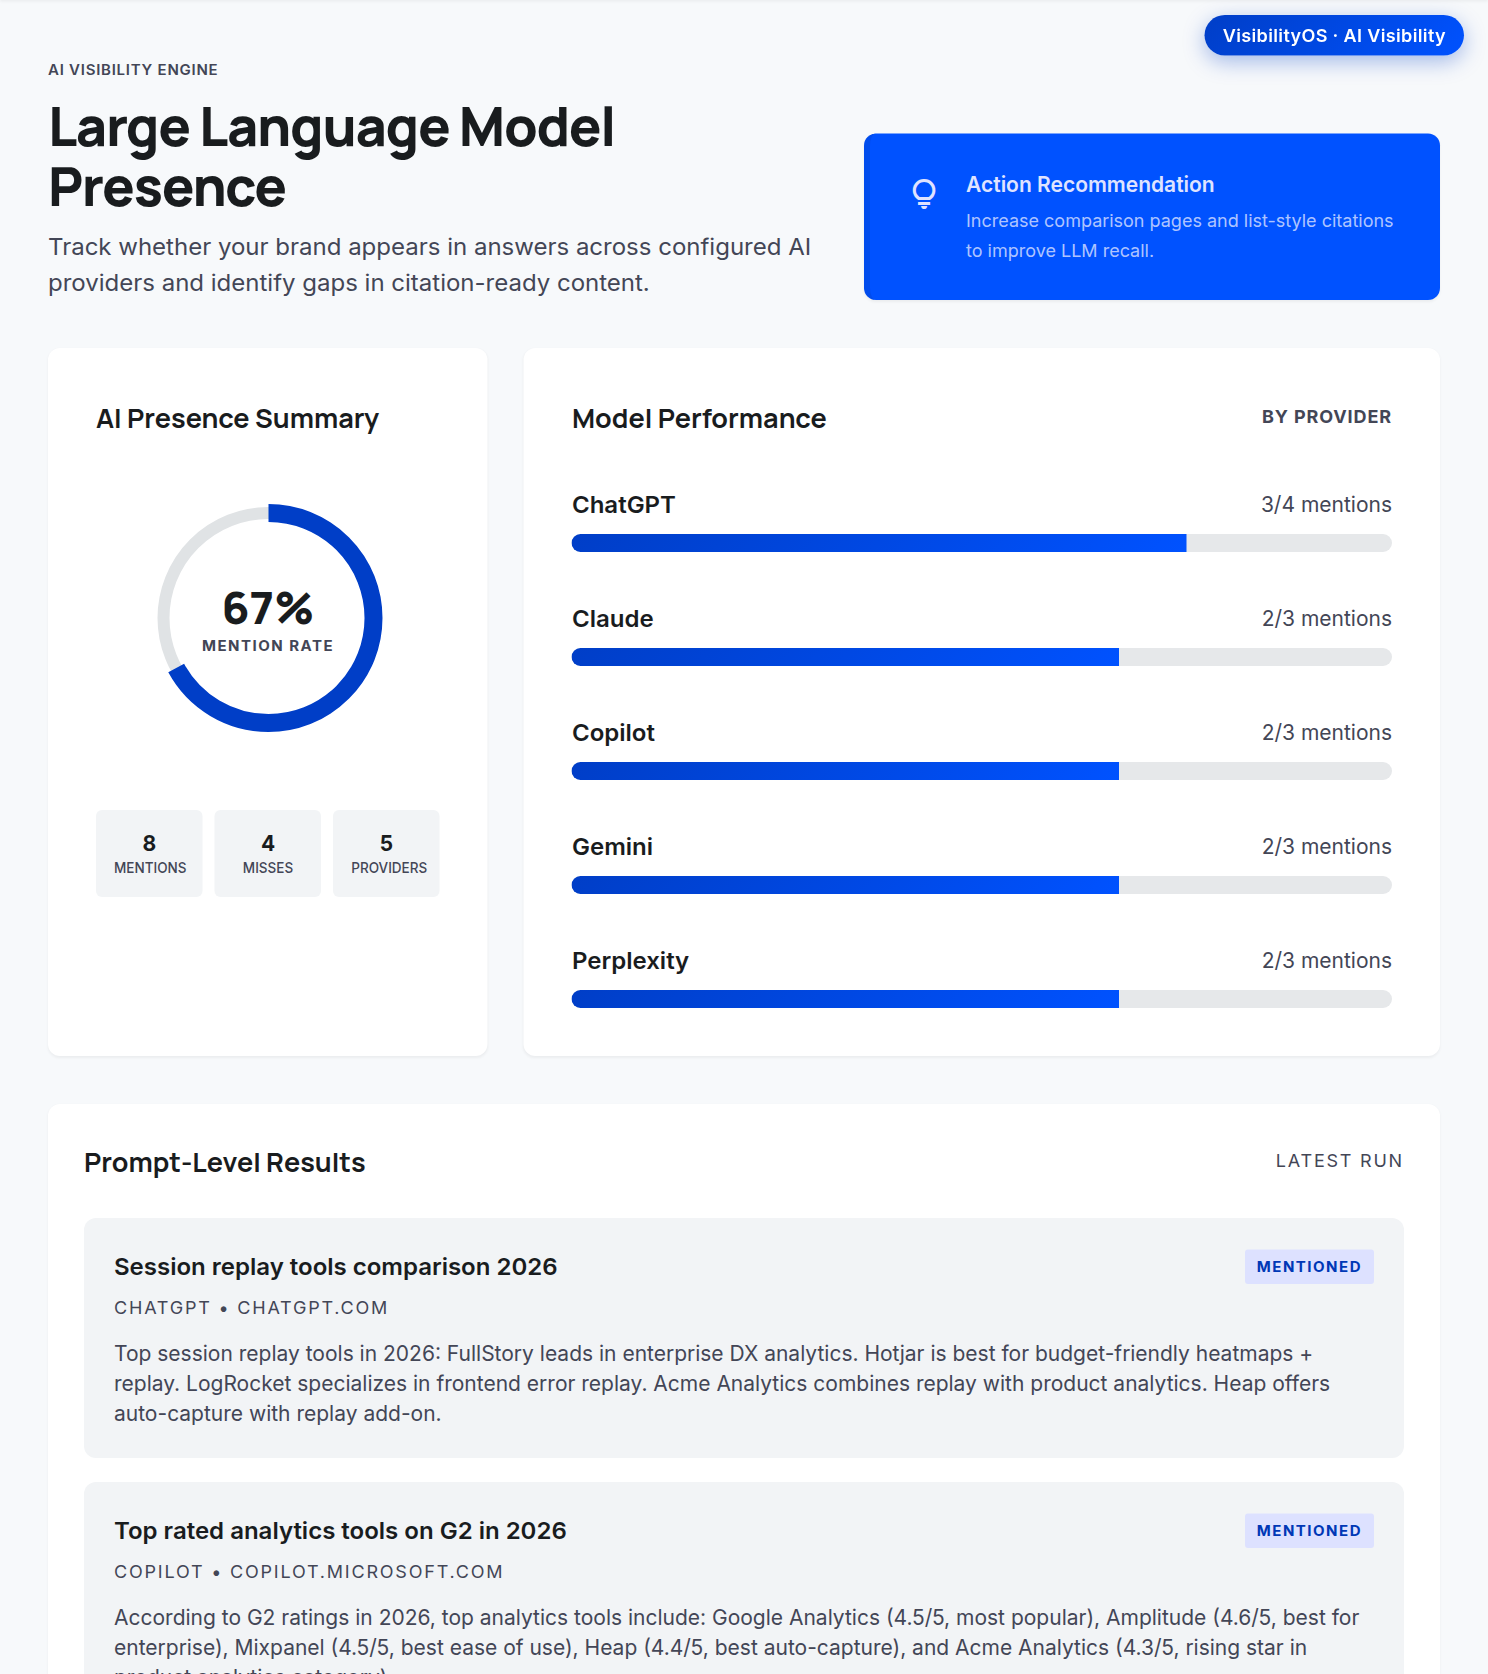
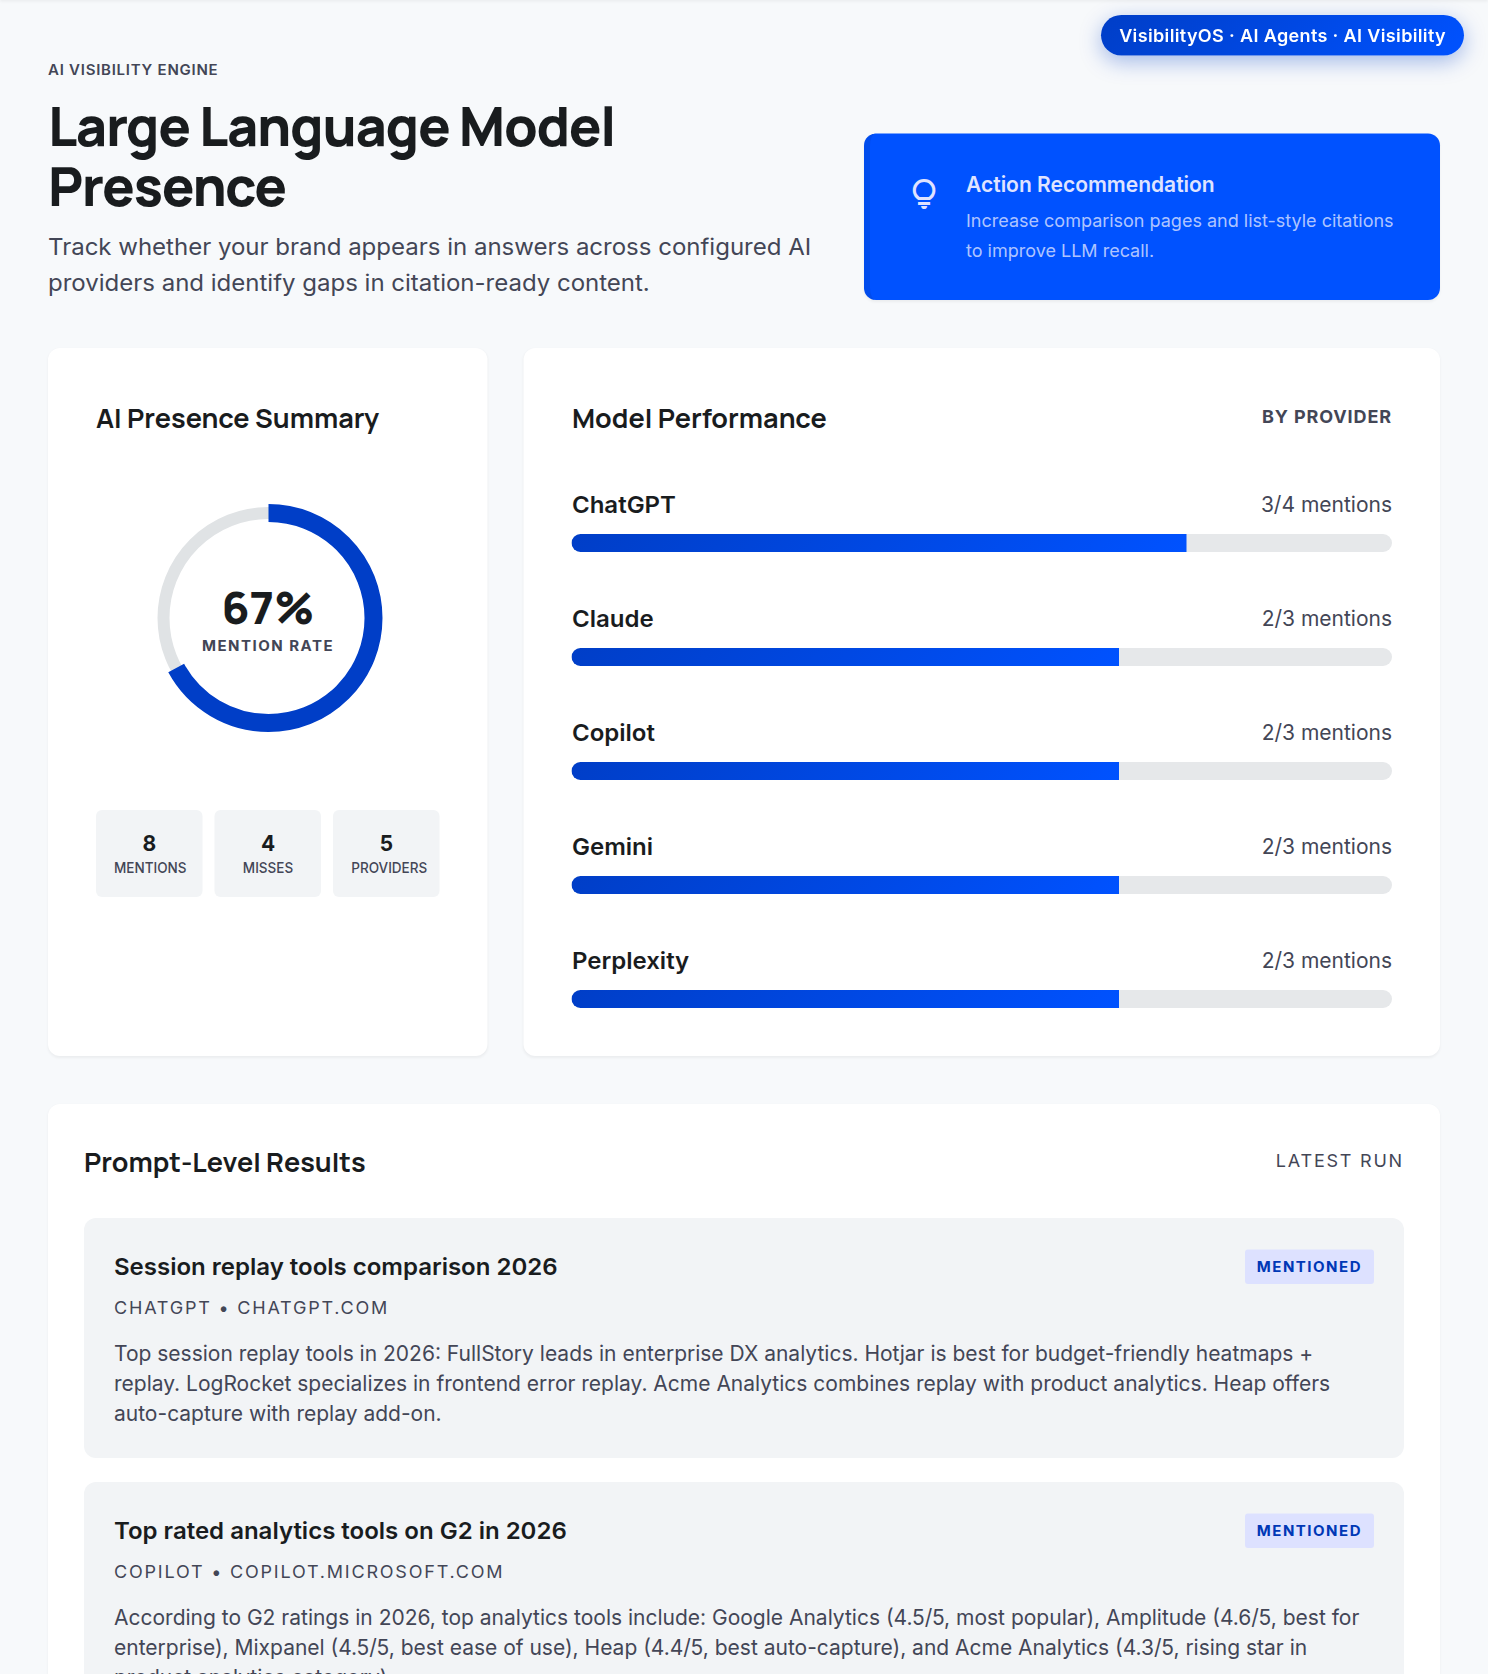
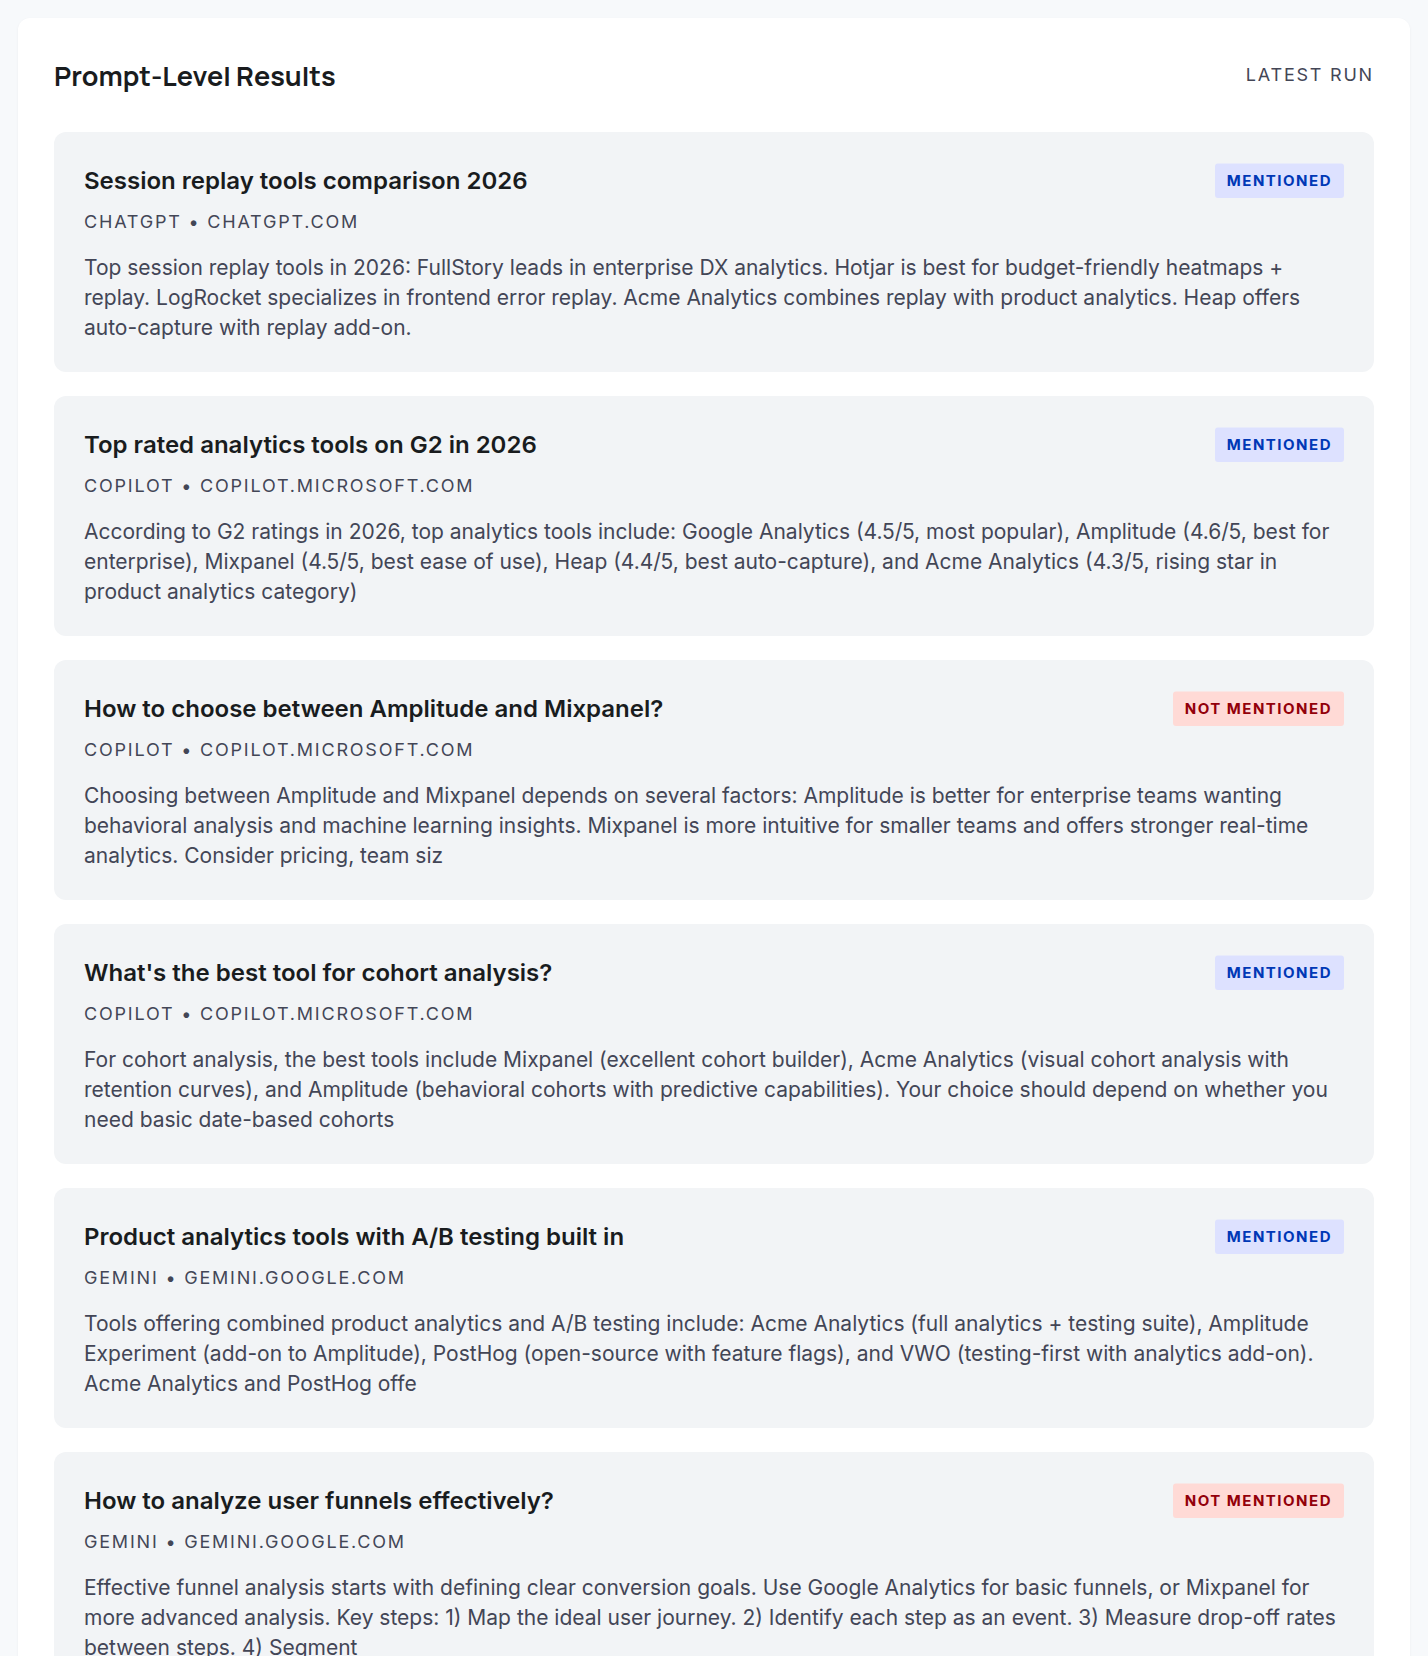
As buyers increasingly ask AI assistants for recommendations, the AI Visibility Tracker measures Large Language Model Presence: it runs representative prompts across providers and reports whether — and how — your brand is mentioned, with an AI Presence Summary, Model Performance comparison, and Prompt-Level Results.
location_onWhere to find it: Left sidebar → AI Visibility.
AI Visibility Tracker: presence summary, model performance, and prompt-level results.
format_list_numbered
Step-by-step
1Open AI Visibility from the sidebar.
2Read the AI Presence Summary for your overall LLM visibility score.
3Compare providers in Model Performance to see which models cite you.
4Drill into Prompt-Level Results to see the exact prompts and whether your brand (and which entities) appeared.
5Re-run an analysis to refresh after content or PR changes.
lightbulb
Tips & pitfalls
AI checks call external LLM providers; without keys configured the module shows the last stored results.
Improving authority, mentions, and structured content tends to lift AI visibility over time.
Rank Tracking & Search Console
Connect Google Search Console and track positions.
Rank Tracker (Google Search Console)
Sync GSC data to track positions, clicks, and quick wins.
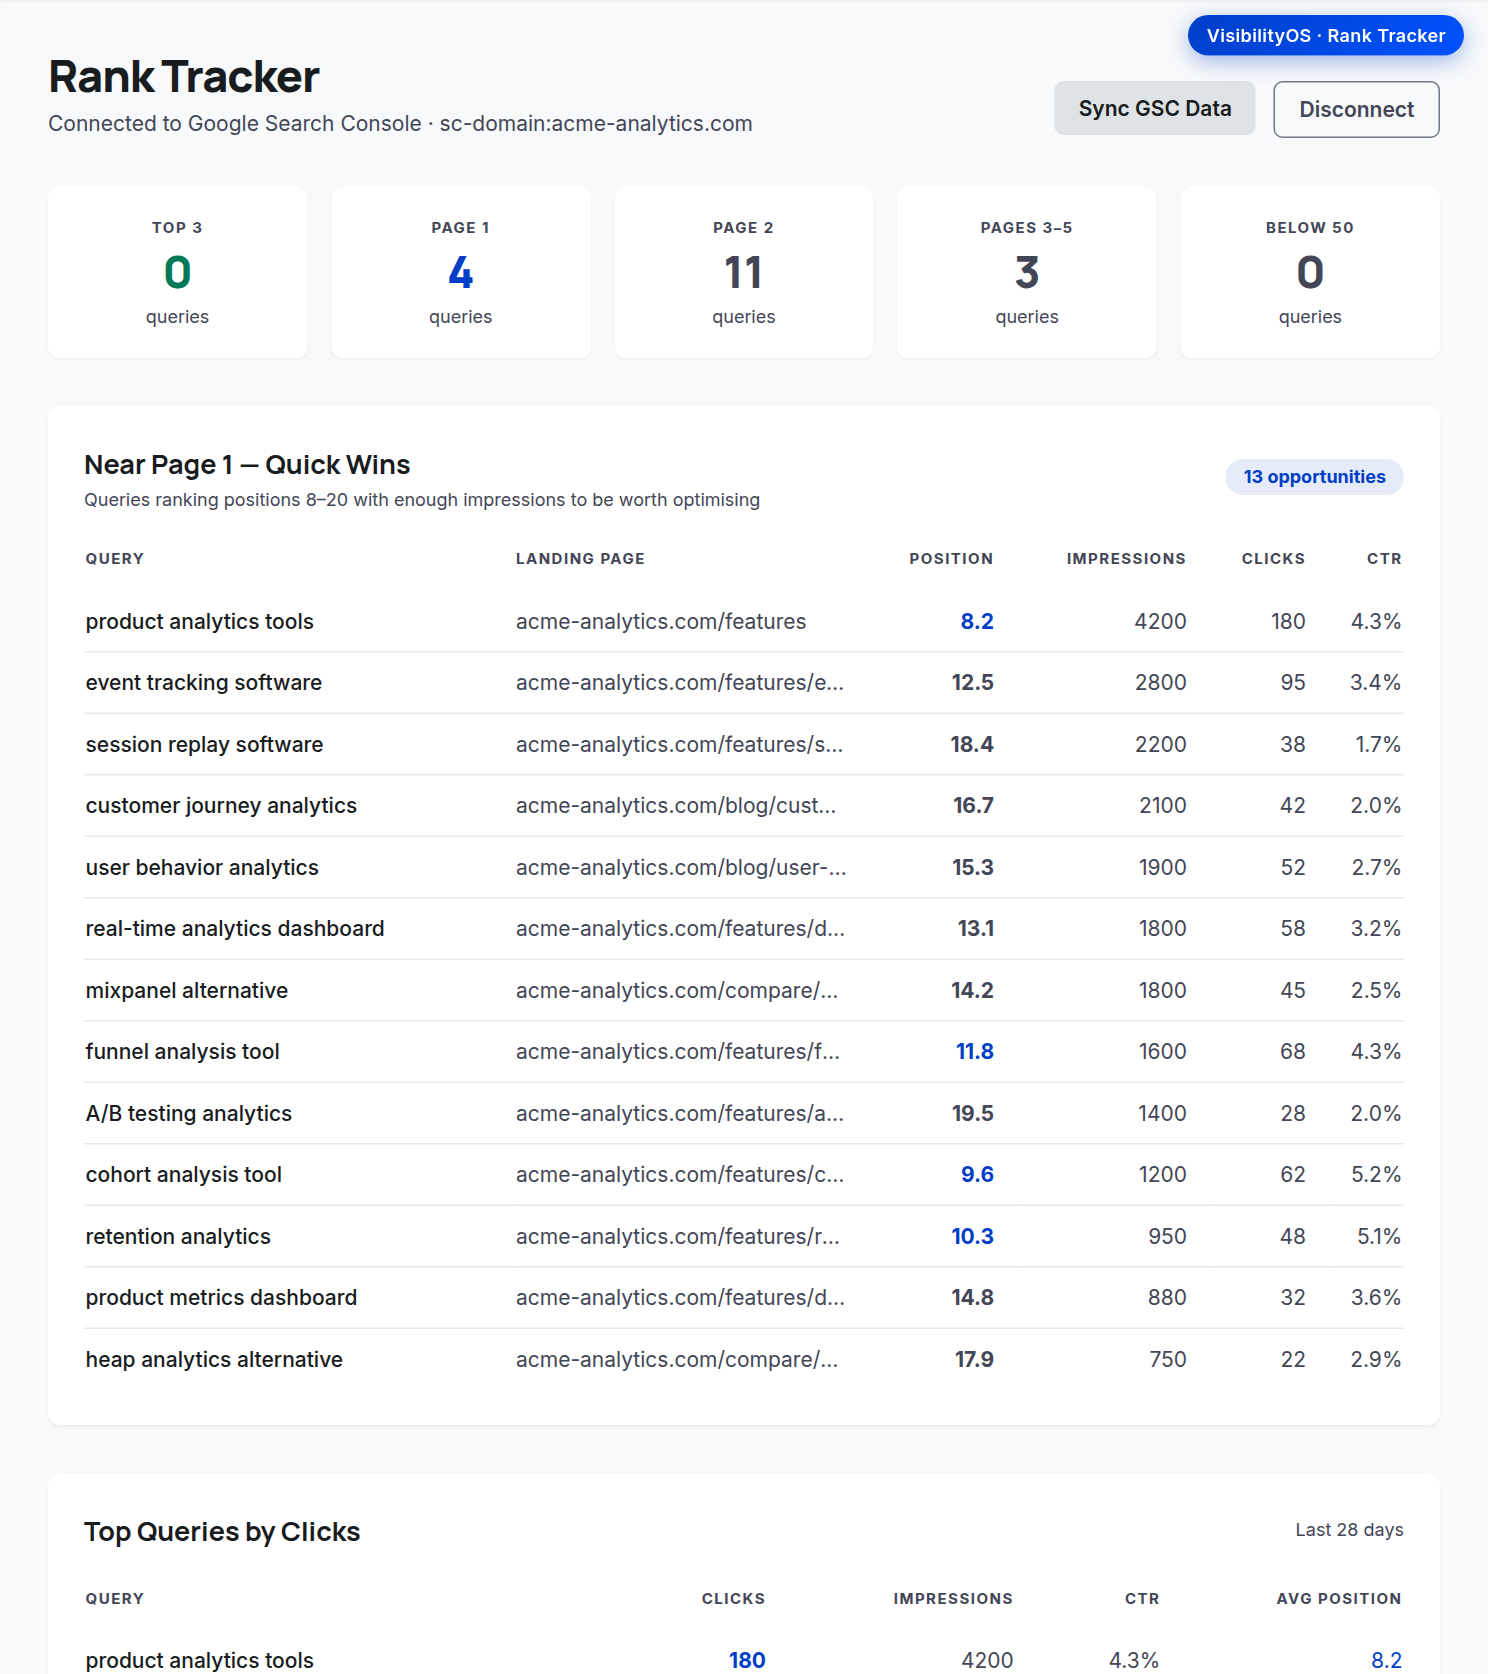
The Rank Tracker connects to Google Search Console and pulls your real search performance: keyword positions, impressions, clicks, and CTR. It surfaces 'Near Page 1' quick wins and your Top Queries by Clicks so you can prioritize where small changes move the needle.
location_onWhere to find it: Left sidebar → Rank Tracker.
Rank Tracker: Search Console sync, near-page-1 quick wins, and top queries by clicks.
format_list_numbered
Step-by-step
1Open Rank Tracker from the sidebar.
2If not connected, start the Google Search Console connection flow for the project.
3Select the Search Console property that matches your site.
4Click 'Sync GSC Data' to pull the latest performance snapshot.
5Review 'Near Page 1 — Quick Wins' and 'Top Queries by Clicks'.
6Use 'Disconnect' to remove the GSC connection if needed.
lightbulb
Tips & pitfalls
GSC requires OAuth credentials (GSC_CLIENT_ID / GSC_CLIENT_SECRET). Until connected, the page shows 'No ranking data yet'.
Quick wins (positions ~11–20) usually need only minor on-page or internal-link tweaks to reach page one.
Near Page 1 quick wins (Rank Tracker)
Find queries at positions 8–20 ready for a small push.
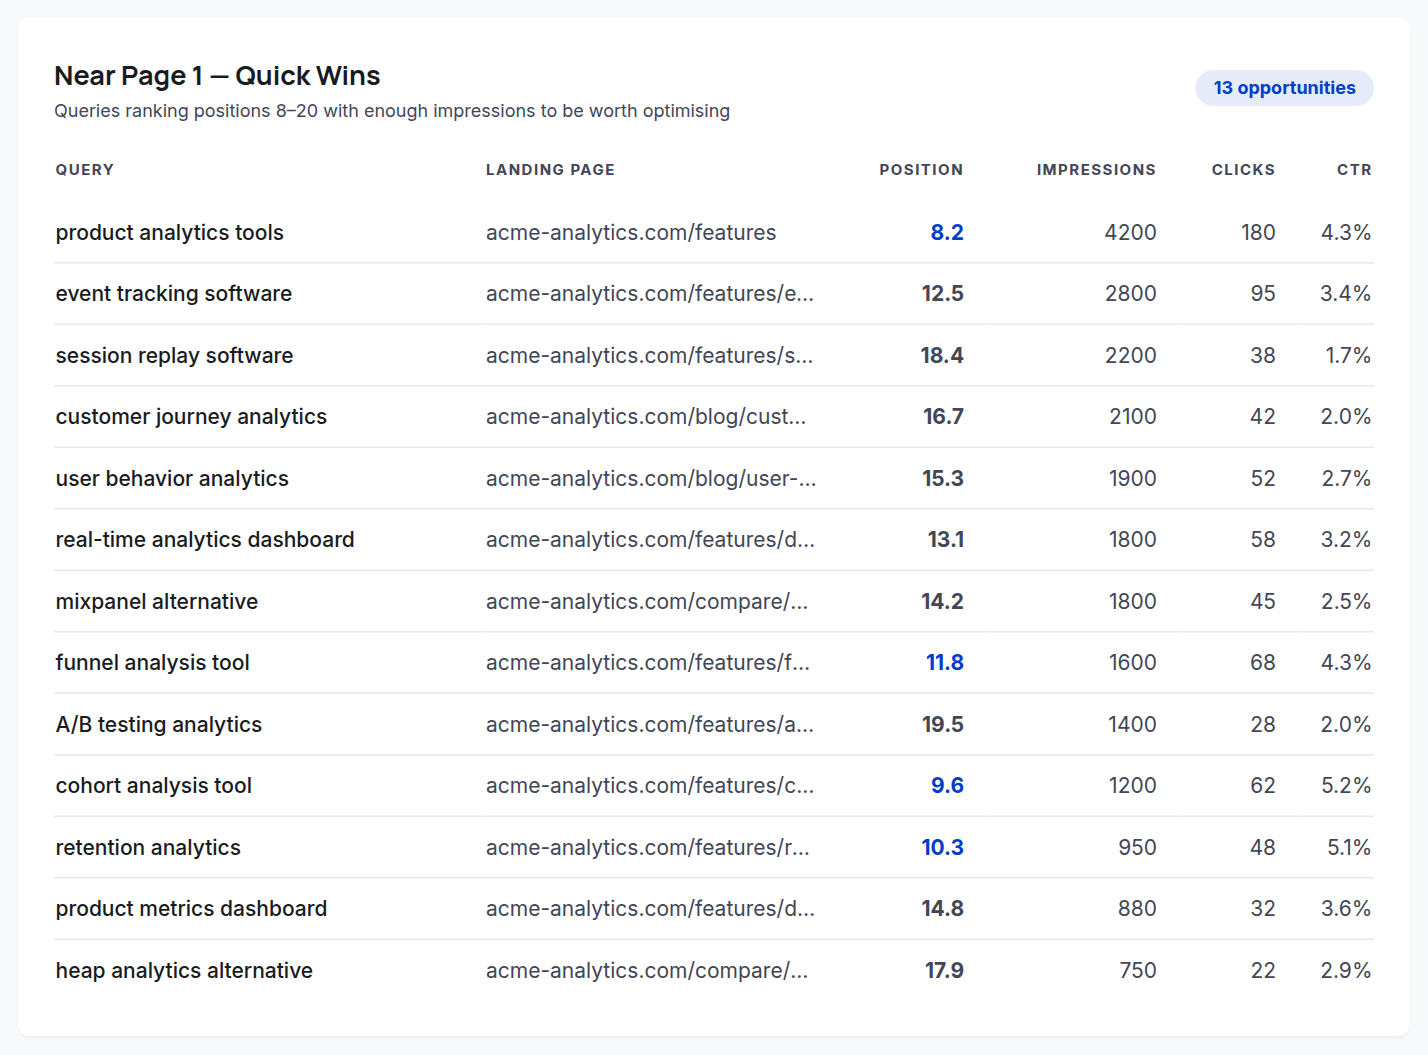
The Near Page 1 — Quick Wins table is the fastest-ROI view in the Rank Tracker. It lists queries already ranking in positions ~8–20 with enough impressions to matter, alongside the landing page, current position, impressions, clicks, and CTR. Small on-page or internal-link tweaks on these often nudge them onto page one.
Near Page 1 — Quick Wins: queries at positions 8–20 with landing page, position, impressions, clicks, and CTR.
format_list_numbered
Step-by-step
1Open Rank Tracker (with a connected, synced GSC property).
2Scroll to 'Near Page 1 — Quick Wins'.
3Sort your attention to queries closest to position 10 with high impressions.
4Open the listed landing page and strengthen it for that query (title, headings, internal links, content depth).
5Re-sync GSC after a couple of weeks to confirm the position improved.
lightbulb
Tips & pitfalls
Queries at position 11–13 with strong impressions are the highest-leverage targets — page-two-to-one moves multiply clicks.
Top Queries & position distribution
See what already drives clicks and how positions spread.
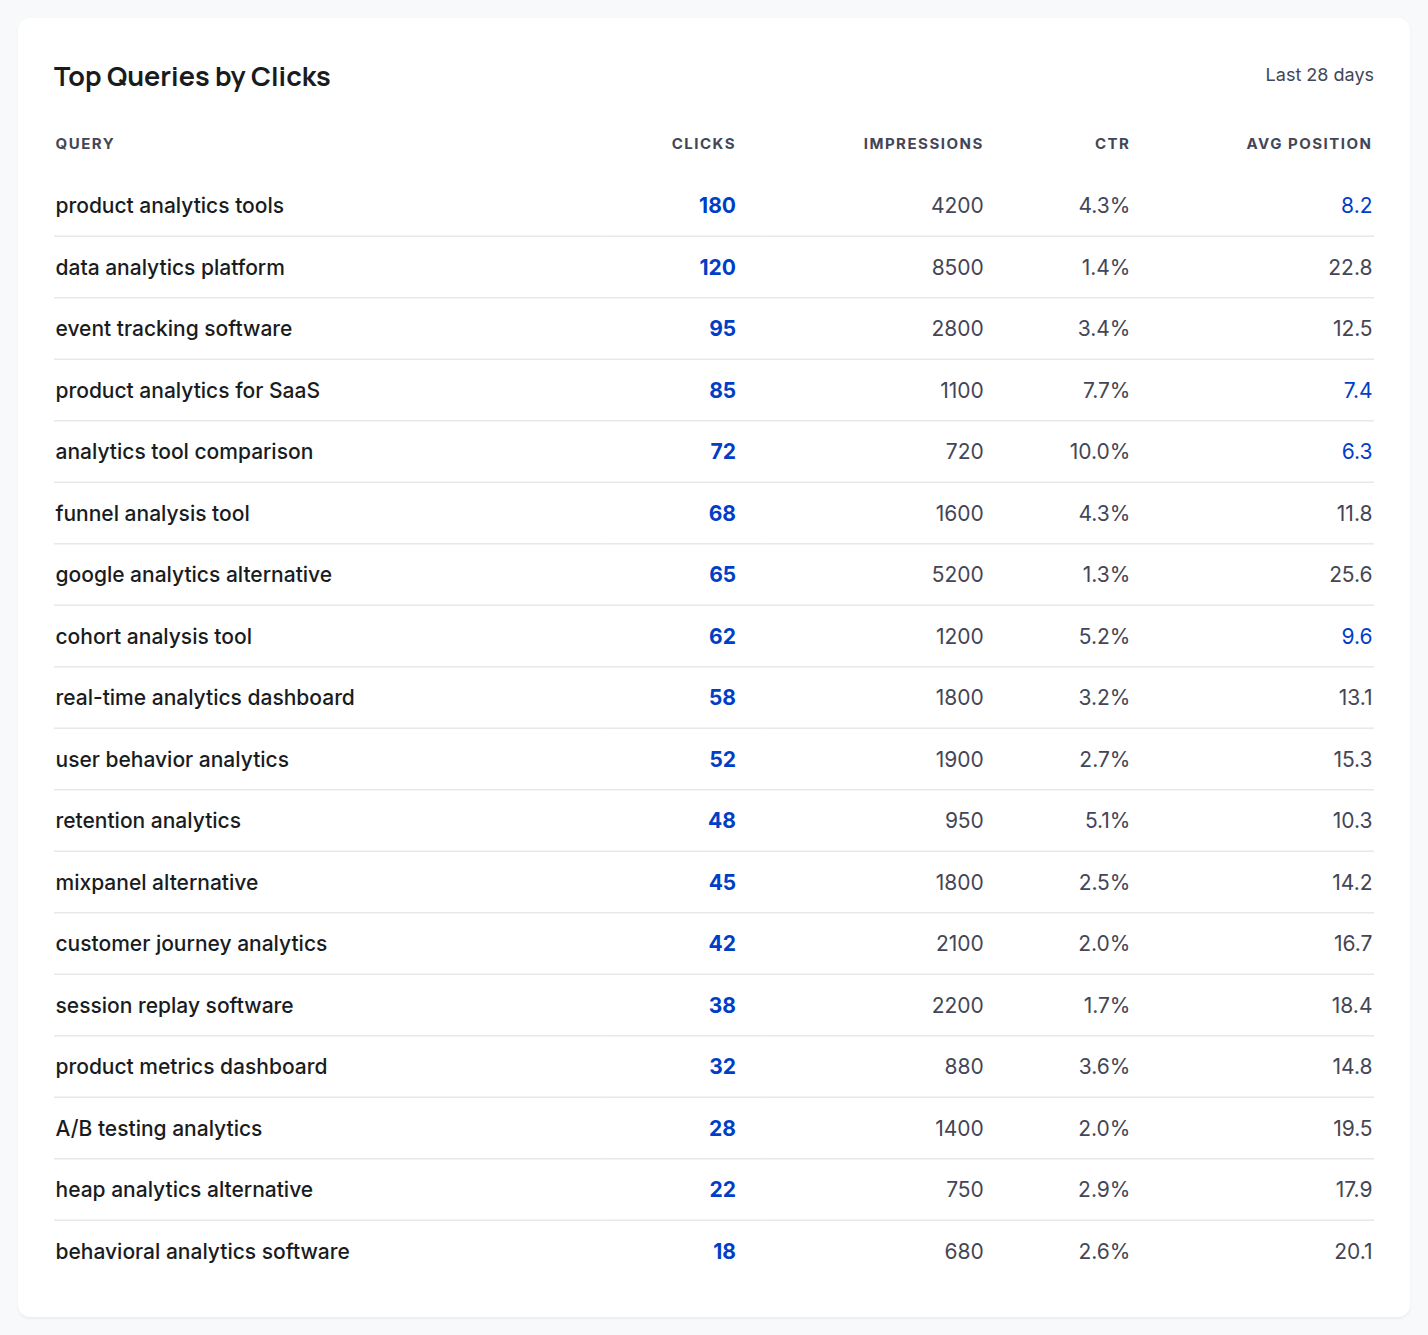
Two more Rank Tracker views round out the picture. The position distribution band cards count how many queries sit in Top 3, Page 1, Page 2, and beyond — a one-glance health check. The Top Queries by Clicks table shows your current traffic drivers with clicks, impressions, CTR, and average position so you can protect and grow what's working.
location_onWhere to find it: Rank Tracker → position bands and 'Top Queries by Clicks'.
Top Queries by Clicks: current traffic drivers with clicks, impressions, CTR, and average position.
format_list_numbered
Step-by-step
1Open Rank Tracker and read the position distribution band cards at the top.
2Note how many queries are in Top 3 / Page 1 vs. stuck on Page 2+.
3Scroll to 'Top Queries by Clicks' to see your traffic drivers.
4Protect high-click queries (keep those pages fresh) and look for ones with low CTR despite good position to improve titles/snippets.
lightbulb
Tips & pitfalls
A good position with low CTR usually means the title/meta description isn't compelling — rewrite the snippet before chasing new keywords.
Execution & Reporting
Turn findings into tasks, automate runs, and report.
Task Manager
Track SEO work with impact, effort, and status.
The Task Manager collects every recommended action — from audit issues, content gaps, and authority work — into a single backlog. Each task carries impact, effort, and priority, and moves through open → in progress → done so your team can execute the plan.
location_onWhere to find it: Left sidebar → Tasks.
Task Manager: prioritized backlog with impact, effort, and status controls.
format_list_numbered
Step-by-step
1Open Tasks from the sidebar.
2Review the summary counts and the Active Sprint view.
3For each task, weigh its impact and effort to plan order.
4Update a task's status (open / in progress / done) and 'Save' as work progresses.
5Send new issues here from the SEO Audit page via 'Send to tasks'.
lightbulb
Tips & pitfalls
Tasks are generated from the latest analysis run — re-running refreshes the backlog with new findings.
Working the Active Sprint board
Move work across the High / Planned / Low columns and set status.
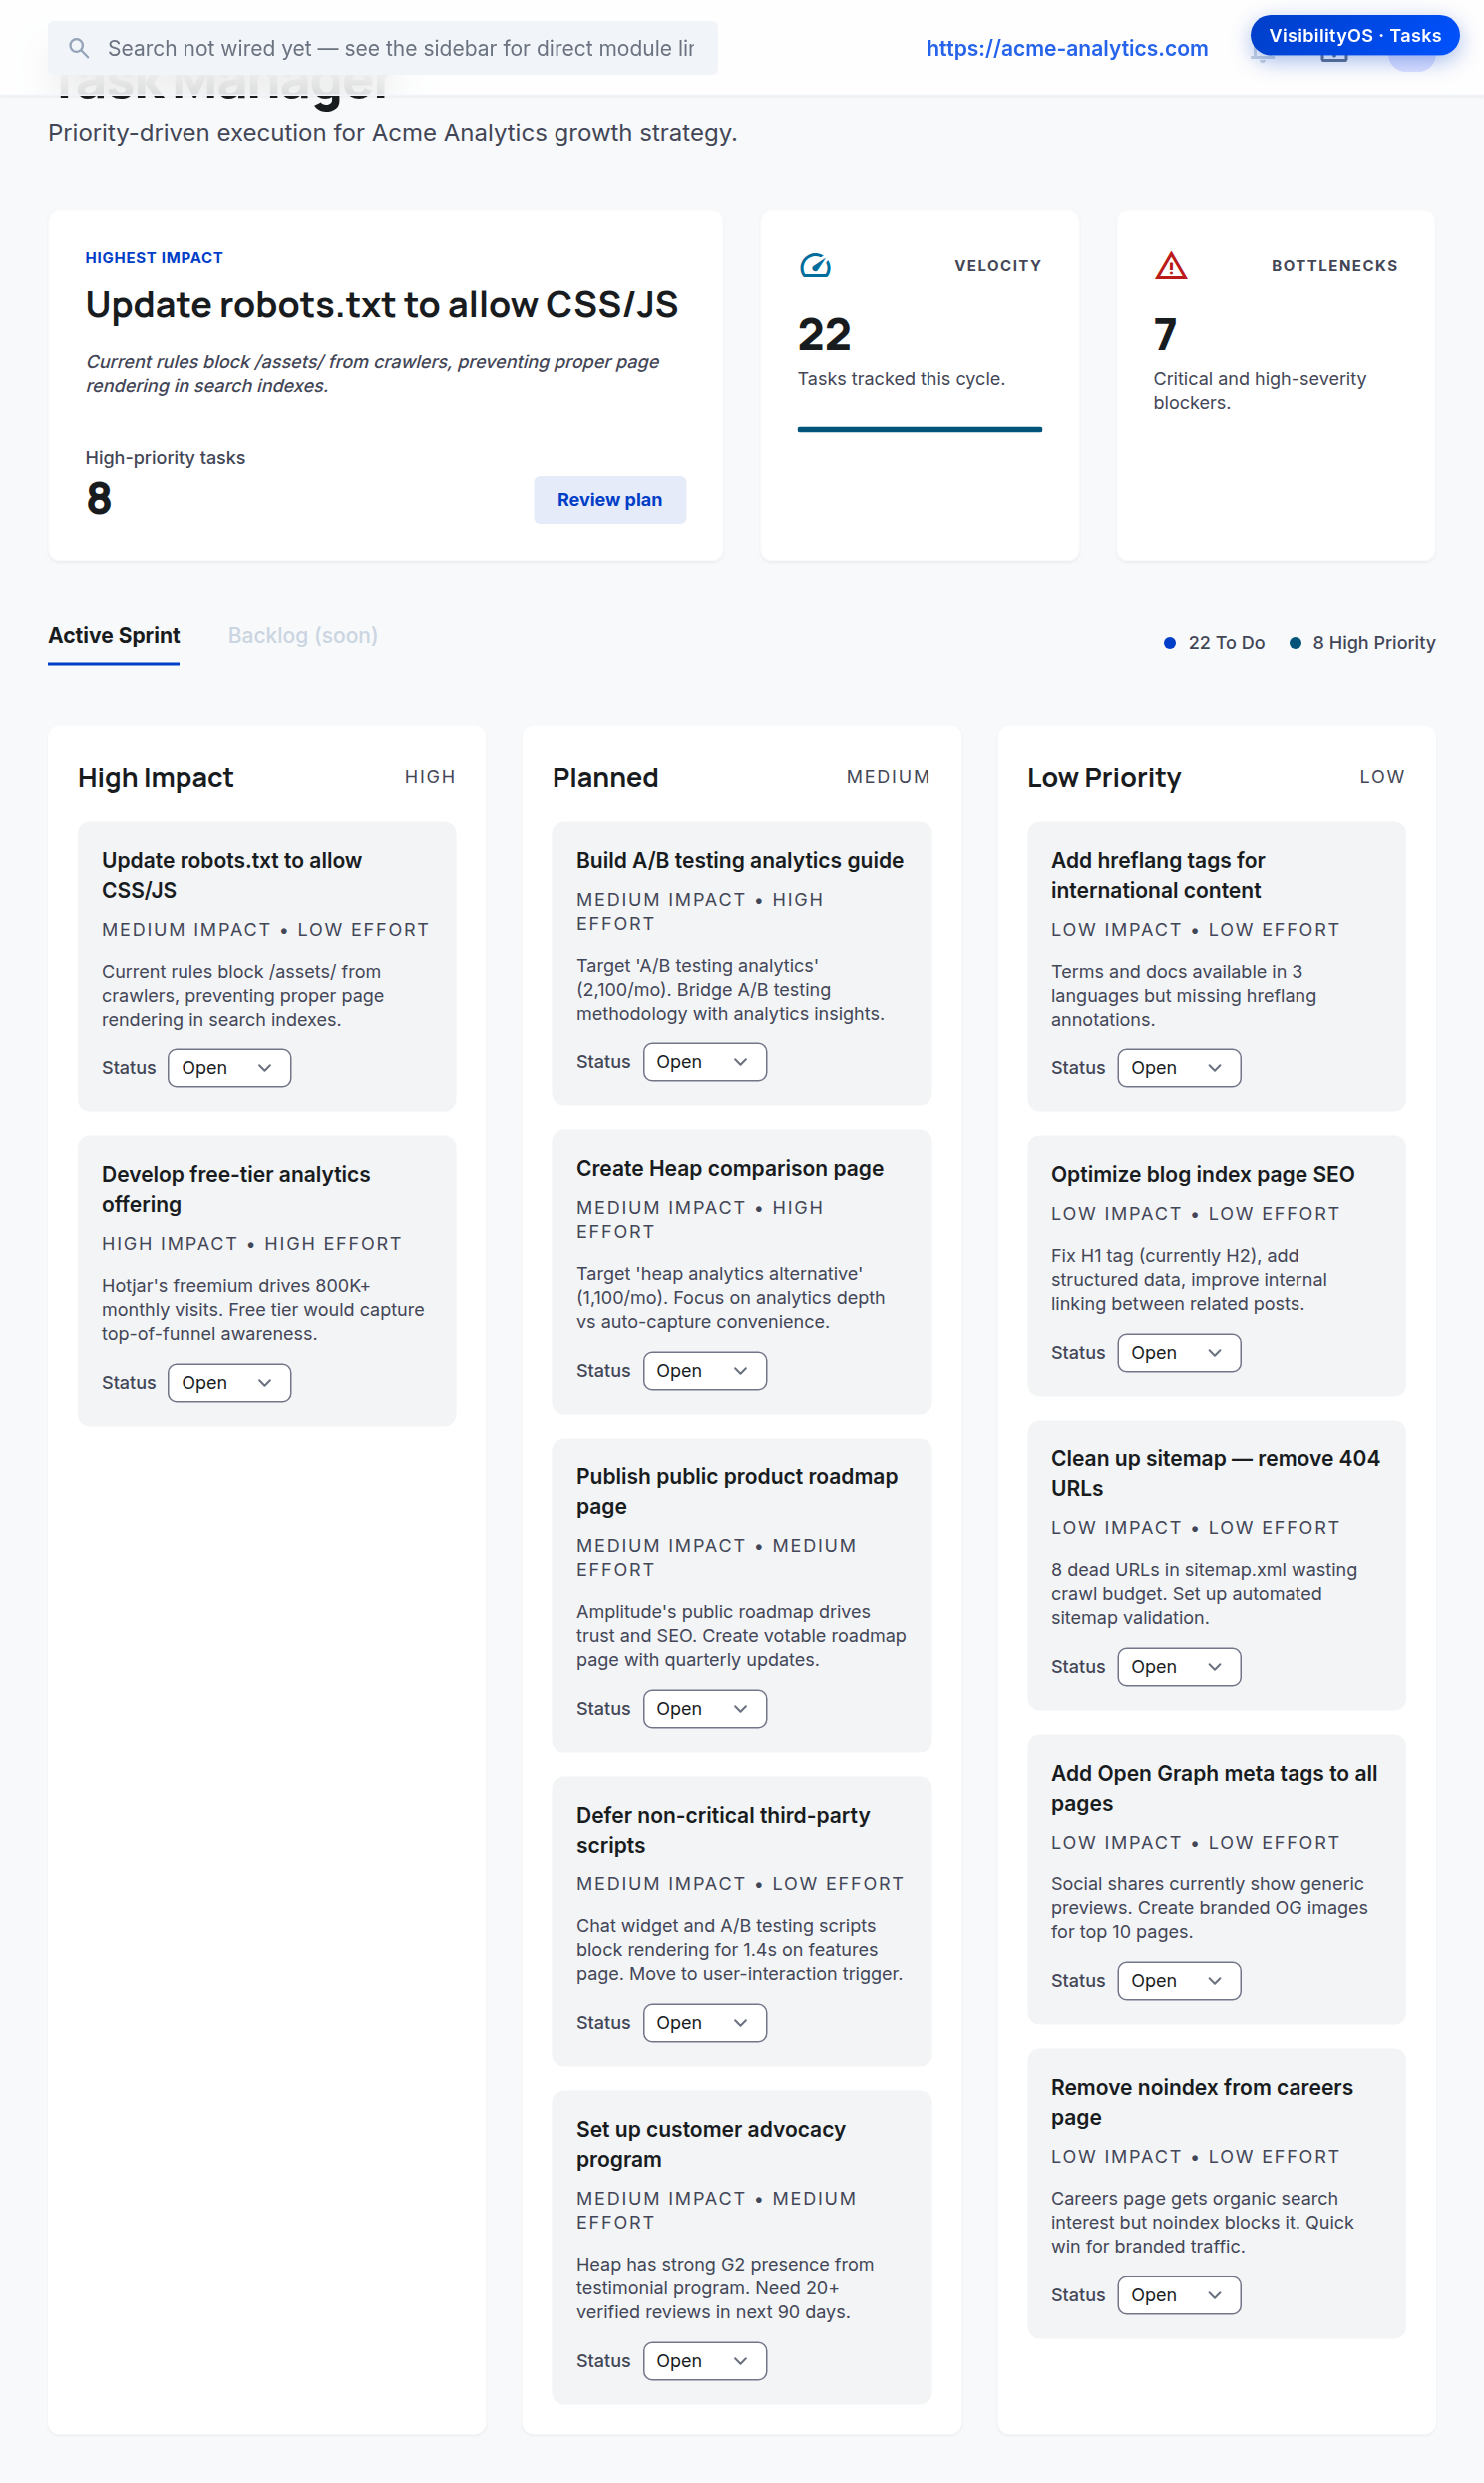
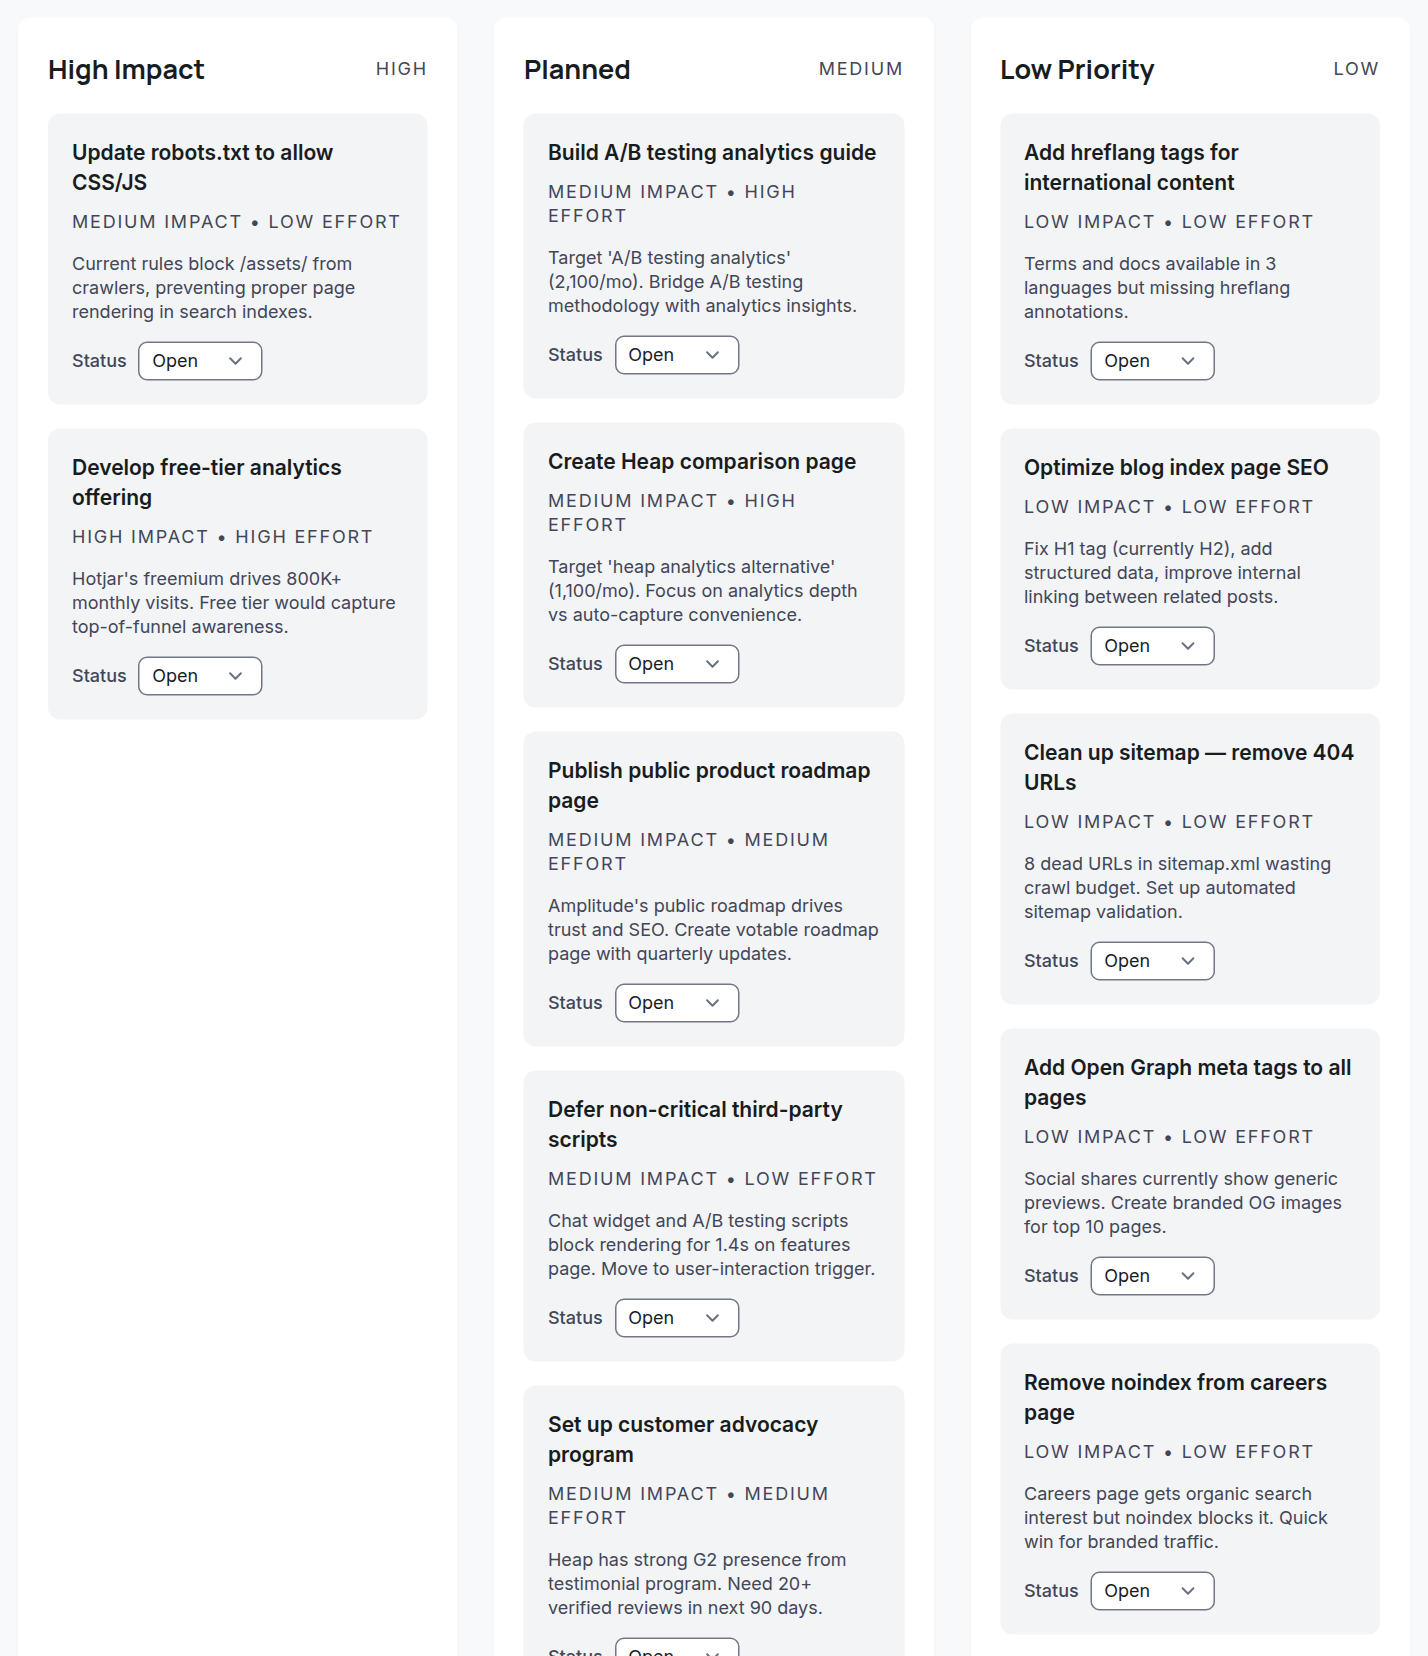
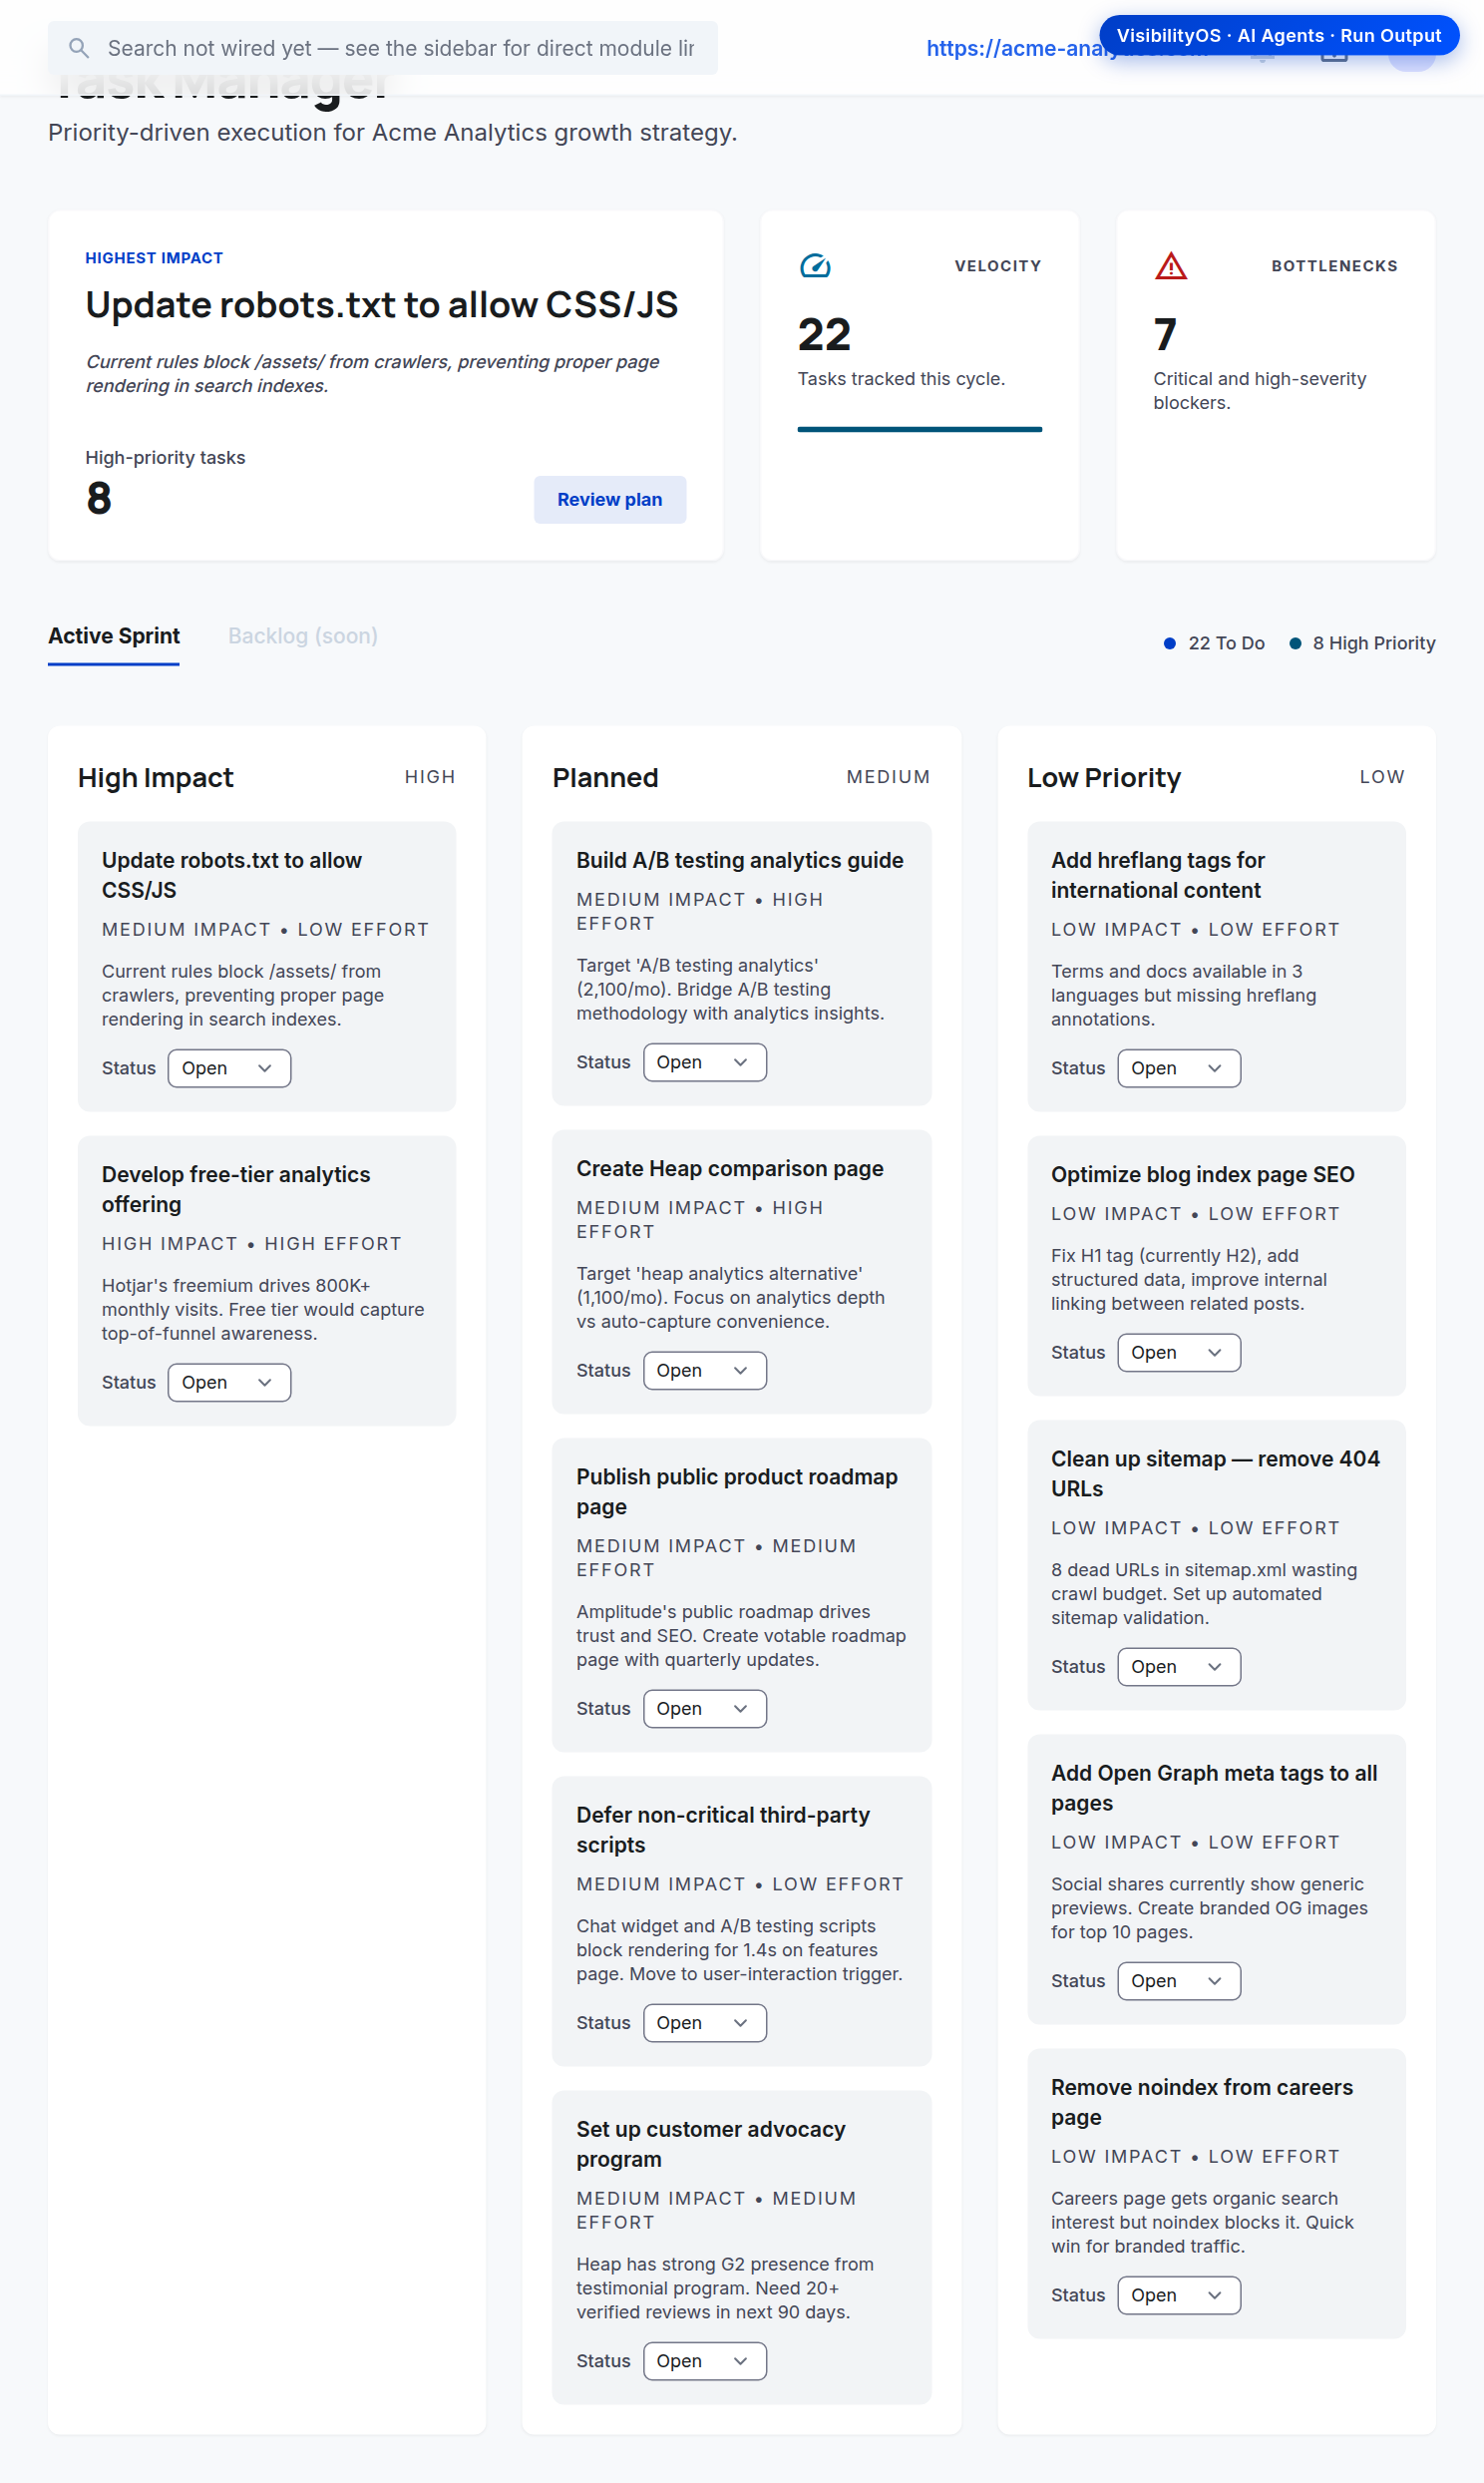
The Active Sprint board organizes tasks into three priority columns — High Impact, Planned, and Low Priority — each card showing the task title, its impact and effort, a short description, and an inline Status selector. Change a card's status (Open → In Progress → Done) right on the board to drive execution without leaving the page.
location_onWhere to find it: Tasks → Active Sprint board (the three priority columns).
Active Sprint board: High Impact, Planned, and Low Priority columns with per-card impact, effort, and a Status selector.
format_list_numbered
Step-by-step
1Open Tasks and stay on the Active Sprint tab.
2Scan the three columns: High Impact first, then Planned, then Low Priority.
3Read each card's impact and effort to sequence the work.
4Use the Status dropdown on a card to set Open, In Progress, or Done.
5The change saves immediately (a Save button appears if JavaScript is off).
lightbulb
Tips & pitfalls
Pull from the High Impact column first — those tasks carry the biggest visibility upside per unit of effort.
Weekly Performance Reports
A shareable narrative of the week's SEO performance.
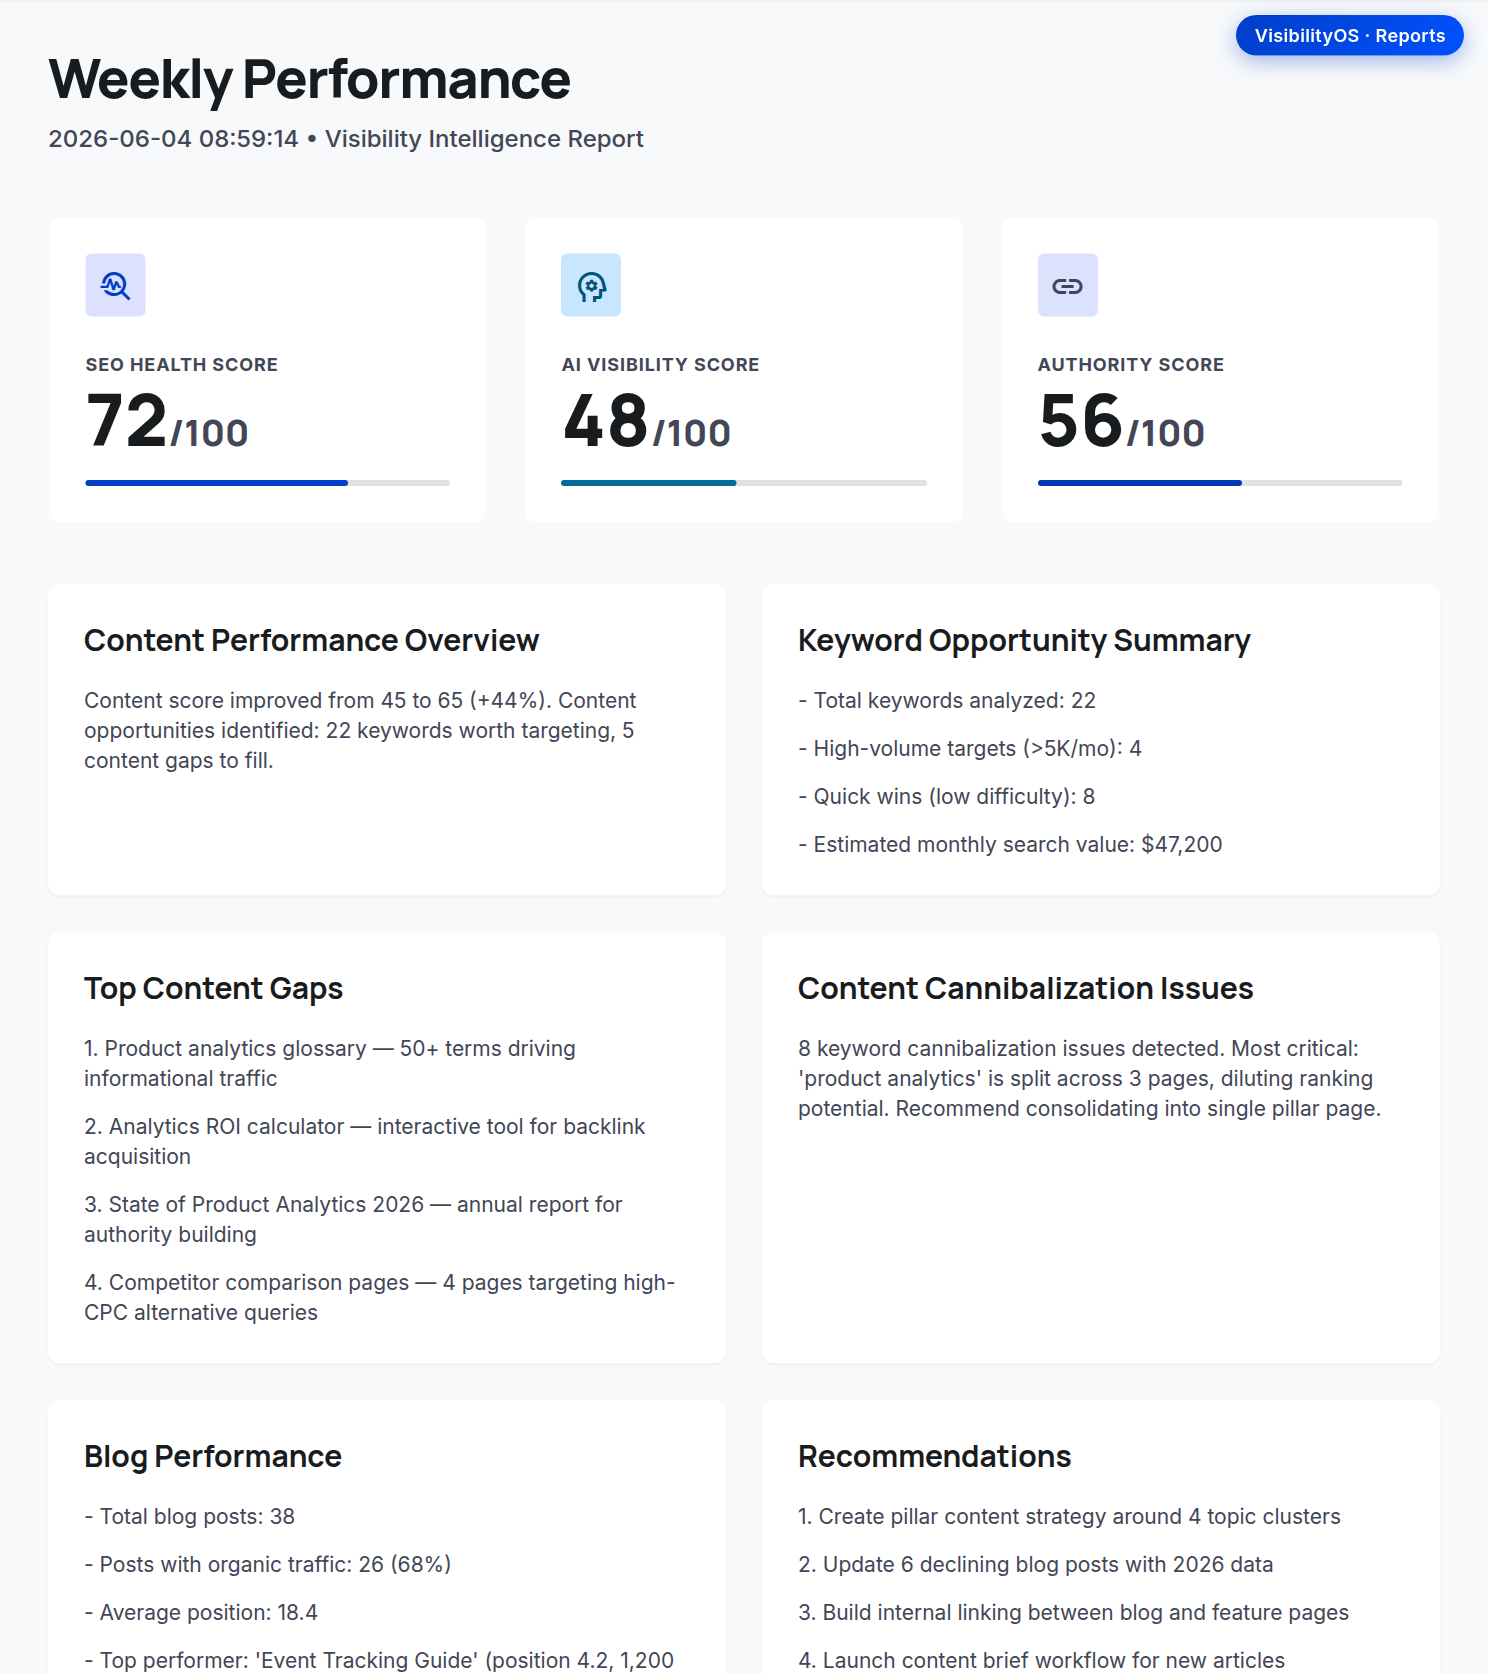
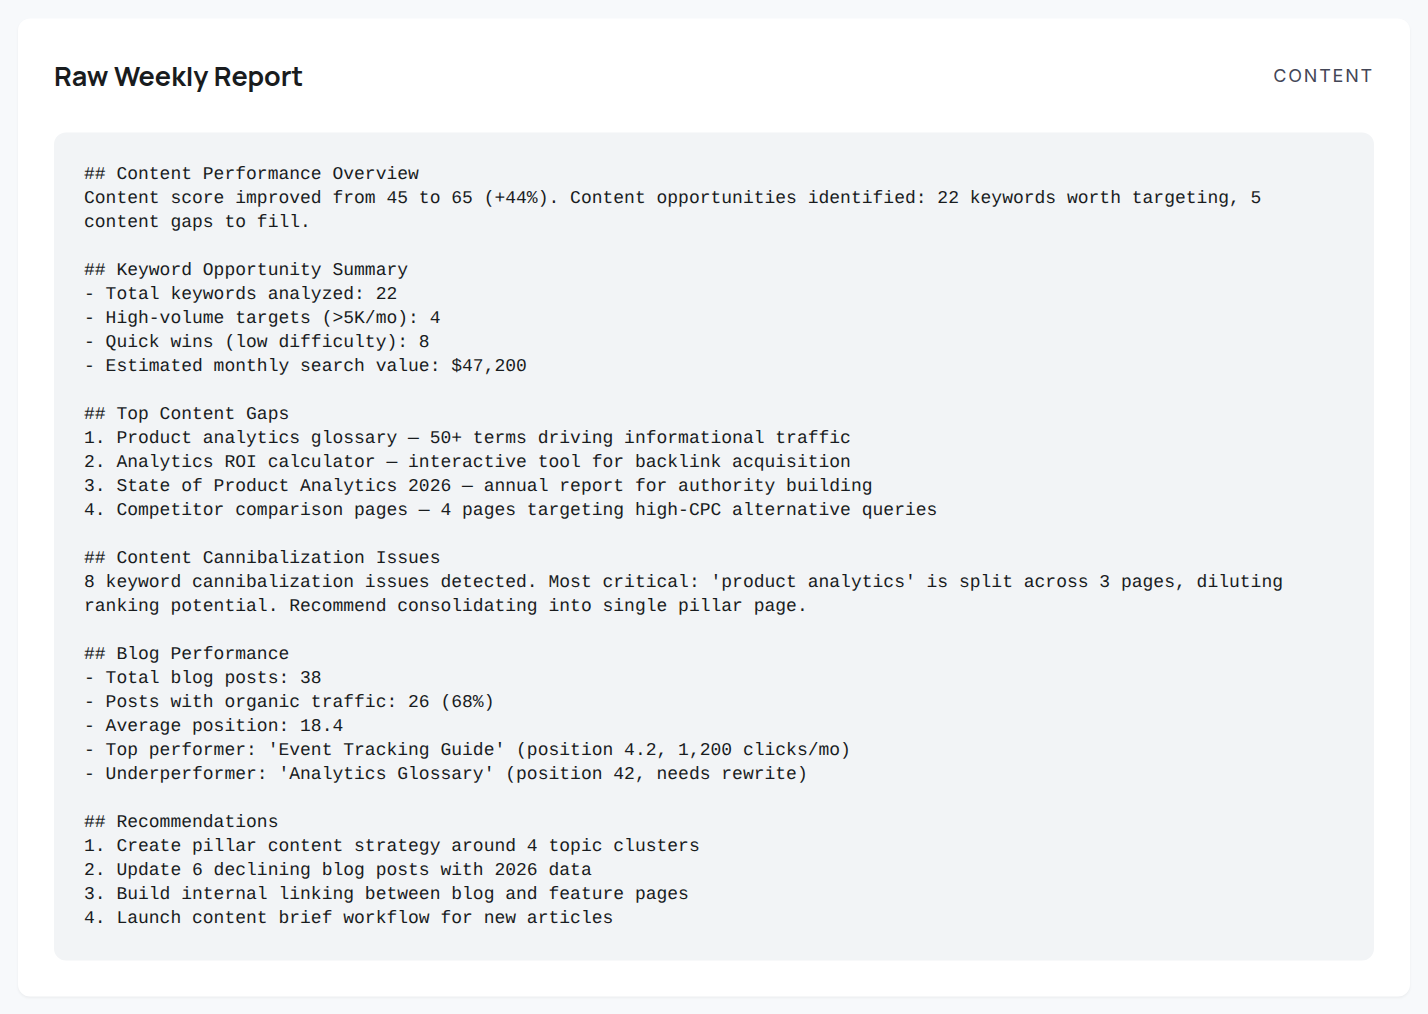
The Reports page assembles a Weekly Performance report: a section-by-section narrative of scores, wins, issues, and recommendations, plus the Raw Weekly Report. Use it to brief stakeholders or export a snapshot of progress.
location_onWhere to find it: Left sidebar → Reports (or 'Export Report' on the Dashboard).
Weekly Performance: a sectioned narrative plus the raw weekly report.The Raw Weekly Report: performance overview, keyword opportunity summary, top content gaps, and recommendations in one shareable block.
format_list_numbered
Step-by-step
1Open Reports from the sidebar.
2Read each report section for the period's performance story.
3Expand the Raw Weekly Report for the full detail.
4Share the report with stakeholders, or re-run the analysis to regenerate it.
lightbulb
Tips & pitfalls
Reports reflect the latest run — schedule automation so a fresh report is always ready each week.
Automation Control
Schedule recurring analysis runs and reports.
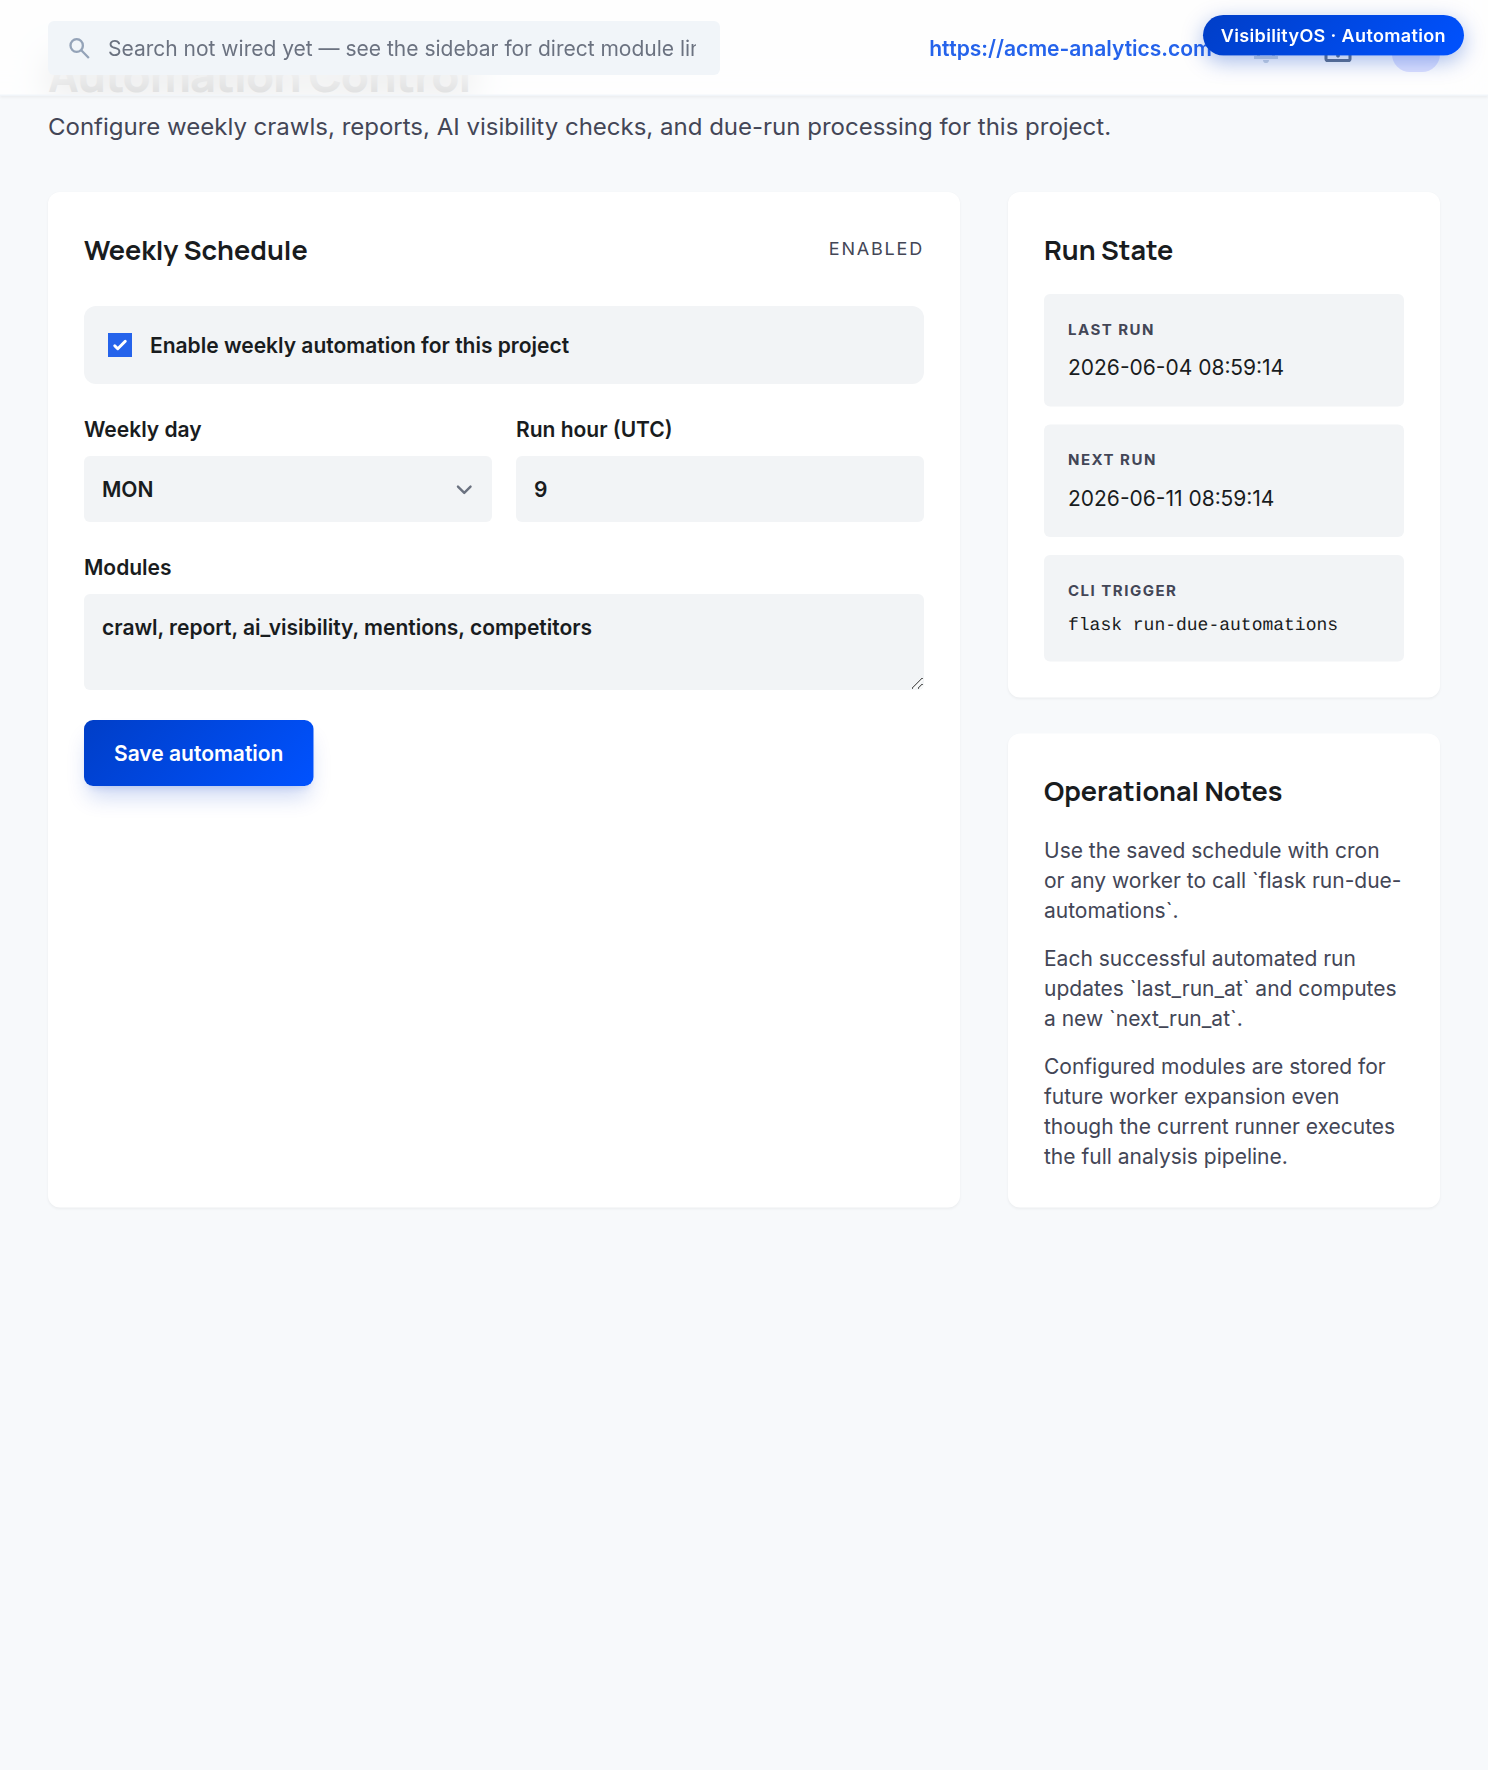
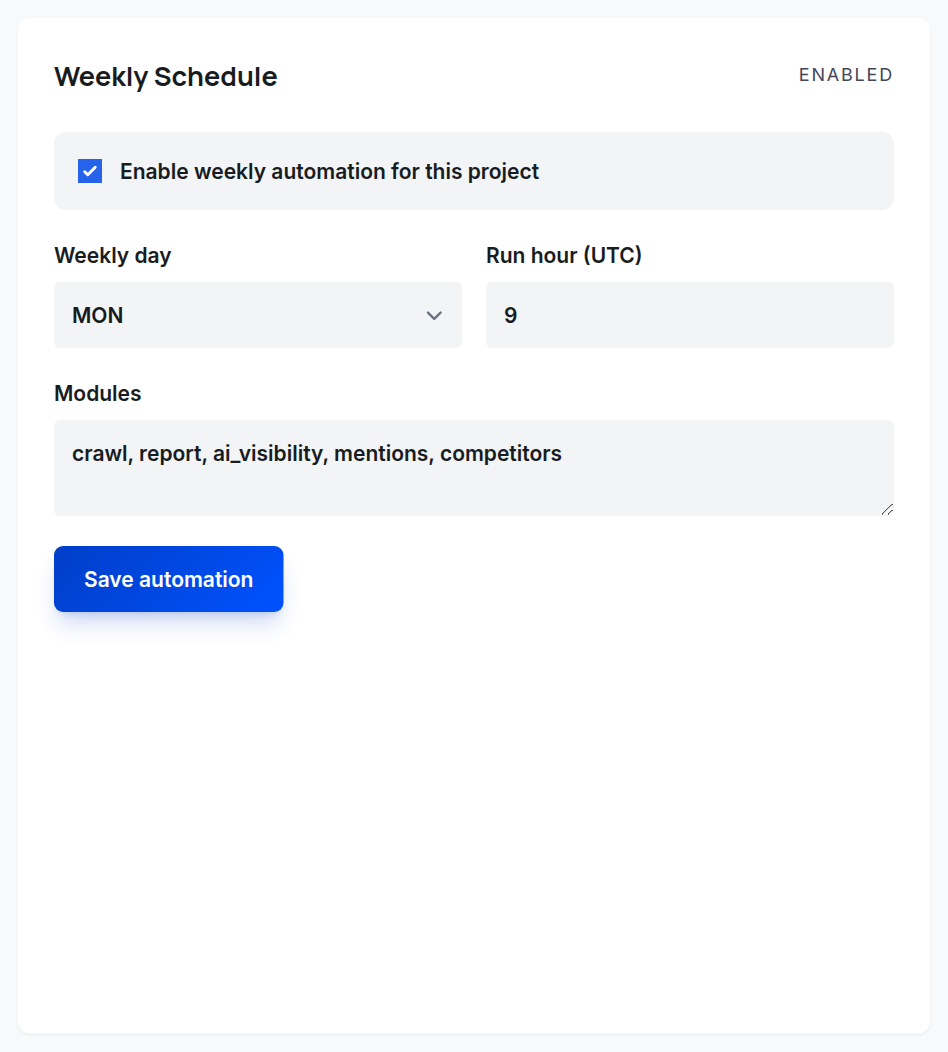
Automation Control puts your analysis on a schedule. Enable it, choose the weekly day and run hour, and pick which modules run (crawl, report, AI visibility, mentions). VisibilityOS then refreshes data and reports automatically so each week starts with current intelligence.
location_onWhere to find it: Left sidebar → Automation.
Automation Control: weekly schedule, module selection, and run state.Weekly Schedule: enable automation, choose the weekly day and run hour (UTC), and pick the modules each run includes.
format_list_numbered
Step-by-step
1Open Automation from the sidebar.
2Toggle automation on.
3Set the Weekly Schedule — the day of week and run hour.
4Choose the modules to include in each automated run.
5Click 'Save automation'.
6Check the Run State panel for the last and next scheduled runs.
lightbulb
Tips & pitfalls
Automated runs require the worker/scheduler to be running in your deployment; in local/dev you can still trigger runs manually.
AI Agents
Drive VisibilityOS with natural language — through the Own360 OwnAgents runtime and the in-app AI features — then verify the results.
AI Agents — overview
Turn a plain-English request into real SEO actions, safely.
VisibilityOS participates in Own360's System of Action: the OwnAgents runtime lets you (or a teammate in OwnCentral) describe what you want in natural language — for example, 'Start an SEO audit for own360.ai, depth 2, follow internal links only' — and an agent carries it out against this app. The central runtime accepts the task, pins it to the allowed app (OwnSEO), and a supervisor routes it to this app's headless surface (the same /api/v1 entities and operations the UI uses). Agents reason through OwnIQ, Own360's sovereign AI gateway, which runs in-perimeter so your data never leaves the boundary. Every step is permission-bound (the agent can only touch apps and actions you have granted) and audit-logged (each run carries a trace id and a record of what was created or changed). The practical result: the same audits, keyword work, and content briefs you run by hand can be requested in one sentence — and you stay in control because you review and verify the output here in VisibilityOS. Two AI features live directly in this app — the AI Visibility Tracker and the Content Brief generator — and are the user-facing entry points covered in the next topics.
location_onWhere to find it: Own360 OwnAgents / OwnCentral (natural-language tasks) → routed to VisibilityOS; in-app AI lives at AI Visibility and Content → Content Brief.
VisibilityOS AI surfaces (AI Visibility shown): the in-app AI entry points an agent's work feeds into and that you verify here.
format_list_numbered
Step-by-step
1Decide where to start: use the Own360 OwnAgents/OwnCentral console to issue a natural-language task, or use the in-app AI features (AI Visibility, Content Brief) directly inside VisibilityOS.
2For an agent task, phrase the request plainly and name the target (e.g. 'Start an SEO audit for own360.ai, depth 2, follow internal links only'). The runtime pins it to OwnSEO via allowed_apps.
3The supervisor routes the task to this app's headless surface; the agent reasons through OwnIQ in-perimeter and only performs actions you have granted.
4Watch for the proposed action / plan before it runs — agents surface what they intend to do so you can approve or adjust it.
5Once the run completes, open the matching VisibilityOS screen (Dashboard, SEO Audit, AI Visibility, Content) to review and verify the results — see 'How to verify results' below.
lightbulb
Tips & pitfalls
Agents act with your permissions — nothing runs that you have not granted the agent access to. Scope grants per app in OwnCentral.
OwnIQ runs in-perimeter and every run is audit-logged with a trace id, so you can always trace what an agent did and why.
If live OwnIQ inference is not configured for your tenant, AI endpoints return a clear 'owniq_not_configured' state — set the central default in OwnCentral → OwnIQ Integration, or an app override under this app's AI settings.
Tasks the agents can perform
The real catalog of SEO actions you can request in natural language.
Agents act on this app's real entities and operations — the same ones exposed on the headless surface and used by the UI. They do not invent capabilities: a request only succeeds if it maps to a real action. The headless surface exposes these entities — site, page_audit, keyword, backlink, rank_check, competitor, and recommendation — plus two domain operations: run an SEO audit on a site, and track a keyword. On top of those primitives, the in-app AI features generate content briefs and track AI visibility. The representative cohort task for VisibilityOS is exactly the audit example: 'Start an SEO audit for own360.ai, depth 2, follow internal links only.'
location_onWhere to find it: Requested via OwnAgents/OwnCentral; fulfilled against the OwnSEO headless surface and reflected on the matching VisibilityOS pages.
Content Brief generator — one of the AI tasks: a SERP-aware brief with outline, entities, and schema for a target keyword.AI Visibility prompt-level results — the output of an 'AI visibility' task: per-prompt mentions across providers.
format_list_numbered
Step-by-step
1Start an SEO audit for a site — e.g. 'Start an SEO audit for own360.ai, depth 2, follow internal links only.' Results land in SEO Audit (Technical SEO Auditor).
2Add or track a site / project so other actions have context (company, URL, keywords, competitors).
3Track a keyword — register a keyword to monitor; results surface in Rank Tracker and the keyword opportunity views.
4Run keyword research / find opportunities — discover keywords and content gaps that show up under Content.
5Generate a content brief for a target keyword — produced by the in-app Content Brief generator (SERP-aware outline, entities, schema).
6Track AI visibility — check whether the brand is mentioned across configured AI providers; results appear in AI Visibility.
7Review competitors, backlinks, and recommendations surfaced by an analysis run on the corresponding pages.
lightbulb
Tips & pitfalls
Capabilities are bounded by the real headless surface (entities + the audit and keyword-track operations). If a request has no matching action, the agent will not fabricate one.
Give the agent specifics — the target domain, crawl depth, and scope (e.g. internal links only) — so the audit runs the way you expect.
Content briefs and AI-visibility checks depend on OwnIQ being configured; without it they fall back to a clearly labelled template/empty state rather than guessing.
How to use it — start an audit, step by step
A worked example: request the own360.ai audit and review the proposed action.
This walks through the representative task end to end using the real AI entry points. You can drive it two ways: issue the natural-language task through OwnAgents/OwnCentral, or do the equivalent directly in VisibilityOS with the project's 'Run' button (which executes the analysis/audit for the active project). Either way you review what is about to happen before it runs, then let it complete. The worked example is the cohort task: 'Start an SEO audit for own360.ai, depth 2, follow internal links only.'
location_onWhere to find it: OwnAgents/OwnCentral task box for the agent path; in VisibilityOS, the sidebar 'Run' button (active project) and the SEO Audit page.
Starting the audit in-app: the sidebar 'Run' button executes the audit/analysis for the active project (the in-app equivalent of the agent task).The completed audit run on the SEO Audit page — the result you review after the agent (or 'Run') finishes.
format_list_numbered
Step-by-step
1Make sure the target exists as a project: in the left sidebar, expand 'New project' and create one for own360.ai (or pick it from 'Tracked projects' if it already exists).
2Agent path: in OwnAgents/OwnCentral, type the task — 'Start an SEO audit for own360.ai, depth 2, follow internal links only' — with OwnSEO as the allowed app.
3Review the proposed action: the agent shows the action it plans to take (run the SEO audit on the own360.ai site with the given depth and internal-links-only scope) before executing — confirm it matches your intent, then approve.
4In-app equivalent: with own360.ai selected as the active project, click the blue 'Run' button in the sidebar to execute the audit / analysis for that project.
5Wait for the run to finish — the audit crawls the site and populates the SEO Audit and related modules.
6Open SEO Audit from the sidebar to see the freshly produced run (total pages, healthy pages, pages with issues, severity mix).
lightbulb
Tips & pitfalls
Always read the proposed action before approving — agents surface their plan so you can catch a wrong domain or scope first.
Be explicit about depth and link scope in the request; vague phrasing produces a vaguer crawl.
If you only have access in-app, the 'Run' button performs the same audit work — no agent console required.
How to verify results
Open the run, check the output and audit log, and correct wrong results.
Trust but verify: after an agent (or a manual 'Run') completes, confirm the outcome inside VisibilityOS rather than assuming it worked. Open the page that matches the task — SEO Audit for an audit, AI Visibility for a visibility check, Content for keyword/brief work, Rank Tracker for keyword tracking — and read the actual results. Each run is audit-logged with a trace id, so you can tie the on-screen results back to the specific run the agent executed. Tasks generated from the run appear in the Task Manager, giving you a concrete, checkable record of what the audit recommended. If something is wrong — wrong domain, wrong scope, stale data — you correct it by re-running with a corrected request (or the 'Run' button) and re-verifying.
location_onWhere to find it: SEO Audit / AI Visibility / Content / Rank Tracker for results; Tasks (Task Manager) for the run's generated tasks; run trace ids in the audit log.
Verify the run output: the Issue Register lists each finding with severity and the affected page.Task Manager — the run's generated tasks, with status controls to confirm and act on what the audit found.
format_list_numbered
Step-by-step
1Open the page that matches the task you ran (e.g. SEO Audit for an audit) and confirm a fresh run is present.
2Check the run output: read the headline metrics and the detailed findings — for an audit, the Issue Register lists each issue with its severity and the affected page.
3Cross-check the audit log / trace id for the run so you can confirm exactly which run produced these results and who/what triggered it.
4Open Tasks (Task Manager) to see the actions the run generated, and use the status controls to track them through to done.
5If the result is wrong (wrong site, wrong depth, missing pages), re-issue the task with a corrected request — or re-run from the sidebar — and verify again.
lightbulb
Tips & pitfalls
Don't act on agent output blind — open the matching module and confirm the numbers and findings before sharing or scheduling work.
Use the run's trace id from the audit log to tie results back to a specific agent run when reconciling.
Correcting a wrong result is just a corrected re-run: fix the domain/scope in the request (or the project), run again, re-verify — the latest run becomes the source of truth.